Kamran Agayev's Oracle Blog

Oracle Certified Master

Archive for the 'Administration' Category

How to get rid of character "^H" at Secure CRT

Posted by Kamran Agayev A. on 18th July 2011

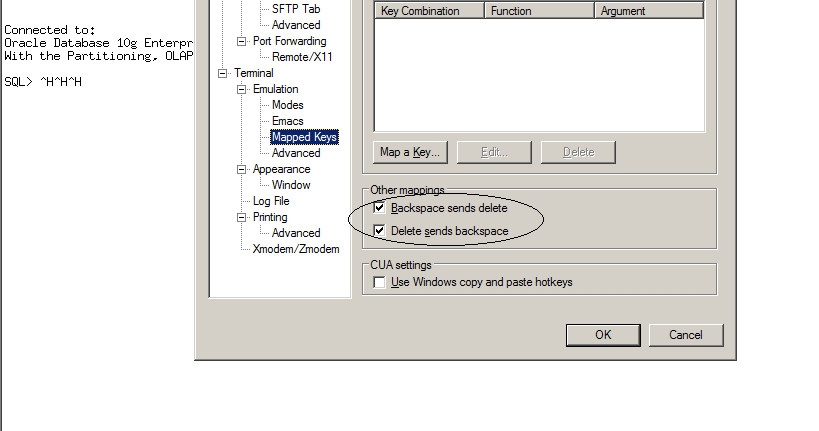
In some terminals when you login to SqlPlus and hit backspace to clear the text you’ve written, the following character apperas “^H”. Without any configuration, you can use “Ctrl”+”Backspace” in order to clear the text from terminal. However, by making a little change in the “Session Options” menu, you can get rid of this annoying character “forever”. Here’s the screenshot:

Posted in Administration | No Comments »

My OpenWorld 2011 session has been accepted

Posted by Kamran Agayev A. on 4th July 2011

Two days ago I’ve recieved an email from Oracle according the paper I’ve submitted for the OpenWorld 2011. The paper has been accepted :)

Here’re the details of my session:

Session ID: 06787
Session Title: Oracle Recovery Manager (Oracle RMAN) 11g New Features

All you who will attend to the OpenWorld this year are invitied to my session. See you in San Francisco!

Posted in Administration | 6 Comments »

Migrating Oracle 10g Grid Control to the new server

Posted by Kamran Agayev A. on 24th June 2011


In this step by step guide I’ll show you how to move the Grid Control from one machine to another. For this I’ll use three virtual machines:

TestDb01 – Is the machine where I’ve installed the Grid Control and there’re three databases that are deployed

TestDB02 – Is the machine where I’ll install new Grid Control

TestDB03 – Is the machine for the databases that are deployed to the first Grid Control

So here is my plan of the whole scenario:

–         I’ve installed Grid Control on the Testdb01 server (Repository db name is emrep)

–         I’ve installed Grid Control on the Testdb02 server (this Grid control will replace the previous one and the repository db name is repnew)

To install Grid Control, use my previous blog posts:

  • Video Tutorial – Installing Oracle 10gR2 Grid Control and deploying agent on Linux and Windows OS

http://kamranagayev.wordpress.com/2011/01/31/video-tutorial-installing-oracle-10gr2-grid-control-and-deploying-agent/

  • Solving the error “OUI-25031″ during Oracle 10g R2 Grid Control (10.2.0.3) installation

http://kamranagayev.wordpress.com/2011/05/17/solving-the-error-oui-25031-during-oracle-10g-r2-grid-control-10-2-0-3-installation/

–         Then, I’ll create two databases on the third server (Testdb03) and deploy the agent to the first Grid Control

After all above pre-requisite steps are ready, we can start the migration. Here’re the migration steps:

–       Stop all application server components

–       Perform some pre-requisite steps on the Grid Control host

–       Run DBCA and create a template of the Grid Control Repository database

–       Connect to the target Grid host and restore the database using DBCA

–       Change emoms.properties file

–       Start application server components

–       Change emd.properties file of each agent

–       Start using the new Grid Control on the new host

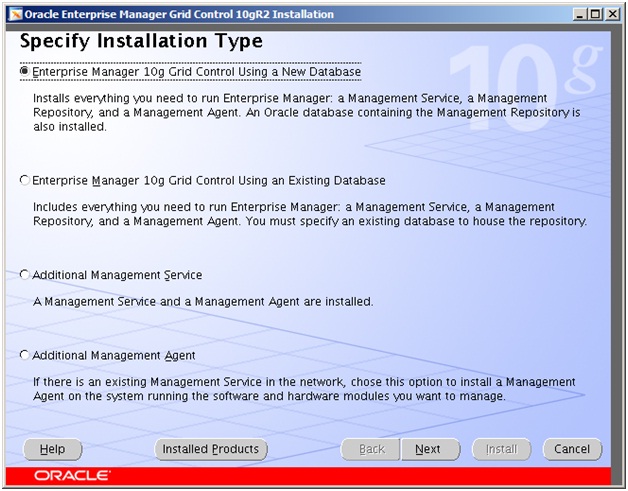
Now let’s start installing the first Grid Control. Download and unzip the installation and run the installer:

Check the first option and click Next:

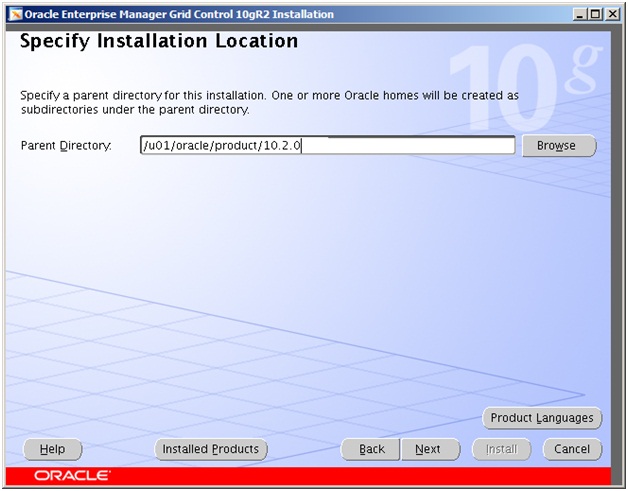
Provide the home directory and click next

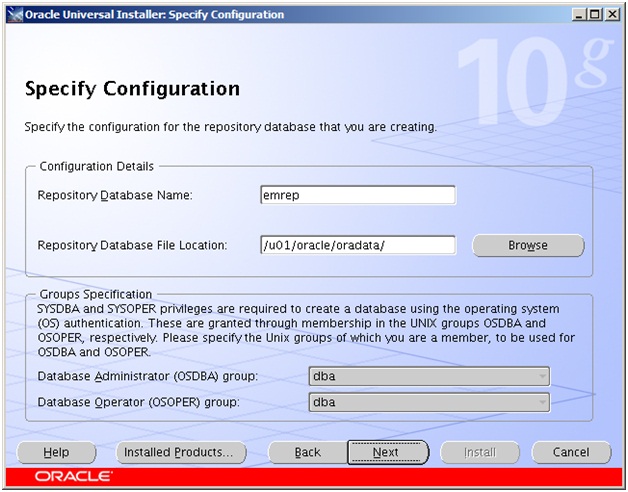
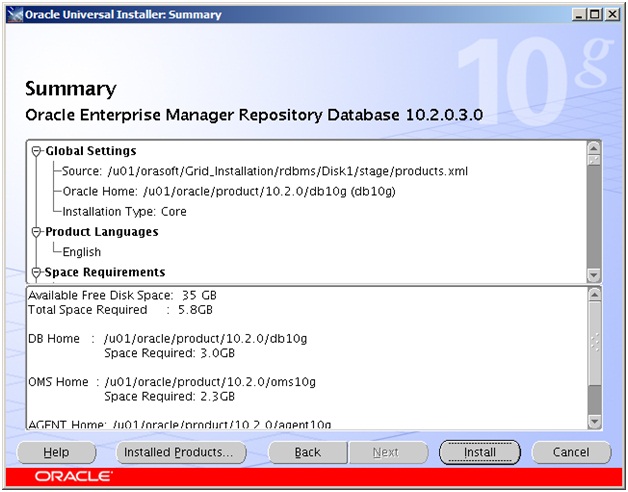
Provide the repository database name and click next. The next steps are simple so I didn’t provide their screenshot, just click Finish to start the installation:

After installation completes, you’ll get an error during the configuration. Try the second link I’ve provided to solve the problem, it’s a bug

Now switch to the second machine (testdb02) and install the new Grid Control and provide the repository name as ‘emrep2’

After installing both Grid Controls, make changes to the “hosts” file which resides under “C:\Windows\System32\drivers\etc” folder of your local PC and add host name and ip address information in order to be able to login both Grid Controls from local web browser.

[code]192.168.0.1 testdb01

192.168.0.2 testdb02[/code]

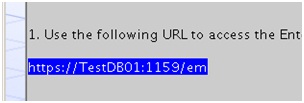
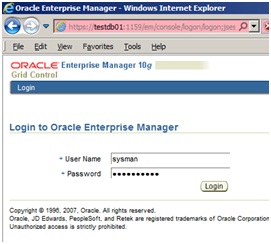
Now open the browser and switch to the link that’s provided at the end of the installation:

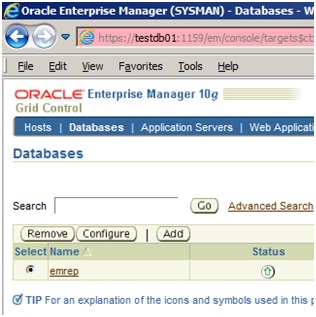
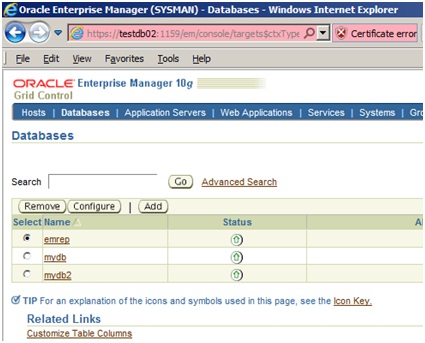
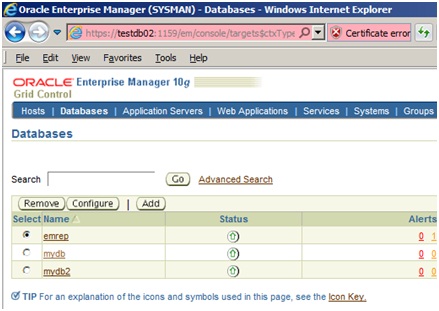
Switch to the Targets menu and select Databases link:

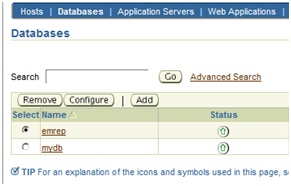
You’ll see that the Repository database “emrep” is registered automatically and the status is UP

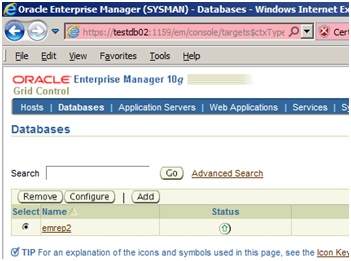
Switch to the second Grid Control, make login and check the status of the databases :

Ok. Now let’s create two databases in the third machine and deploy them to the first Grid Control.

Let’s create the first database. Switch to the third machine and run dbca. Make sure you’ve added the Grid Control ip and host name information to the /etc/hosts file:

[code]192.168.0.1         testdb01[/code]

Run DBCA, provide the name of the database (mydb). In the fourth step, you’ll not be able to deploy the agent, as you haven’t installed the agent yet. See, “Use Grid Control with Enterprise Manager” is not active:

Go on and finish the installation.

Now, let’s install the agent and deploy it to the first Grid Control. For this, in the first Grid Control machine, switch to the following directory and copy the installation file to the third machine:

[code][oracle@TestDB01~]$ cd /u01/oracle/product/10.2.0/oms10g/sysman/agent_download/10.2.0.3.0/linux_x64

[oracle@TestDB01 linux_x64]$ scp agentDownload.linux_x64 testdb03:/tmp/

oracle@testdb03’s password:

agentDownload.linux_x64                                           100%   27KB  26.9KB/s          00:00 [/code]


Now switch to the third machine and run the installation as follows:

[code][oracle@TestDB03 ~]$ chmod 755 /tmp/agentDownload.linux_x64

[oracle@TestDB03 ~]$ /tmp/agentDownload.linux_x64 -b /u01/oracle/product/10.2.0 -m "testdb01" [/code]

This command will extract the installation remotely and installs the agent to the specified directory

After installation completes, run the following root.sh script with the root user:

/u01/oracle/product/10.2.0/agent10g/root.sh

Now agent is installed. Let’s secure it and check the status:

[code][oracle@TestDB03 bin]$ ./emctl status agent

Oracle Enterprise Manager 10g Release 3 Grid Control 10.2.0.3.0.

Copyright (c) 1996, 2007 Oracle Corporation. All rights reserved.

—————————————————————

Agent Version : 10.2.0.3.0

OMS Version : 10.2.0.3.0

Protocol Version : 10.2.0.2.0

Agent Home : /u01/oracle/product/10.2.0/agent10g

Agent binaries : /u01/oracle/product/10.2.0/agent10g

Agent Process ID : 7739

Parent Process ID : 7713

Agent URL : http://TestDB03:1830/emd/main/

Repository URL : http://testdb01:4889/em/upload/

Started at : 2011-06-23 14:07:21

Started by user : oracle

Last Reload : 2011-06-23 14:07:21

Last successful upload : (none)

Last attempted upload : (none)

Total Megabytes of XML files uploaded so far : 0.00

Number of XML files pending upload : 13

Size of XML files pending upload(MB) : 4.87

Available disk space on upload filesystem : 81.63%

Last attempted heartbeat to OMS : 2011-06-23 14:08:23

Last successful heartbeat to OMS : unknown

—————————————————————

Agent is Running and Ready[/code]

[code][oracle@TestDB03 bin]$ ./emctl clearstate agent

Oracle Enterprise Manager 10g Release 3 Grid Control 10.2.0.3.0.

Copyright (c) 1996, 2007 Oracle Corporation. All rights reserved.

EMD clearstate completed successfully[/code]

[code][oracle@TestDB03 bin]$ ./emctl secure agent

Oracle Enterprise Manager 10g Release 3 Grid Control 10.2.0.3.0.

Copyright (c) 1996, 2007 Oracle Corporation. All rights reserved.

Enter Agent Registration password :

Agent successfully stopped… Done.

Securing agent… Started.

Requesting an HTTPS Upload URL from the OMS… Done.

Requesting an Oracle Wallet and Agent Key from the OMS… Done.

Check if HTTPS Upload URL is accessible from the agent… Done.

Configuring Agent for HTTPS in CENTRAL_AGENT mode… Done.

EMD_URL set in /u01/oracle/product/10.2.0/agent10g/sysman/config/emd.properties

Securing agent… Successful.

Agent successfully restarted… Done.

[oracle@TestDB03 bin]$[/code]
[code]
[oracle@TestDB03 bin]$ ./emctl upload agent

Oracle Enterprise Manager 10g Release 3 Grid Control 10.2.0.3.0.

Copyright (c) 1996, 2007 Oracle Corporation. All rights reserved.

—————————————————————

EMD upload completed successfully

[oracle@TestDB03 bin]$ ./emctl status agent

Oracle Enterprise Manager 10g Release 3 Grid Control 10.2.0.3.0.

Copyright (c) 1996, 2007 Oracle Corporation. All rights reserved.

—————————————————————

Agent Version : 10.2.0.3.0

OMS Version : 10.2.0.3.0

Protocol Version : 10.2.0.2.0

Agent Home : /u01/oracle/product/10.2.0/agent10g

Agent binaries : /u01/oracle/product/10.2.0/agent10g

Agent Process ID : 9580

Parent Process ID : 9563

Agent URL : https://TestDB03:1830/emd/main/

Repository URL : https://TestDB01:1159/em/upload

Started at : 2011-06-23 14:09:48

Started by user : oracle

Last Reload : 2011-06-23 14:09:48

Last successful upload : 2011-06-23 14:10:16

Total Megabytes of XML files uploaded so far : 10.62

Number of XML files pending upload : 3

Size of XML files pending upload(MB) : 0.00

Available disk space on upload filesystem : 81.65%

Last successful heartbeat to OMS : 2011-06-23 14:09:50

—————————————————————

Agent is Running and Ready

[oracle@TestDB03 bin]$

[/code]

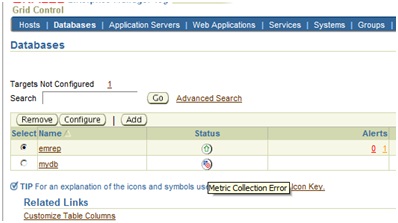
Now switch to the first Grid Control and check the Databases page again. If you didn’t get anything added, just logout and login again. You should get the following screen:

We have a metric collection for the second db, let’s configure it. Provide the password for the dbsnmp user and click OK. After a while it should be UP.

Now let’s create the second db and deploy it as well. But know, as we’ve installed agent, we should get the Grid Control deployment option during the database creation. Run dbca, provide the name of the database (mydb2)

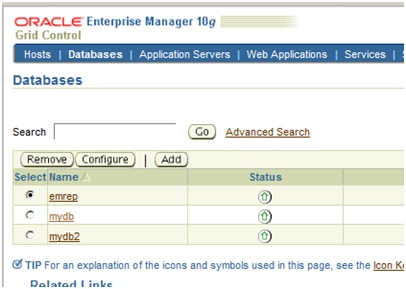
After installation completes, you’ll see the database was added to the Grid Control

Ok. Now let’s review what we have done so far, and what we need to do. There’re three databases that are deployed to the first Grid Control. Our mission is to move the first Grid Control to the second server and forward the connections from all agents (from testdb03 machine) to the new Grid Control (to testdb02)

Moving Grid Control to the new Host

First of all, stop all application server components, connect to the database and change the value JOB_QUEUE_PROCESSES parameter:

[code][oracle@TestDB01 bin]$ ./opmnctl stopall

opmnctl: stopping opmn and all managed processes…
[oracle@TestDB01 bin]$ export ORACLE_SID=emrep
[oracle@TestDB01 bin]$ sqlplus / as sysdba

SQL*Plus: Release 10.1.0.4.0 – Production on Thu Jun 23 15:29:00 2011

Copyright (c) 1982, 2005, Oracle. All rights reserved.

Connected to:

Oracle Database 10g Enterprise Edition Release 10.1.0.4.0 – 64bit Production

With the Partitioning, OLAP and Data Mining options

SQL> show parameter job_queue_processes

NAME TYPE VALUE

———————————— ———– ——————————

job_queue_processes integer 10

SQL> alter system set job_queue_processes=0;

System altered.

SQL> [/code]Then connect with SYSMAN and run the following command:

[code]SQL> conn sysman

Enter password:

Connected.

SQL> exec emd_maintenance.partition_maintenance;

[/code]Due to unknown bug, the procedure locks itself, so open new connection and check it’s wait event:

[code]SQL> col event format a30

SQL> col username format a30

SQL> set linesize 150

SQL> select username, sid, serial#, blocking_session, event from v$session where
username=’SYSMAN’;

USERNAME SID SERIAL# BLOCKING_SESSION EVENT

—————————— ———- ———- —————- ——————————

SYSMAN 129 1123 db file sequential read

After some minutes, you’ll get the following output

[code]USERNAME SID SERIAL# BLOCKING_SESSION EVENT

—————————— ———- ———- —————- ——————————

SYSMAN 129 1123 129 library cache pin [/code]What I did is to kill the first session and run the command again

[code]SQL> alter system kill session ‘129,1123’ immediate;

System altered.

SQL>[/code]


You’ll get the following output from the first session:

[code]BEGIN

emd_maintenance.partition_maintenance; END;

*

ERROR at line 1:

ORA-00028: your session has been killed

SQL> [/code]


Run the command again, and it will end with success

[code]SQL> exec emd_maintenance.partition_maintenance;

PL/SQL procedure successfully completed.

SQL>[/code]


Now run the following command:

[code]SQL> exec emd_maintenance.remove_em_dbms_jobs;

PL/SQL procedure successfully completed.

SQL>[/code]


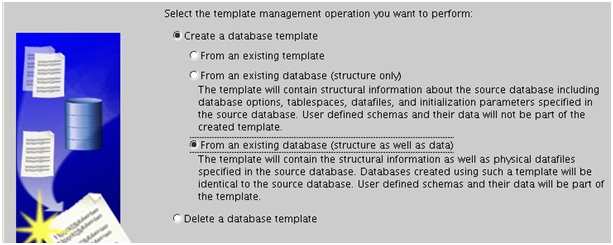
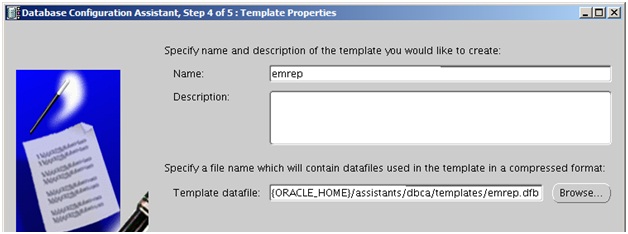
Now run DBCA from the Grid host and create a template. Select “Manage Template” and choose “From the existing database (structure as well as data)” option as follows:

Provide the name for the template and click Next to create it in the directory shown below:

Now copy the file to the second grid control


[code][oracle@TestDB01 ~]$ scp /u01/oracle/product/10.2.0/db10g/assistants/dbca/templates/emrep.*

testdb02:/u01/oracle/product/10.2.0/db10g/assistants/dbca/templates/

emrep.dbc                                     100%    5975     5.8KB/s   00:00

emrep.dfb                                     100%  170MB    24.4MB/s   00:07

[oracle@TestDB01 ~]$[/code]


Now connect to the second Grid machine and restore the database using DBCA. Run dbca, choose Create database option and there you’ll see “emrep” template. Choose it and proceed:

Provide the name of the database as emrepnew and uncheck the option “Configure the database with Enterprise Manager”. Provide the same password as it was for the first Grid Control installation (it can be different as well) and finish the installation

After the installation connect to the new database and unlock the following accounts by providing the password:


[code][oracle@TestDB02 ~]$ export ORACLE_SID=emrepnew

[oracle@TestDB02 ~]$ sqlplus / as sysdba

SQL> alter user sysman identified by pass account unlock;

User altered.

SQL>alter user dbsnmp identified by pass account unlock;

User altered.

SQL>alter user mgmt_view account unlock;

User altered.

SQL>

Then run the following commands with SYSMAN user:

SQL> conn sysman

Enter password:

Connected.

SQL> exec emd_maintenance.analyze_emd_schema(‘SYSMAN’);

PL/SQL procedure successfully completed.

SQL> alter system set job_queue_processes=10 scope=both;

System altered.

SQL> exec emd_maintenance.submit_em_dbms_jobs;

PL/SQL procedure successfully completed.

SQL>[/code]


Now, we need to change emoms.propertiesfile to forward the Grid Control to the new repository. For this, firstly take backup of the emoms.properties file

[code][oracle@TestDB02 ~]$ cd /u01/oracle/product/10.2.0/oms10g/sysman/config/

[oracle@TestDB02 config]$ cp emoms.properties emoms.properties_backup [/code]


Then, edit that file and change the value of the following parameters:

oracle.sysman.eml.mntr.emdRepSID=emrep2

oracle.sysman.eml.mntr.emdRepConnectDescriptor=(DESCRIPTION\=(ADDRESS_LIST\=(ADDRESS\=(PROTOCOL\=TCP)(HOST\=TestDB02)(PORT\=1521)))(CONNECT_DATA\=(SERVICE_NAME\=emrep2)))

Change emrep2 to emrepnew, save and exit

Now stop and start the OMS

[code][oracle@TestDB02 bin]$ ./opmnctl stopall

opmnctl: stopping opmn and all managed processes…

[oracle@TestDB02 bin]$ ./opmnctl startall

opmnctl: starting opmn and all managed processes…[/code]


Now open the browser and view the new OEM

As you see, all databases are moved to the new grid control, I mean, OEM uses new repository. Now we need to change agent configurations as well to upload their data to the new OEM. Switch to the third machine (testdb03), move to the agent configuration directory, take backup of the emd.properties file and make the following changes:

[code][oracle@TestDB03 ~]$ cd /u01/oracle/product/10.2.0/agent10g/sysman/config/

[oracle@TestDB03 config]$ cp emd.properties emd.properties_backup[/code]Change the following parameters:

–         REPOSITORY_URL

–         emdWalletSrcUrl

–         EMD_URL

REPOSITORY_URL=https://TestDB02:1159/em/upload

emdWalletSrcUrl=http://testdb02:4889/em/wallets/emd

EMD_URL=http://TestDB03:1830/emd/main/  (remove “s” from https)

Then, remove the following files:


[code]rm -r <AGENT_HOME>/sysman/emd/state/*

rm -r <AGENT_HOME>/sysman/emd/upload/*

rm <AGENT_HOME>/sysman/emd/lastupld.xml

rm <AGENT_HOME>/sysman/emd/agntstmp.txt

rm <AGENT_HOME>/sysman/emd/blackouts.xml

rm <AGENT_HOME>/sysman/emd/protocol.ini[/code]

Now switch to OMS and secure it again:


[code][oracle@TestDB02 bin]$ ./opmnctl stopall

opmnctl: stopping opmn and all managed processes…[/code]
[code][oracle@TestDB02 bin]$ cd ../../bin/

[oracle@TestDB02 bin]$ ./emctl secure oms

Oracle Enterprise Manager 10g Release 3 Grid Control

Copyright (c) 1996, 2007 Oracle Corporation.  All rights reserved.

Enter Enterprise Manager Root Password :

Enter Agent Registration password :

OPMN processes already stopped…   Done.

Securing central oms…   Started.

Checking Repository…   Done.

Checking Em Key…  Done.

Checking Repository for an existing Enterprise Manager Root Key…   Done.

Fetching Root Certificate from the Repository…   Done.

Generating Registration Password Verifier in the Repository…   Done.

Generating Oracle Wallet Password for Enterprise Manager OMS…   Done.

Generating Oracle Wallet for Enterprise Manager OMS…   Done.

Generating Oracle Wallet for iAS HTTP Server…   Done.

Updating HTTPS port in emoms.properties file…   Done.

Generating HTTPS Virtual Host for Enterprise Manager OMS…   Done.

Securing central oms…   Ended.

[oracle@TestDB02 bin]$ cd ../opmn/bin/

[oracle@TestDB02 bin]$ ./opmnctl startall

opmnctl: starting opmn and all managed processes…

[oracle@TestDB02 bin]$ [/code]Now switch to the agent host and secure it as well:

[code][oracle@TestDB03 bin]$ ./emctl secure agent

Oracle Enterprise Manager 10g Release 3 Grid Control 10.2.0.3.0.

Copyright (c) 1996, 2007 Oracle Corporation.  All rights reserved.

Enter Agent Registration password :

Failed to stop agent…[/code]


If you got above error, kill the agent process manually and try again:

[code][oracle@TestDB03 bin]$ ps -ef | grep agent

oracle    1556 31812  0 13:59 ?        00:00:02  /u01/oracle/product/10.2.0/db_1/bin/emagent

[oracle@TestDB03 bin]$ kill -9 1556 [/code]

 
[code][oracle@TestDB03 bin]$ ./emctl secure agent

Oracle Enterprise Manager 10g Release 3 Grid Control 10.2.0.3.0.

Copyright (c) 1996, 2007 Oracle Corporation.  All rights reserved.

Enter Agent Registration password :

Agent is already stopped…   Done.

Securing agent…  Started.

Requesting an HTTPS Upload URL from the OMS…   Done.

Requesting an Oracle Wallet and Agent Key from the OMS…   Done.

Check if HTTPS Upload URL is accessible from the agent…   Done.

Configuring Agent for HTTPS in CENTRAL_AGENT mode…   Done.

EMD_URL set in /u01/oracle/product/10.2.0/agent10g/sysman/config/emd.properties

Securing agent…   Successful.

[oracle@TestDB03 bin]$[/code]

 
[code]

[oracle@TestDB03 bin]$ ./emctl start agent

Oracle Enterprise Manager 10g Release 3 Grid Control 10.2.0.3.0.

Copyright (c) 1996, 2007 Oracle Corporation.  All rights reserved.

Starting agent …… started.

[oracle@TestDB03 bin]$ ./emctl upload agent

Oracle Enterprise Manager 10g Release 3 Grid Control 10.2.0.3.0.

Copyright (c) 1996, 2007 Oracle Corporation.  All rights reserved.

—————————————————————

EMD upload completed successfully[/code]

 
[code][oracle@TestDB03 bin]$ ./emctl status agent
Oracle Enterprise Manager 10g Release 3 Grid Control 10.2.0.3.0.

Copyright (c) 1996, 2007 Oracle Corporation.  All rights reserved.

—————————————————————

Agent Version     : 10.2.0.3.0

OMS Version       : 10.2.0.3.0

Protocol Version  : 10.2.0.2.0

Agent Home        : /u01/oracle/product/10.2.0/agent10g

Agent binaries    : /u01/oracle/product/10.2.0/agent10g

Agent Process ID  : 10098

Parent Process ID : 10081

Agent URL         : https://TestDB03:1830/emd/main/

Repository URL    : https://TestDB02:1159/em/upload

Started at        : 2011-06-23 16:51:37

Started by user   : oracle

Last Reload       : 2011-06-23 16:51:37

Last successful upload                       : 2011-06-23 16:52:04

Total Megabytes of XML files uploaded so far :     6.78

Number of XML files pending upload           :        1

Size of XML files pending upload(MB)         :    0.00

Available disk space on upload filesystem    :    81.75%

Last successful heartbeat to OMS             : 2011-06-23 16:51:40

—————————————————————

Agent is Running and Ready

[oracle@TestDB03 bin]$[/code]

That’s all. We’ve successfully moved the Grid Control from one machine to another and made necessary changes to the Agent.

Here’re the list of metalink notes I’ve used which can be helpful for you to get more information


Grid Control Repository: Steps to Migrate the 10g Repository from One Machine to Another on the Same Platform [ID 1068841.1]

Grid Control Repository: How to Move Grid Control Repository from One Machine to Another Using DBCA (on the same Platform) [ID  733530.1]

How to Point an Agent to a Different Grid Control OMS and Repository? [ID 413228.1]

How to Secure the OMS and Agent Components in a 10g Grid Control Setup? [ID 283091.1]

Posted in Administration | 8 Comments »

My presentation at TROUG 2011(Turkish Oracle User Group)

Posted by Kamran Agayev A. on 22nd June 2011

Two monthes ago at 21 April (2011), I attended TROUG (Turkish Oracle User Group) conference at Istanbul (Bahçeşehir University), the second city I love after Baku which is my hometown. The trip was wonderful, I met with the best Oracle Gurus of Turkey such as Tonguc Yilmaz (Oracle ACE), Husnu Sensoy (Oracle ACE Director) , Zekeriya Besiroqlu (Oracle ACE), Gokhan Atil, Emre Baransel, Ferhad Sengonul, Yasin Saygili (Oracle ACE) and others. Moreover, I also met the worldwide Oracle Guru – Jonathan Lewis and had a great dinner with him.

I also made a presentation with Zekeriya Besiroqlu. If you know Turkish language, you can watch it from the following link:

This is not the full video, I’ll try to post the full version in the near future

Posted in Administration | 1 Comment »

Vote for me for OOW-2011 Conference Session

Posted by Kamran Agayev A. on 6th June 2011

After presenting last year at OOW-2010 Unconference session, I’ve decided to move forward and present at OOW-2011 this year. So if you want to see me at OOW-2011 at San Francisco, just take 2 minutes to register and vote for my session from the following link:

https://mix.oracle.com/events/oow11/proposals/11013

Thanks to everyone!

Posted in Administration | 6 Comments »

Solving the error "OUI-25031" during Oracle 10g R2 Grid Control (10.2.0.3) installation

Posted by Kamran Agayev A. on 17th May 2011

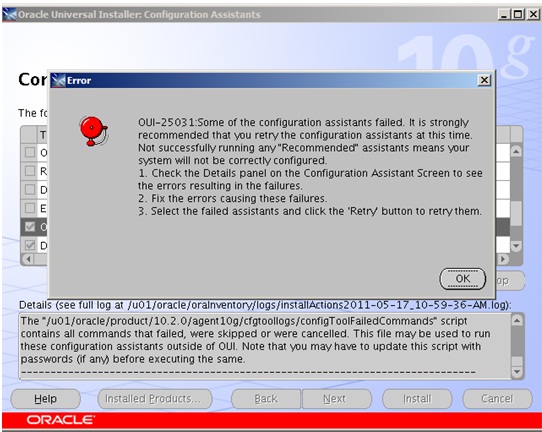
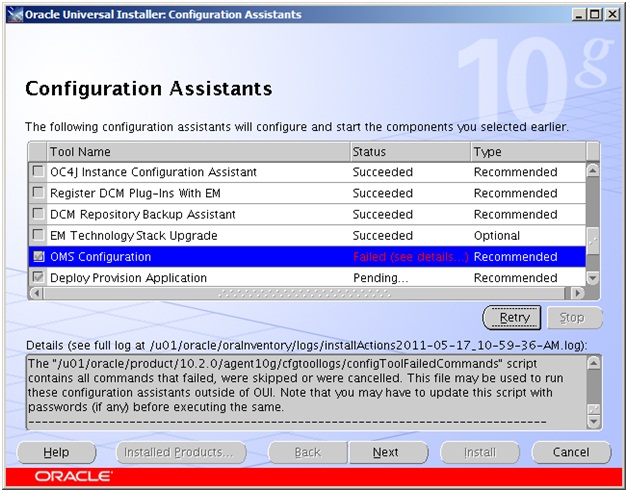
Yesterday while installing OEM Grid Control 10gR2 (10.2.3) I got the following error:

As I’ve accustomed to get some errors (or hit a bug) either during Grid Control installation, or configuration, I was calm and after some time found the following documentation which describes the error:

How to Recover From Enterprise Manager Grid Control 10g Base Releases (10.2.0.x.0) Installation Errors after 31-Dec-2010 [ID 1228103.1]

And here’s the explanation :)

The Enterprise Manager Grid Control 10g base releases used a fixed end date for the root certificate used to setting up secure communications via the Secure Socket Layer (SSL) protocol. The fixed date used is the 31-Dec-2010 00:00:00 UTC.

The certificate expiration will cause errors to occur if you attempt to install these releases on or after 31-Dec-2010.

Amazing .. Anyway, the solution was adding a Patch and making some configuration changes. Here’re the steps what I’ve done:

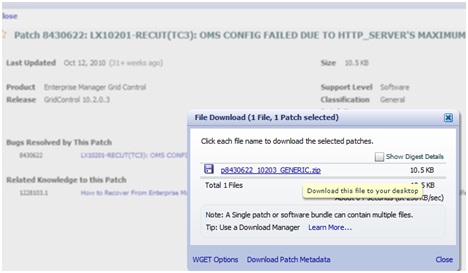
Firstly, you need to download and install the Patch 8430622 from metalink

Patch 8430622: LX10201-RECUT(TC3): OMS CONFIG FAILED DUE TO HTTP_SERVER’S MAXIMUM RETRY LIMIT

After downloading the file, copy it to the server, extract it and patch

[code]

[oracle@Server orasoft]$ unzip p8430622_10203_GENERIC.zip

Archive:  p8430622_10203_GENERIC.zip

creating: 8430622/

creating: 8430622/files/

creating: 8430622/files/sysman/

creating: 8430622/files/sysman/jlib/

creating: 8430622/files/sysman/jlib/emagentSDK.jar/

creating: 8430622/files/sysman/jlib/emagentSDK.jar/oracle/

creating: 8430622/files/sysman/jlib/emagentSDK.jar/oracle/sysman/

creating: 8430622/files/sysman/jlib/emagentSDK.jar/oracle/sysman/eml/

creating: 8430622/files/sysman/jlib/emagentSDK.jar/oracle/sysman/eml/sec/

creating: 8430622/files/sysman/jlib/emagentSDK.jar/oracle/sysman/eml/sec/util/

inflating: 8430622/files/sysman/jlib/emagentSDK.jar/oracle/sysman/eml/sec/util/RootCert.class

inflating: 8430622/README.txt

creating: 8430622/etc/

creating: 8430622/etc/xml/

inflating: 8430622/etc/xml/ShiphomeDirectoryStructure.xml

inflating: 8430622/etc/xml/GenericActions.xml

creating: 8430622/etc/config/

inflating: 8430622/etc/config/inventory

inflating: 8430622/etc/config/actions

[oracle@Server orasoft]$

[/code]

Switch to $OMS_HOME/bin folder and stop the OMS

[code]

[oracle@Server bin]$ ./emctl stop oms

Oracle Enterprise Manager 10g Release 3 Grid Control

Copyright (c) 1996, 2007 Oracle Corporation.  All rights reserved.

Oracle Management Server is Down.

[oracle@Server bin]$

[/code]

Make sure your ORACLE_HOME set to Oracle Management Server home

[code]

[oracle@Server 8430622]$ export ORACLE_HOME=/u01/oracle/product/10.2.0/oms10g/

[oracle@Server 8430622]$ opatch apply

Invoking OPatch 10.2.0.3.0

Oracle interim Patch Installer version 10.2.0.3.0

Copyright (c) 2005, Oracle Corporation.  All rights reserved..

Oracle Home       :
/u01/oracle/product/10.2.0/oms10g

Central Inventory : /u01/oracle/oraInventory

from           : /etc/oraInst.loc

OPatch version    :
10.2.0.3.0

OUI version       :
10.2.0.3.0

OUI location      :
/u01/oracle/product/10.2.0/oms10g//oui

Log file location :
/u01/oracle/product/10.2.0/oms10g/cfgtoollogs/opatch/opatch2011-05-17_11-41-29AM.log

ApplySession applying interim patch ‘8430622’ to OH ‘/u01/oracle/product/10.2.0/oms10g’

OPatch detected non-cluster Oracle Home from the inventory and will patch the local system only.

Backing up files and inventory (not for auto-rollback) for the Oracle Home

Backing up files affected by the patch ‘8430622’ for restore. This might take a while…

Backing up files affected by the patch ‘8430622’ for rollback. This might take a while…

Patching component oracle.sysman.top.oms, 10.2.0.3.0…

Updating jar file
"/u01/oracle/product/10.2.0/oms10g/sysman/jlib/emagentSDK.jar" with "/sysman/jlib/emagentSDK.jar/oracle/sysman/eml/sec/util/RootCert.class"

ApplySession adding interim patch ‘8430622’ to inventory

Verifying the update…

Inventory check OK: Patch ID 8430622 is registered in Oracle Home inventory with proper meta-data.

Files check OK: Files from Patch ID 8430622 are present in Oracle Home.

OPatch succeeded.

[oracle@Server 8430622]$

[/code]

Now, stop Oracle Management Service process:

[code]

[oracle@Server 8430622]$ cd
/u01/oracle/product/10.2.0/oms10g/opmn/bin

[oracle@Server bin]$ ./opmnctl stopall

opmnctl: stopping opmn and all managed processes…

[oracle@Server bin]$

[/code]

Now, re-secure the management service:

[code]

[oracle@Server oms10g]$ cd $ORACLE_HOME/bin

[oracle@Server bin]$ ./emctl secure oms -reset

Oracle Enterprise Manager 10g Release 3 Grid Control

Copyright (c) 1996, 2007 Oracle Corporation.  All rights reserved.

Enter Enterprise Manager Root Password :

Enter Agent Registration password :

OPMN processes already stopped…   Done.

Securing central oms…  Started.

Checking Repository…  Done.

Checking Em Key…  Done.

Checking Repository for an existing Enterprise Manager Root Key…

WARNING! An Enterprise Manager Root Key already exists in

the Repository. This operation will replace your Enterprise Manager Root Key.

All existing Agents that use HTTPS will need to be

reconfigured if you proceed. Do you wish to continue and

overwrite your Root Key

(Y/N) ?

Y

Are you sure ? Reset of the Enterprise Manager Root Key

will mean that you will need to reconfigure each Agent

that is associated with this OMS before they will be

able to upload any data to it. Monitoring of Targets

associated with these Agents will be unavailable until

after they are reconfigured.

(Y/N) ?

Y

Generating Enterprise Manager Root Key (this takes a minute)…   Done.

Fetching Root Certificate from the Repository…   Done.

Generating Registration Password Verifier in the Repository…   Done.

Generating Oracle Wallet Password for Enterprise Manager OMS…   Done.

Generating Oracle Wallet for Enterprise Manager OMS…   Done.

Generating Oracle Wallet for iAS HTTP Server…   Done.

Updating HTTPS port in emoms.properties file…   Done.

Generating HTTPS Virtual Host for Enterprise Manager OMS…   Done.

Securing central oms…  Ended.

[/code]

[oracle@Server bin]$

Now start the Oracle Management Service

[code]

[oracle@Server bin]$ ./emctl start oms

Oracle Enterprise Manager 10g Release 3 Grid Control

Copyright (c) 1996, 2007 Oracle Corporation.  All rights reserved.

opmnctl: opmn is already running

Starting HTTP Server …

Starting Oracle Management Server …

Checking Oracle Management Server Status …

Oracle Management Server is Up.

[oracle@Server bin]$

[/code]

Now switch to the windows where you got the error, click on Retry button.

After all, we got the following screen which tells us that the Grid Control installed successfully:

Posted in Administration | 10 Comments »

Will be presenting at TROUG (Turkish Oracle User Group) in Istanbul, Turkey

Posted by Kamran Agayev A. on 15th April 2011

I’m planning to present at TROUG (Turkish Oracle User Group) for the next week on April 21 in Istanbul, Turkey. The presentation will be on RMAN 11g New Features with practical demonstrations with Zekeriya Besiroqlu who’s working as a Senior Oracle Instructor for Oracle University Turkey. I can’t wait to meet my best Turkish friends :)

For more information (on Turkish language), visit the following link:

http://www.troug.org/?p=406

Posted in Administration | 3 Comments »

ORA-00600: internal error code, arguments: [ktftb_backout_xids_3]

Posted by Kamran Agayev A. on 15th April 2011

During testing 11g new feature – Flashback Transaction Backout, I got following internal error :

[code]

ORA-00600: internal error code, arguments: [ktftb_backout_xids_3], [1], [0],[], [], [], [], [], [], [], [], []

[/code]

After a little investigation I find out that I got it because of setting “numtxns” parameter incorrectly. I’ve set it to “2” while was backing out only one transaction:

[code]

declare
trans_arr xid_array;
begin
trans_arr := xid_array(‘08000C00DA000000’);
dbms_flashback.transaction_backout (
numtxns=>2,
xids            => trans_arr,
options         => dbms_flashback.cascade
);
end;

[/code]

Then I realized it and changed the value to “1” and the process succeeded. Instead of returning a readable error, Oracle throws an undefined internall error and there’s no any information on this error at metalink :)

Posted in Administration | 4 Comments »

Step by Step installing Oracle 10g RAC on VMware

Posted by Kamran Agayev A. on 5th April 2011

In this guide I’m going to show you the process of creating Oracle 10g R2 RAC on OEL4. First of all I have to mention that I’ve prepared this guide based on the well known RAC on VMWare guide of for Vincent Chan which can be found at OTN. After using that guide I’ve decided to create a more screenshot based explained guide and prepared this blog post which contains 150 screenshots! :)

These days wordpress.com is working veeeeery slowly, so it took me two days to upload all images and create this blog post :) That was really boring. But now the blog post is online and I would be glad to hear the visitors valuable feedbacks.

In this tutorial, we use OEL4 because Oracle 10gR2 is not compatible with OEL5 (as the db was released before the OS released) As in my all tutorials, I use vmware virtual machine. In this guide I will create two virtual machines. Let’s start creating the first machine. But before it, create three directories inside one folder (for example c:\vmware)

[code]C:\vmware\rac1

C:\vmware\rac2

C:\vmware\sharedstorage[/code]

Create the following virtual machine in the first folder and create all shared storages in the third folder
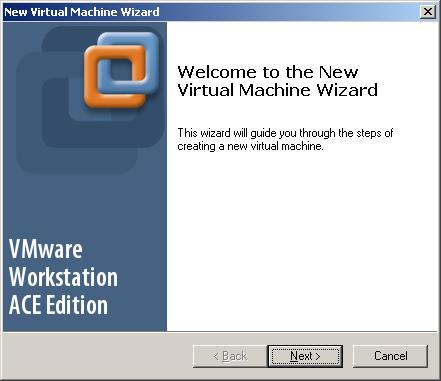
Click Next
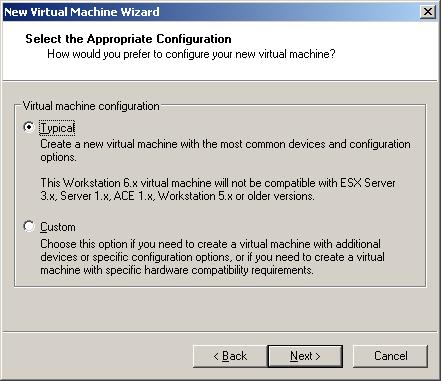
Select Typical and click Next
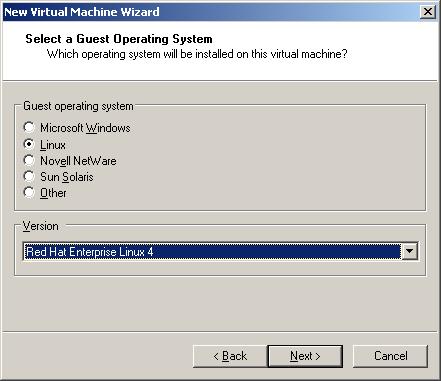
Select “Red Hat Enterprise Linux 4” and Click Next

Provide the name of the virtual machine (rac1), select the location for vmware disk (you can make it c:\vmware\rac1) and click Next
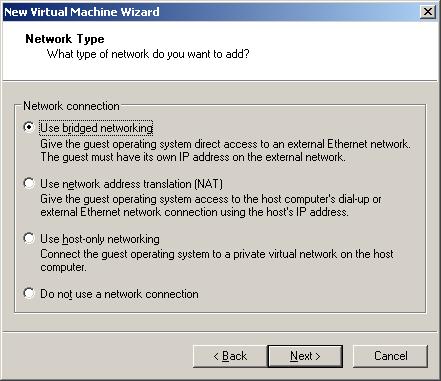
Select bridged network and click next
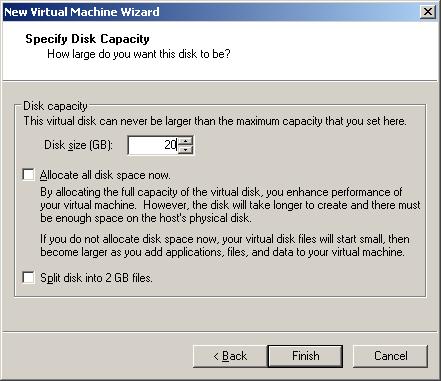
Define the size of the hard drive of the virtual machine and click Next (set it to 20 GB and don’t check “Allocate all disk space now” checkbox) 
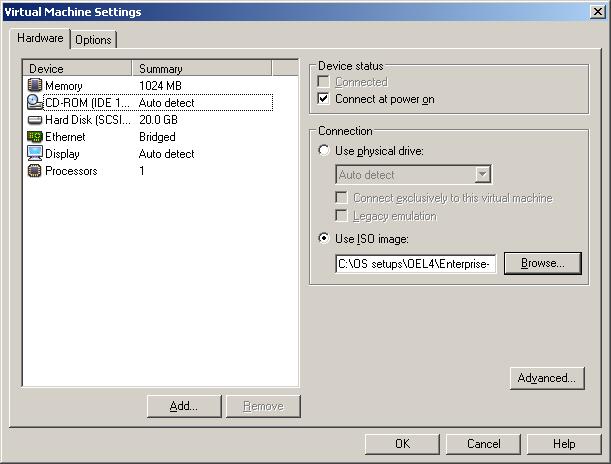
Mount the ISO image of the OEL4 installation and start adding more four hard drives and one Ethernet device. Click on Add button
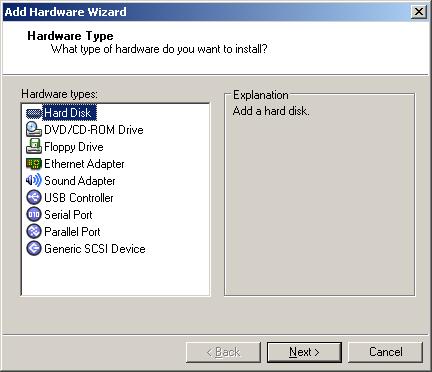
Select “Hard Disk” and click Next
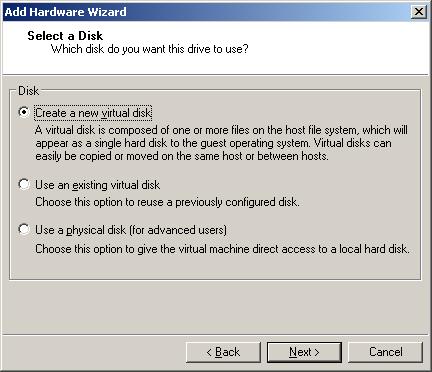
Select “Create a new virtual disk” and click Next
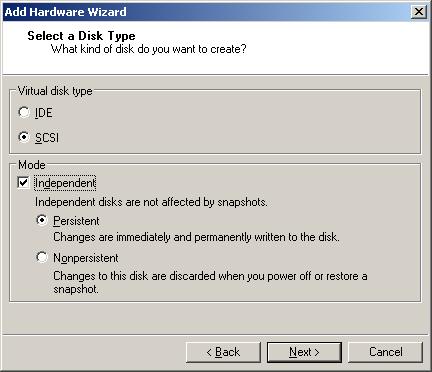
Select “SCSI” and check “Independent->Persistent” and click Next
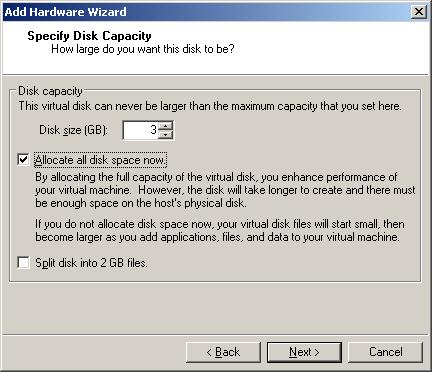
For the first device, specify the disk size as “3gb”, check “Allocate all disk space now” and click Next

Create a separate folder named “C:\vmware\sharedstorage” in your hard drive, set the name of the new hard drive to “ocfs2disk.vmdk”.
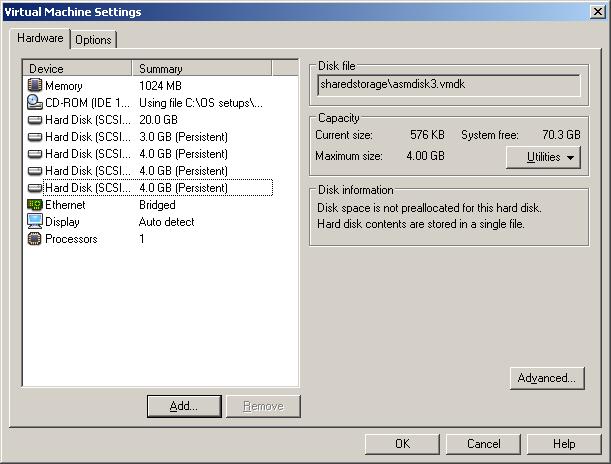
After creating the first device, create more three devices with 4GB in size (asmdisk1.vmdk, asmdisk2.vmdk, asmdisk3.vmdk) and make all of them “Independent->Persistent” and don’t allocate the disk space for each of them

Next, start changing the device node for each of them. Start from the firstly added hard drive, select it, click on Advanced button and make it SCSI 1:0. For next hard drive make it 1:1 and so on
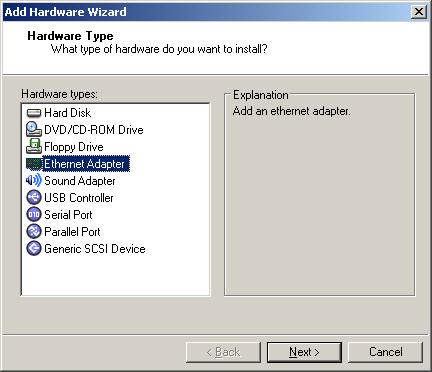
Add new Ethernet device
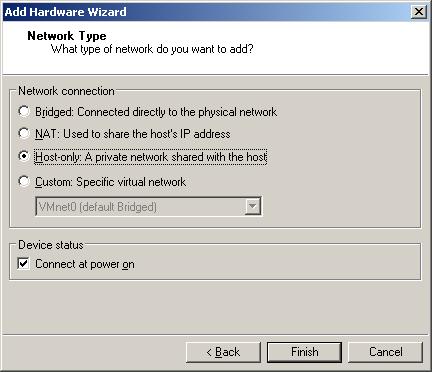
Change the network connection to “Host-only”

Make sure that the last state of your virtual machine looks like as it’s seen above

Then locate the configuration file of the virtual machine and start editing it

Add the lines that are marked in bold to the configuration file to make the devices be shared between to nodes

–          By specifying “disk.locking” to FALSE will allow any virtual machine to load a SCSI disk device even it’s in use by an another virtual machine

–          Specify “diskLib.dataCacheMaxSize = “0” to turn off the disk caching for clustered virtual machines.

–          By specifying scsi1.sharedBus = “virtual” will give the whole bus the ability to be shared. This prevents the locking of this specific disk

Start the virtual machine
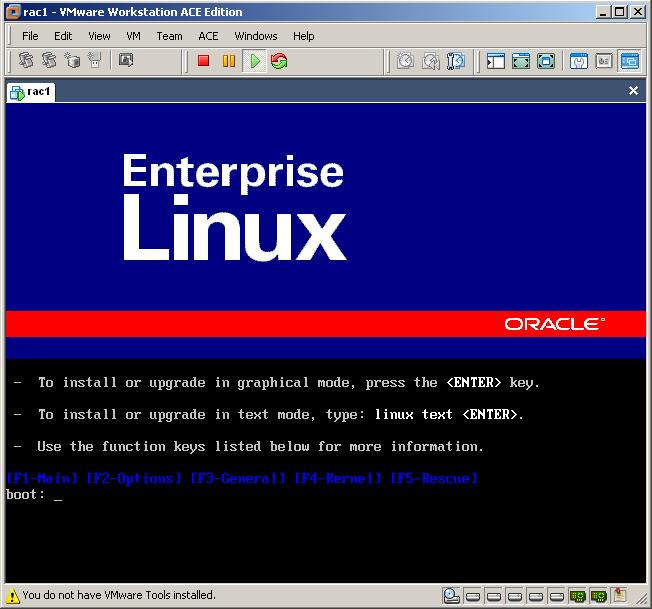
As you have already mounted the ISO image of the OEL4, the above screen appears
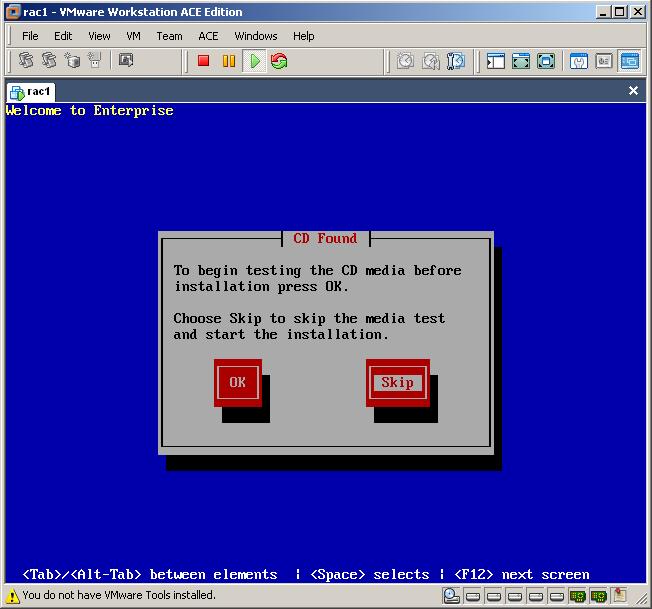
Click Skip
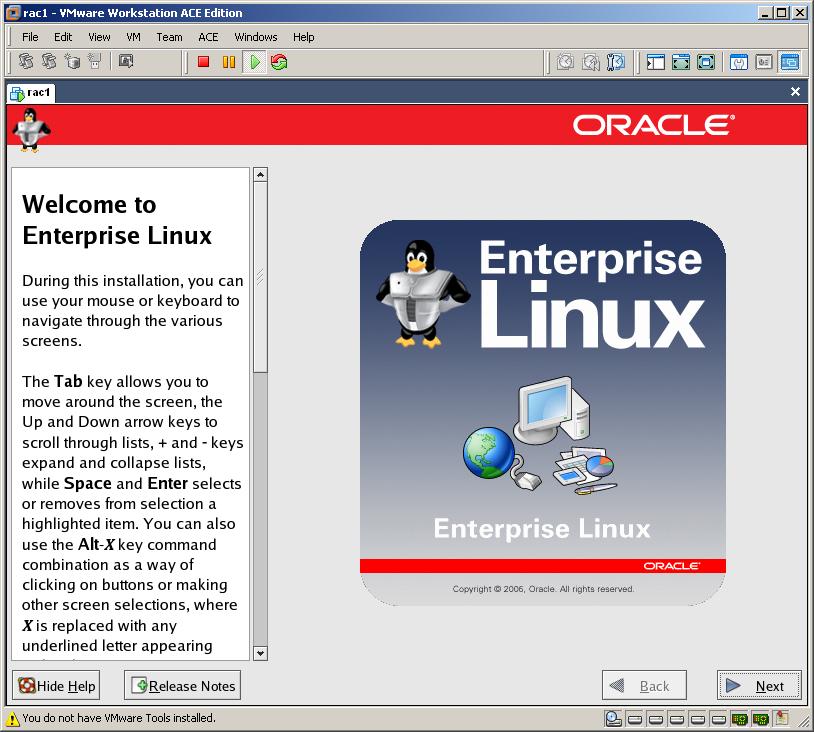
Click Next
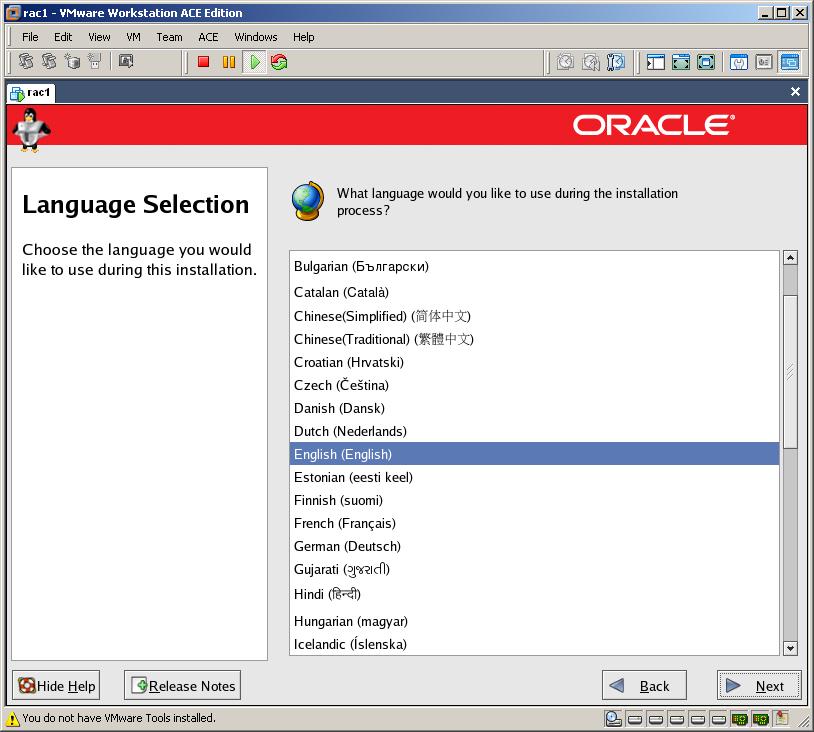
Select installation language and click next
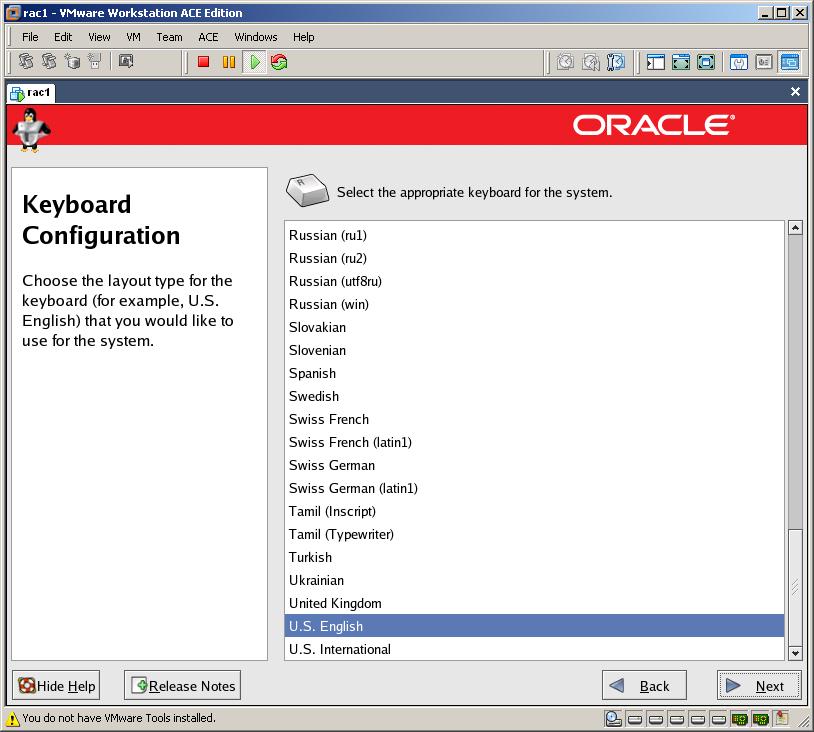
Select appropriate keyboard and click next
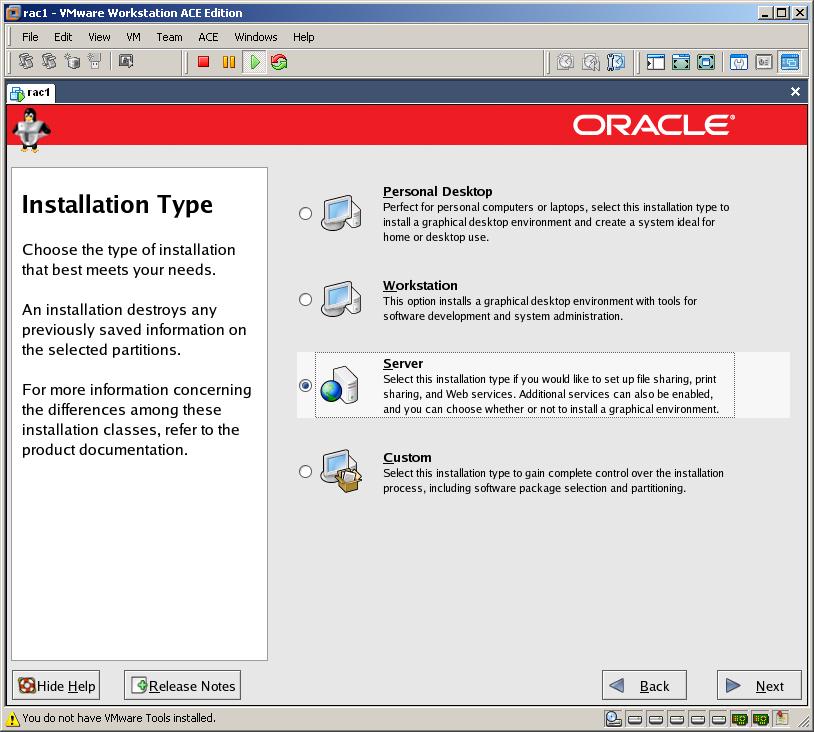
Select “Server” as the installation type and click Next
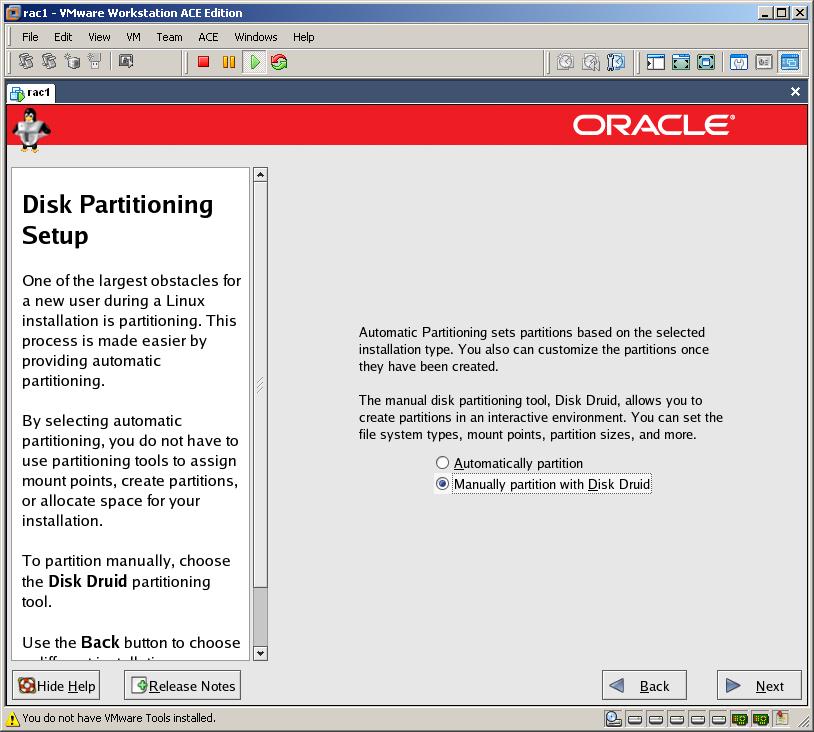
Select Disk Druid for disk partitioning method and click Next

Click Yes for all warnings and click Next

Double click in the first drive /dev/sda
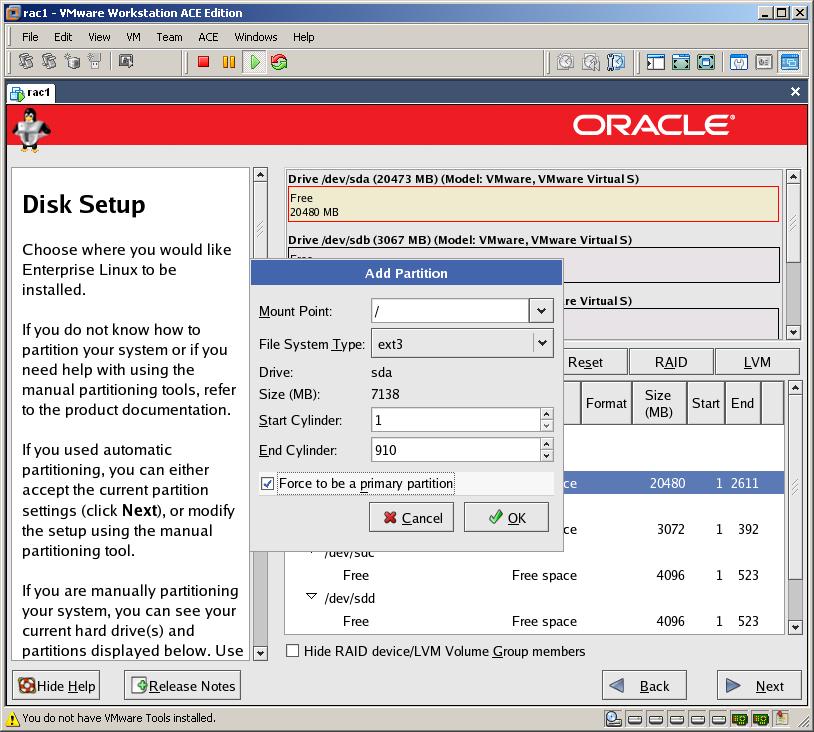
Specify ‘/’ as a mount point, make its files system “ext3” and make the End Cylinder 900 (to make the size of the root folder 7Gb). Check “Force to be a primary partition” and click Ok
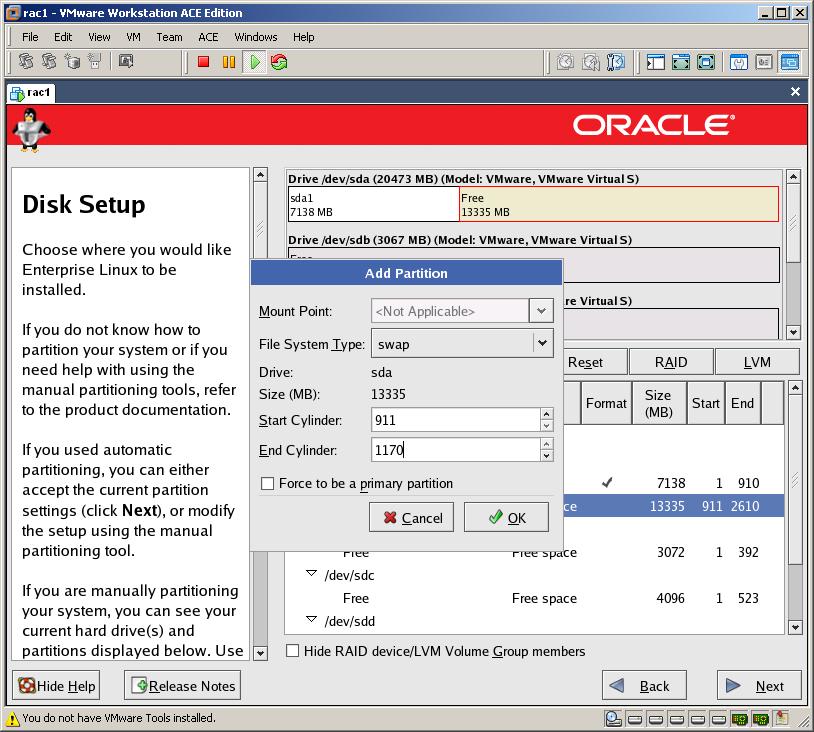
Select File System Type as “swap” and change End Cylinder to 1170
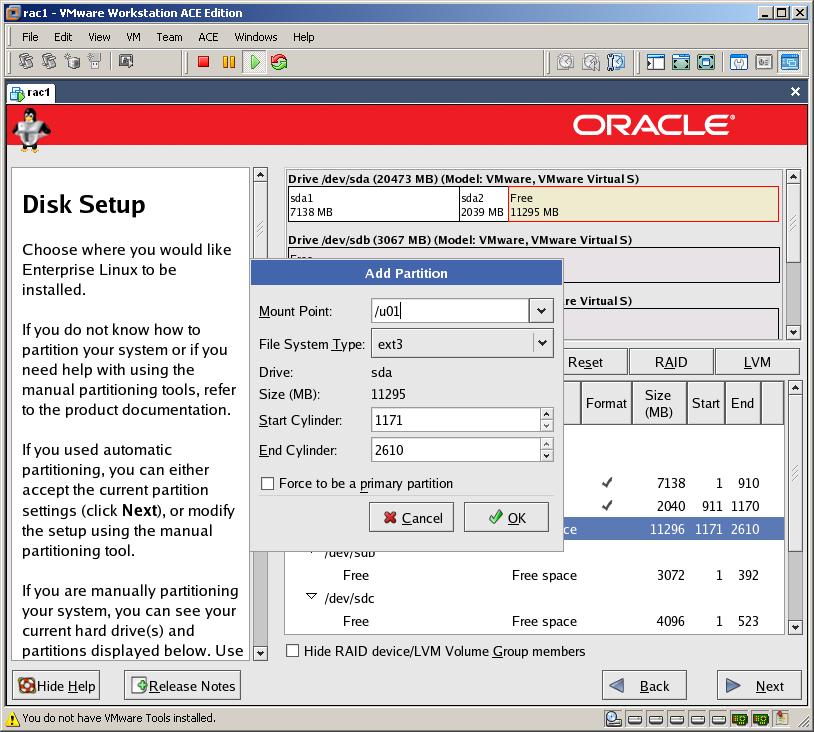
Create mount point called /u01, make its files system “ext3” and make End Cylinder 2610 and click Ok

Make sure that the last state of your disk partitioning looks like as it’s seen above

Now let’s configure the network devices. Select the first device and click Edit
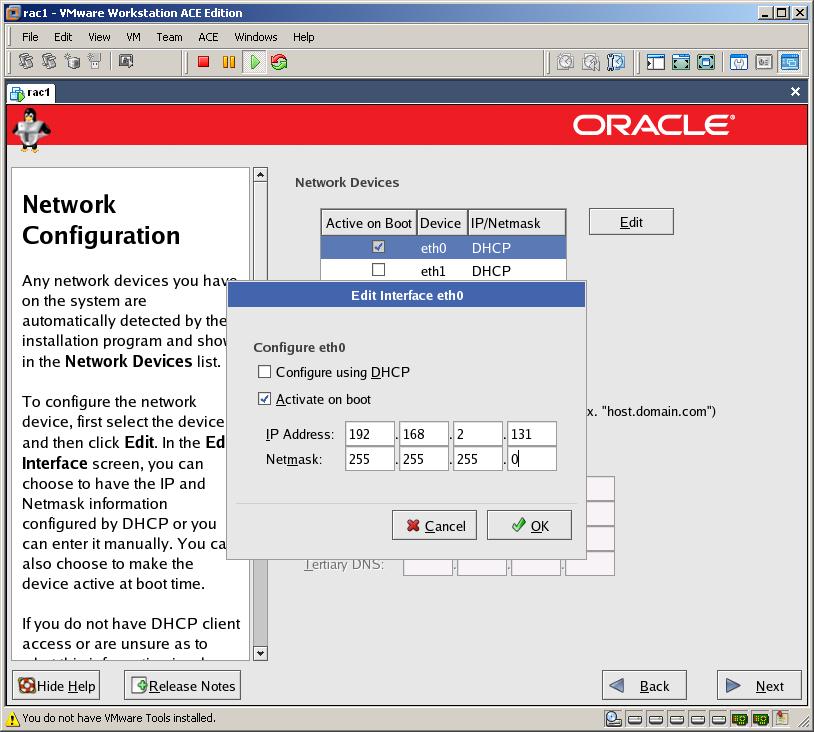
Uncheck “Configure using DHCP” and provide the following ip address and netmask:

IP Address: 192.168.2.131

Netmask: 255.255.255.0
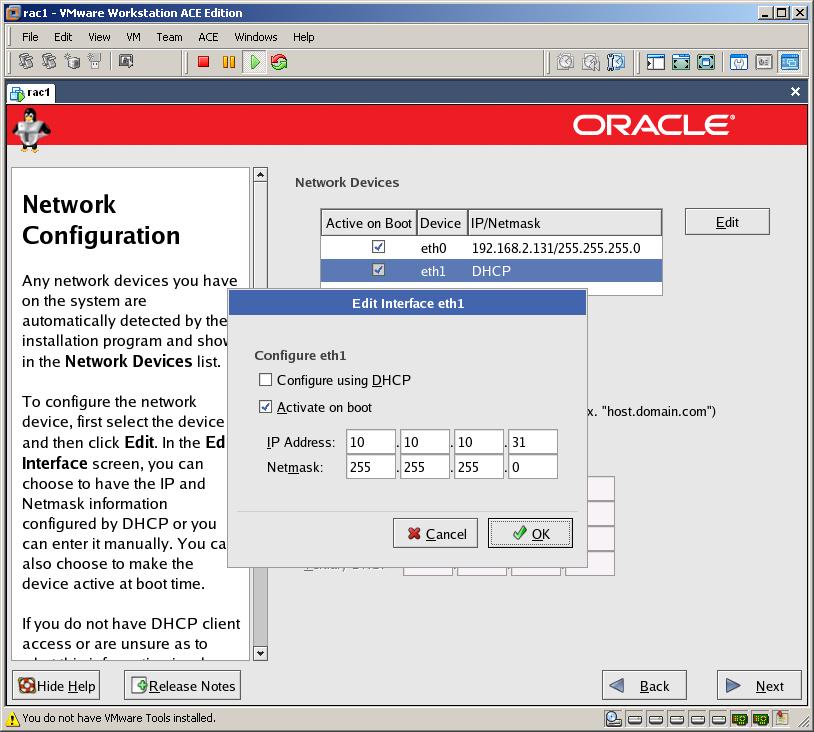
Select the second device, edit it, uncheck “Configure using DHCP” and provide the following ip address and netmask

IP address: 10.10.10.31

Netmask: 255.255.255.0
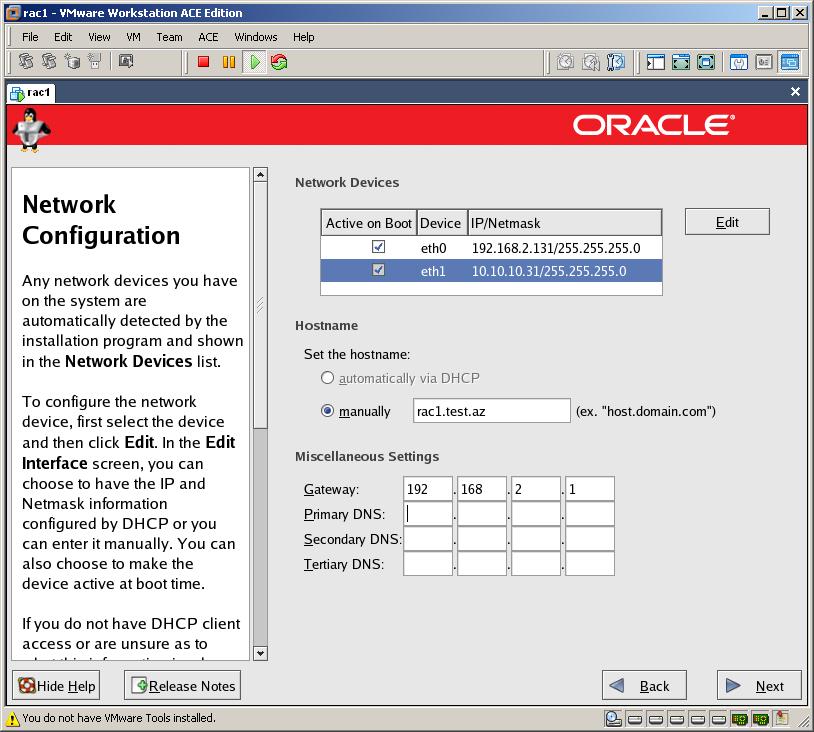
Set the hostname as “rac1.test.az” (you can provide any domain name) and set the gateway to 192.168.2.1
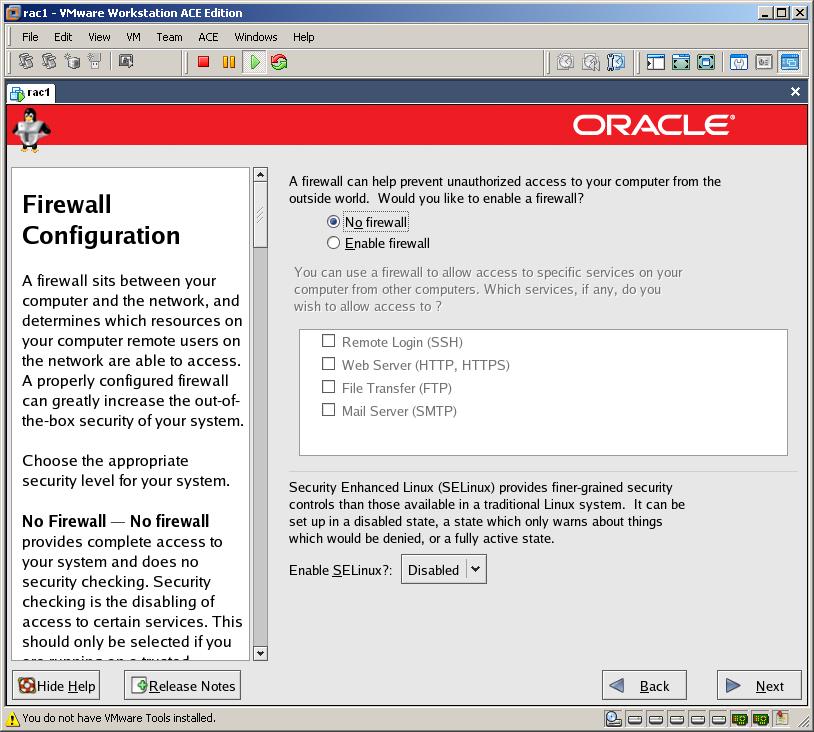
Disable Firewall and SELinux and click Next
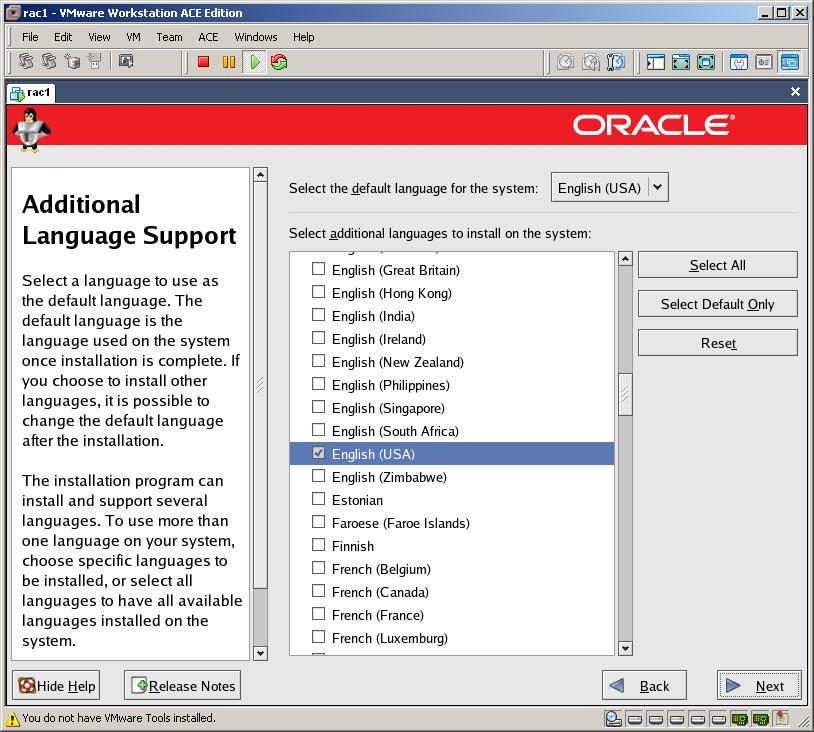
Select the default language for the system and click Next
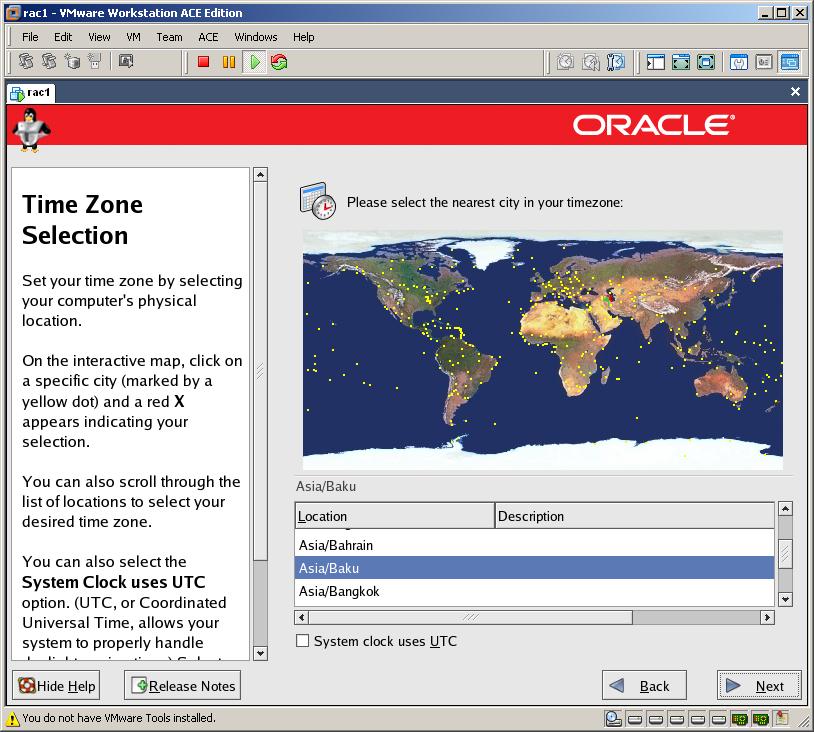
Select Time-Zone and Click Next
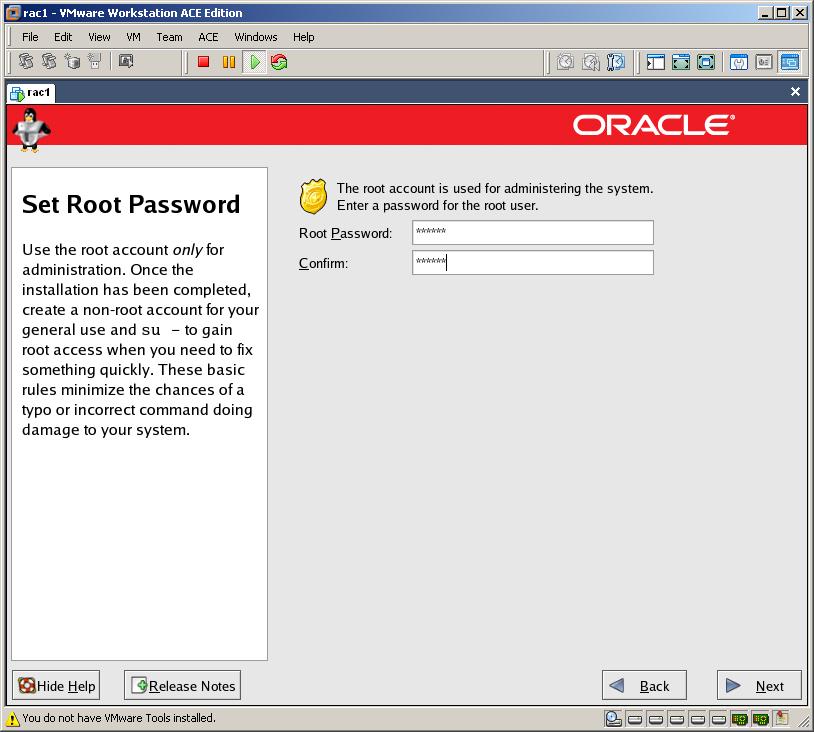
Provide the password for the root user and click next
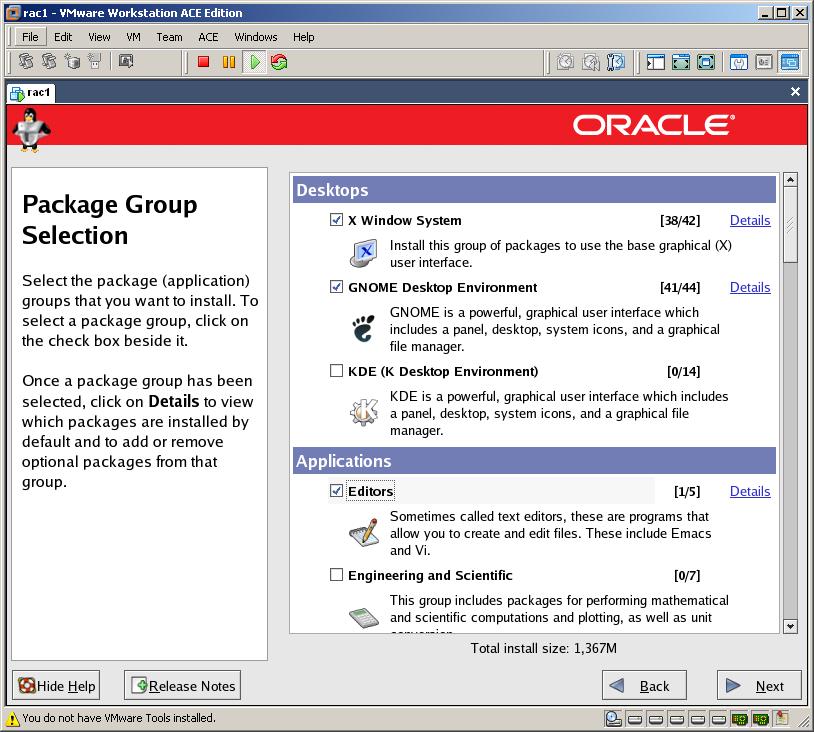
Select necessary packages for Oracle installation. Here’s the list of the necessary packages:

X Window System

Gnome Desktop Environment

Editors

Graphical Internet

Server Configuration Tools

Legacy Network (click Details and select “rsh_server” and “telnet-server”)

Development Tools

Legacy Software Development

Administration Tools

System Tools (select all packages that starts with “ocfs2” and “oracleasm”, select “systat” as well)
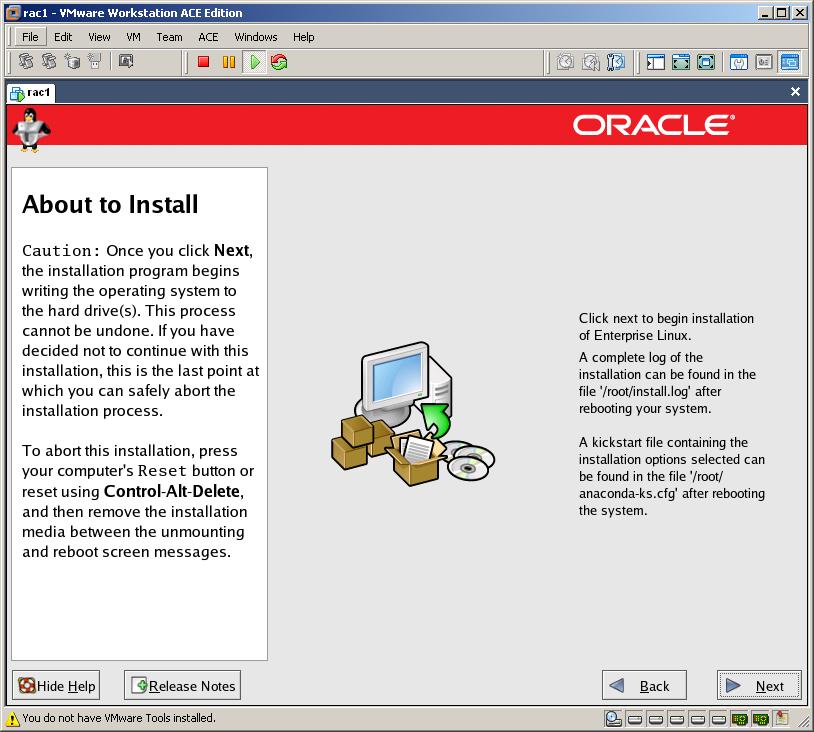
Click Next to start the installation
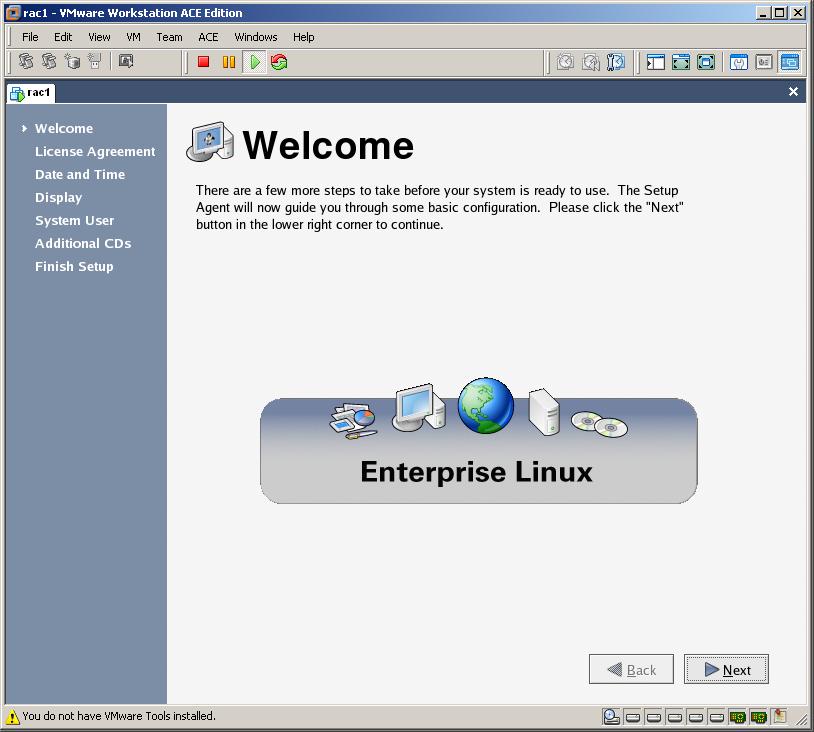
After installation completed the machine restarts. Click Next
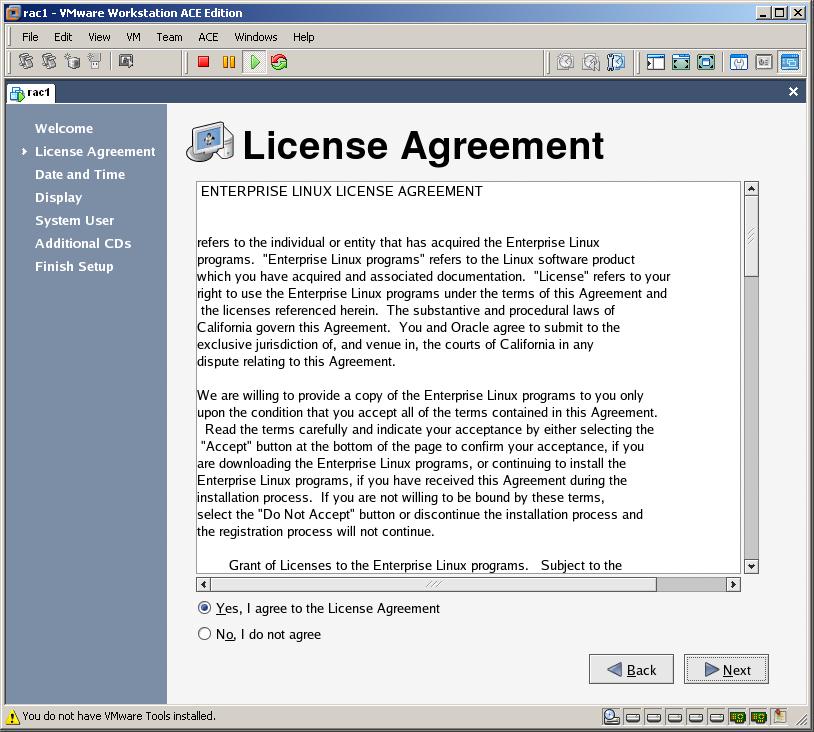
Agree with license and click Next
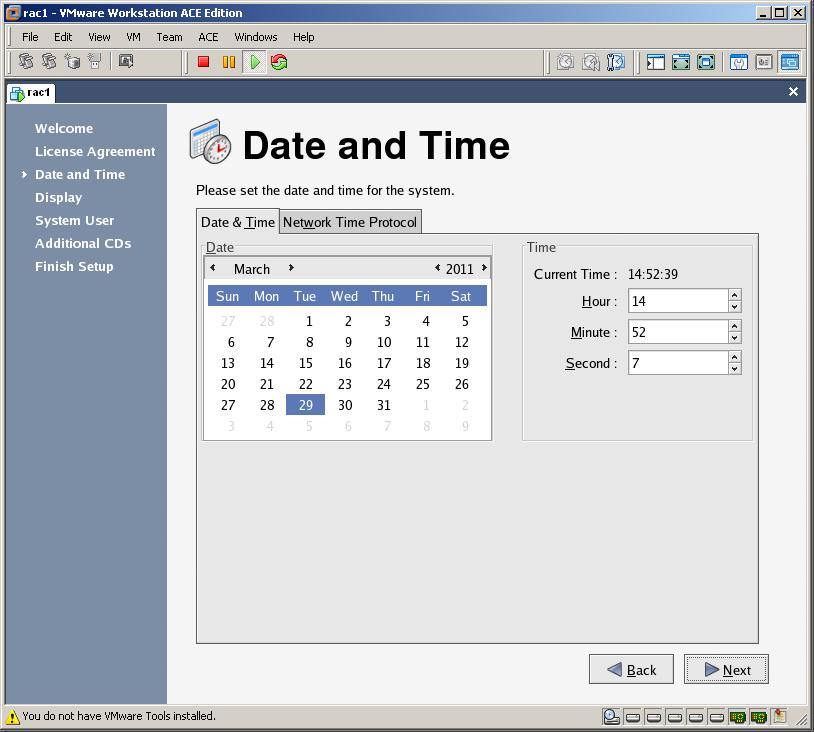
Set the date and time and click Next
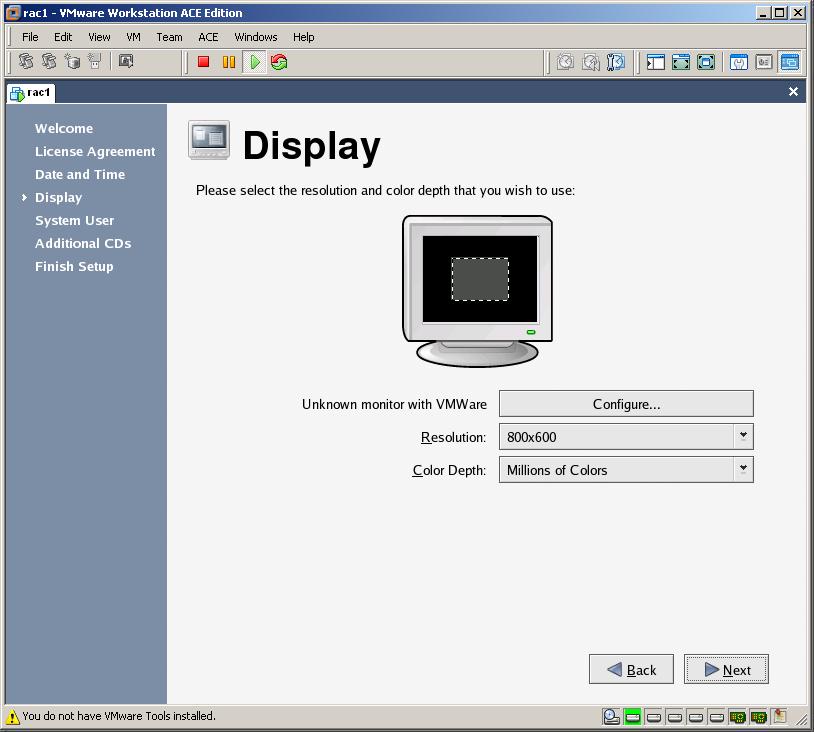
Set the display and click Next
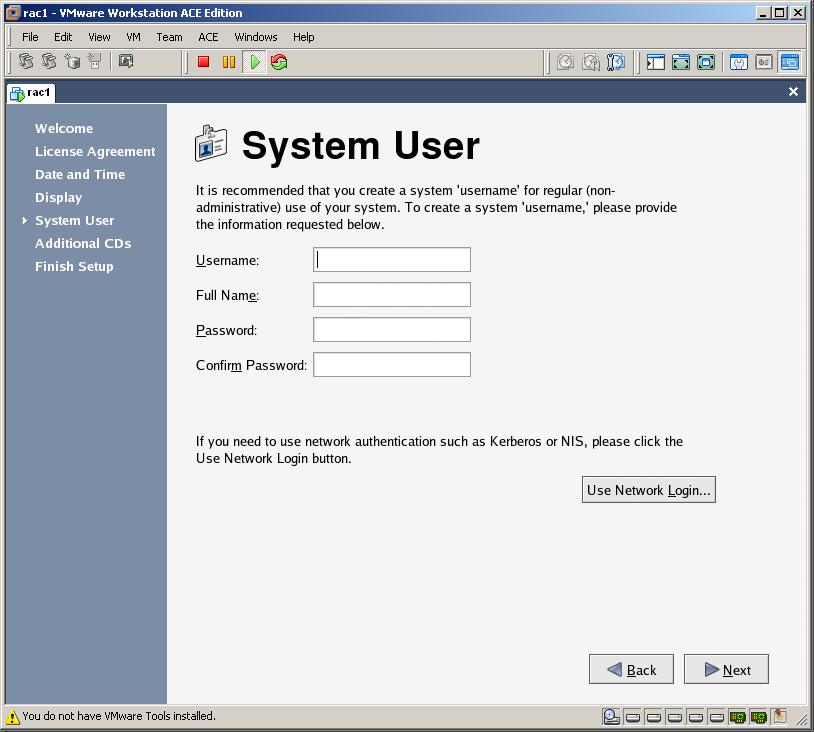
You don’t need to create a user so click Next
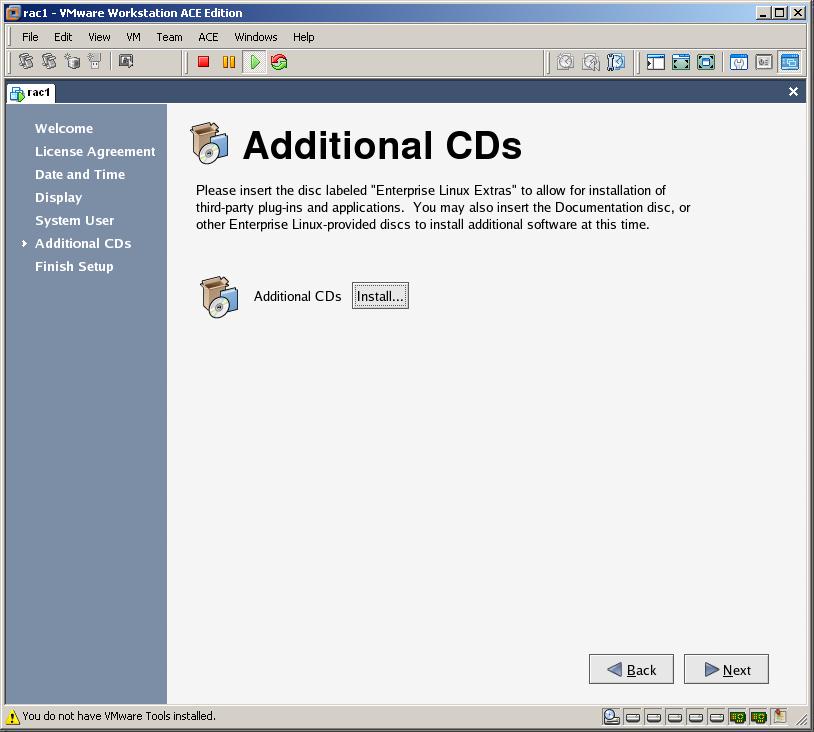
Click Next
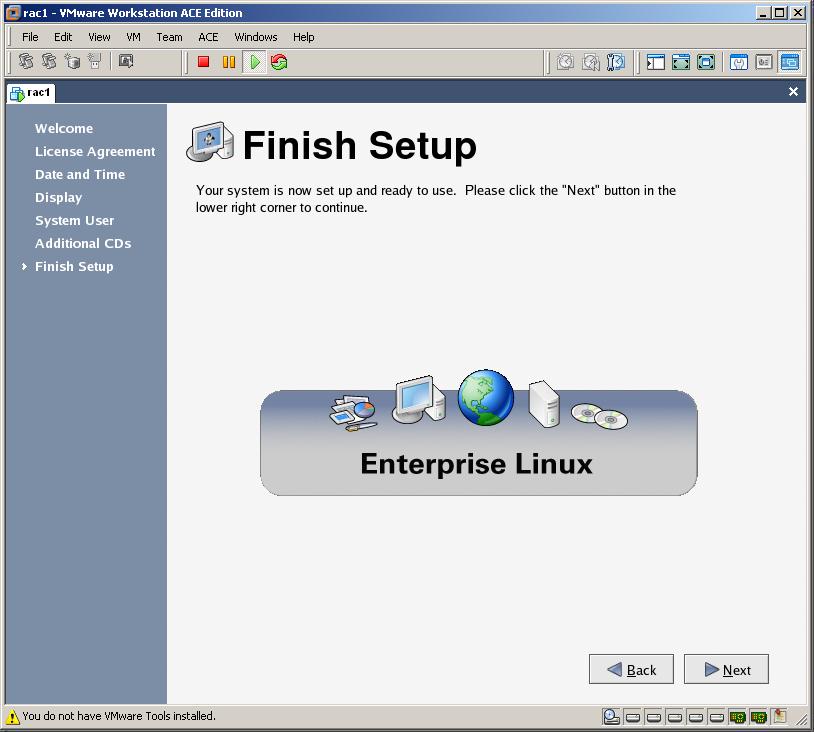
Click Next and finish the installation
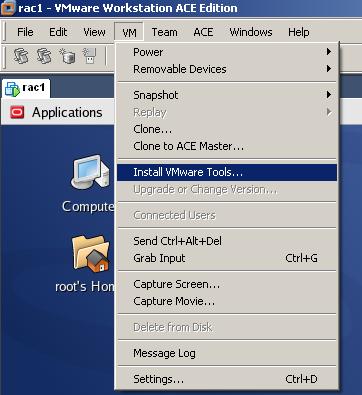
Now let’s install vmware tools. For this, disconnect the mounted ISO image, choose “Install VMware Tools” from VM menu
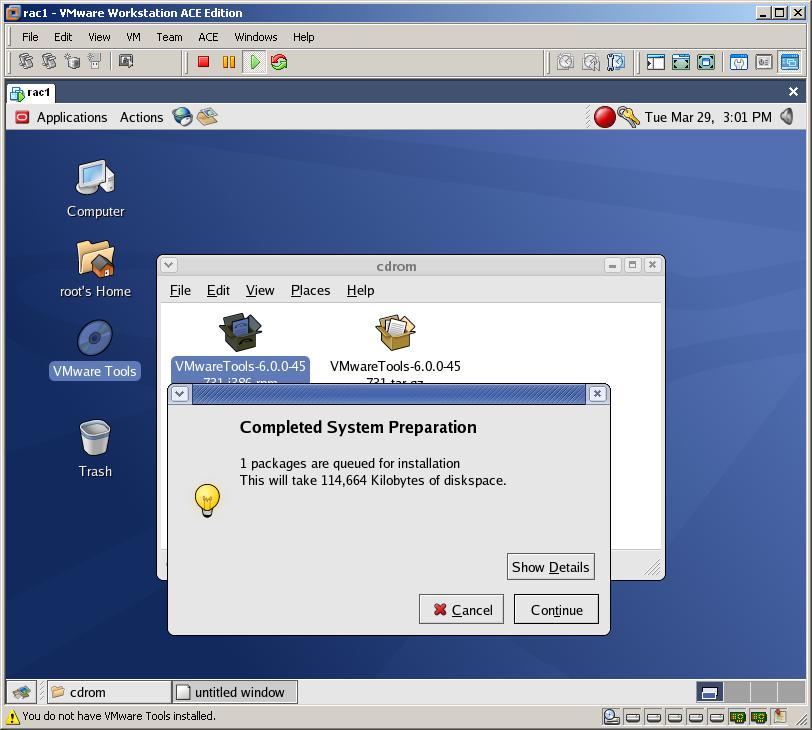
Double click on VMware tools icon and run the .rpm file by double clicking on it
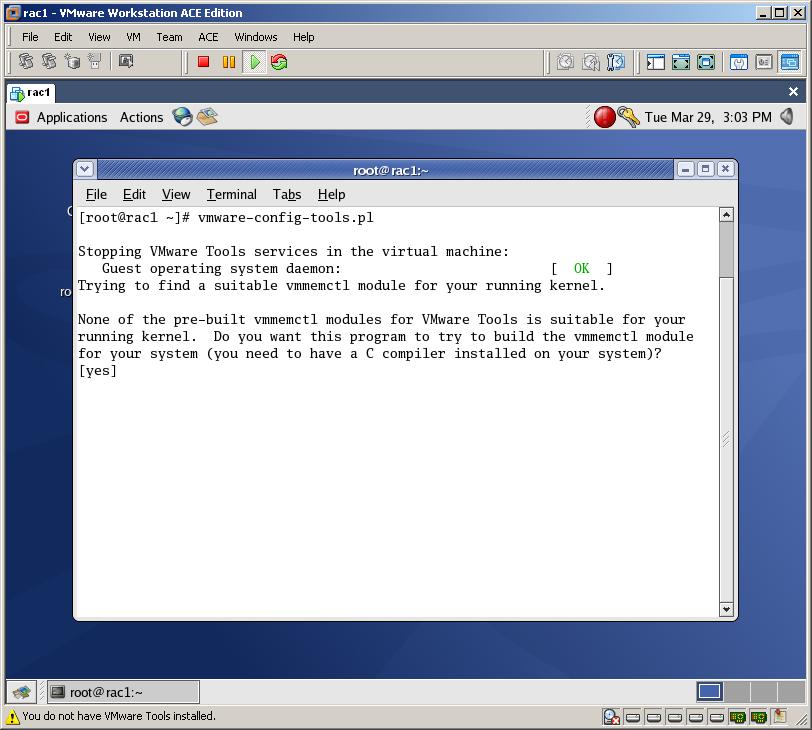
After the window is closed, open new terminal and run vmware-config-tools.pl  and finish the installation of vmware tools
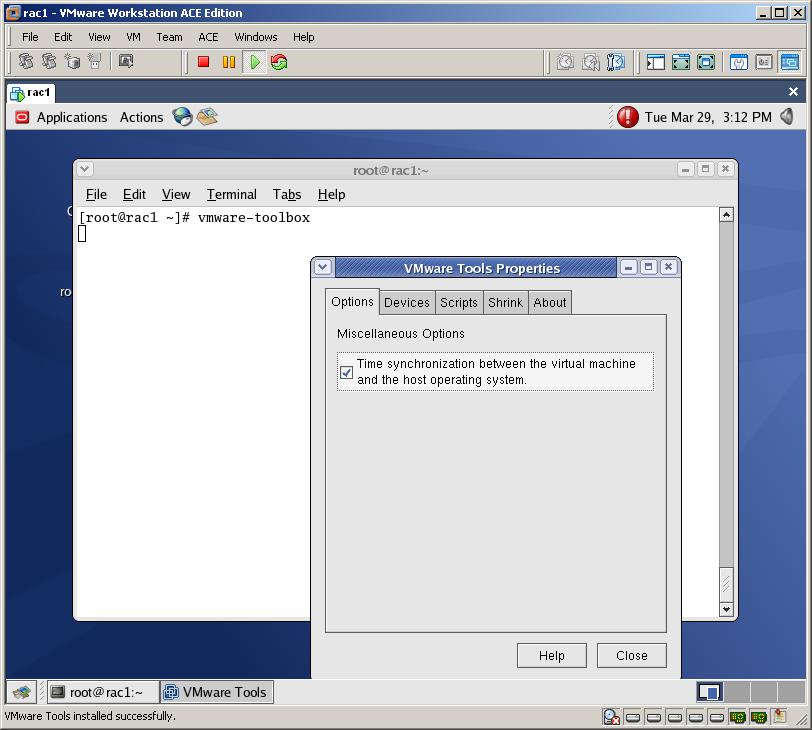
 

To synchronize the time on the virtual machine with the host machine execute “vmware-toolbox” on the terminal window and check the check box
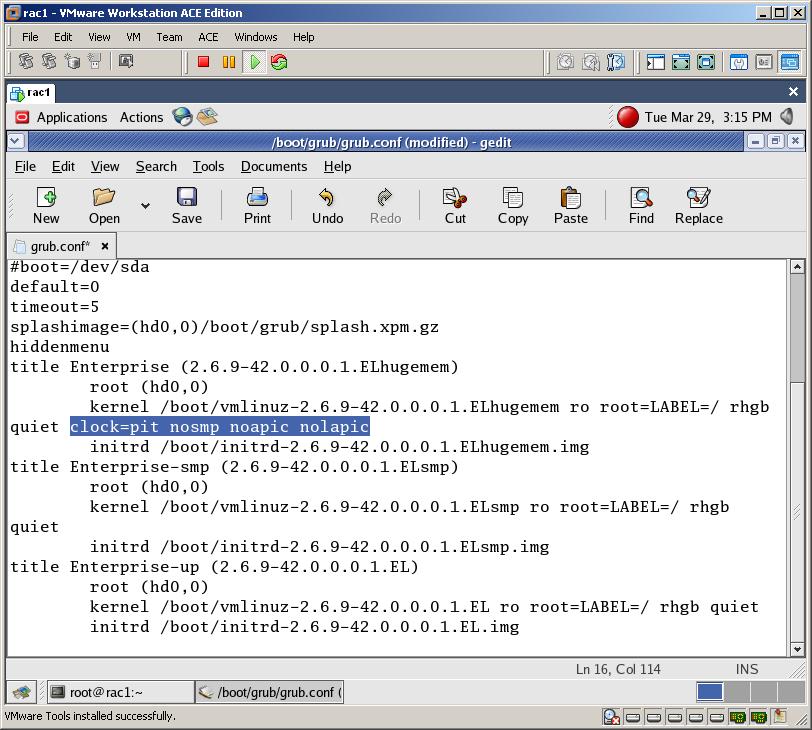
Edit /boot/grub/grub.conf file and add “clock=pit nosmp noapic nolapic” to the line that reads kernel /boot

The “clock=pit” prevents the clock for running to quickly and “nosmp noapic nolapic” prevents the clock from running too slowly. After you make the change, reboot the machine for change to take effect
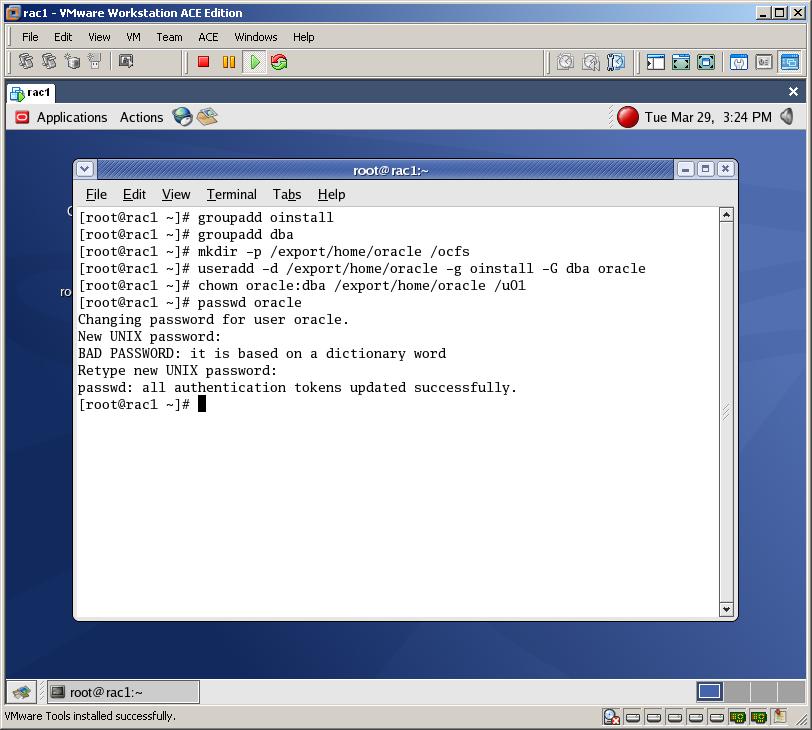
Now let’s start the prerequisite steps for Oracle installation. For this we’ll create a group, a user and some directories

[code]groupadd oinstall

groupadd dba

mkdir -p /export/home/oracle

mkdir /ocfs

useradd -d /export/home/oracle -g oinstall -G dba oracle

chown oracle:dba /export/home/oracle /u01

passwd oracle[/code]
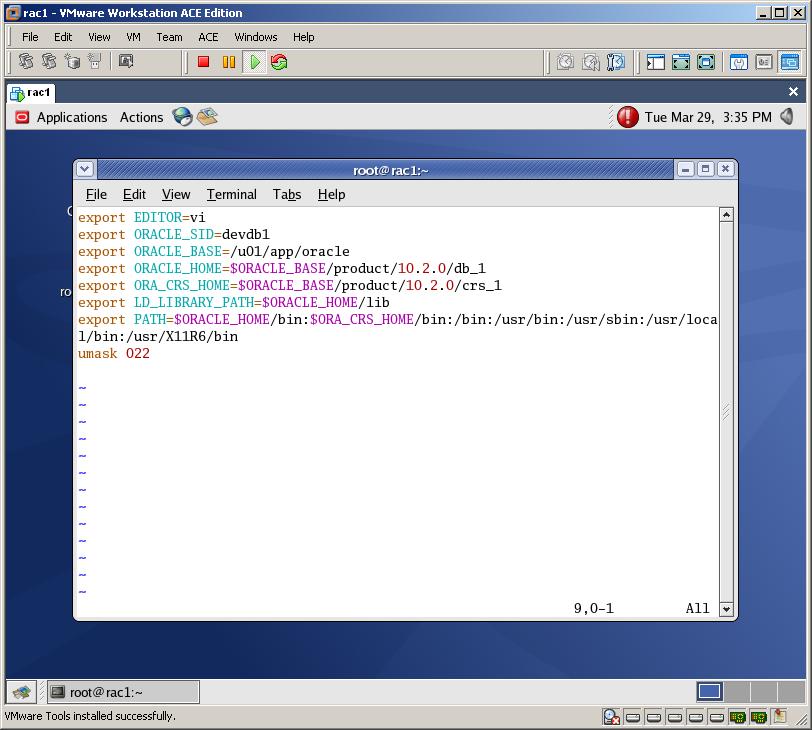
Change the .bash_profile (and .bashrc) file and add the following lines:

[code]export EDITOR=vi

export ORACLE_SID=devdb1

export ORACLE_BASE=/u01/app/oracle

export ORACLE_HOME=$ORACLE_BASE/product/10.2.0/db_1

export ORA_CRS_HOME=$ORACLE_BASE/product/10.2.0/crs_1

export LD_LIBRARY_PATH=$ORACLE_HOME/lib

export PATH=$ORACLE_HOME/bin:$ORA_CRS_HOME/bin:/bin:/usr/bin:/usr/sbin:/usr/local/bin:/usr/X11R6/bin

umask 022[/code]
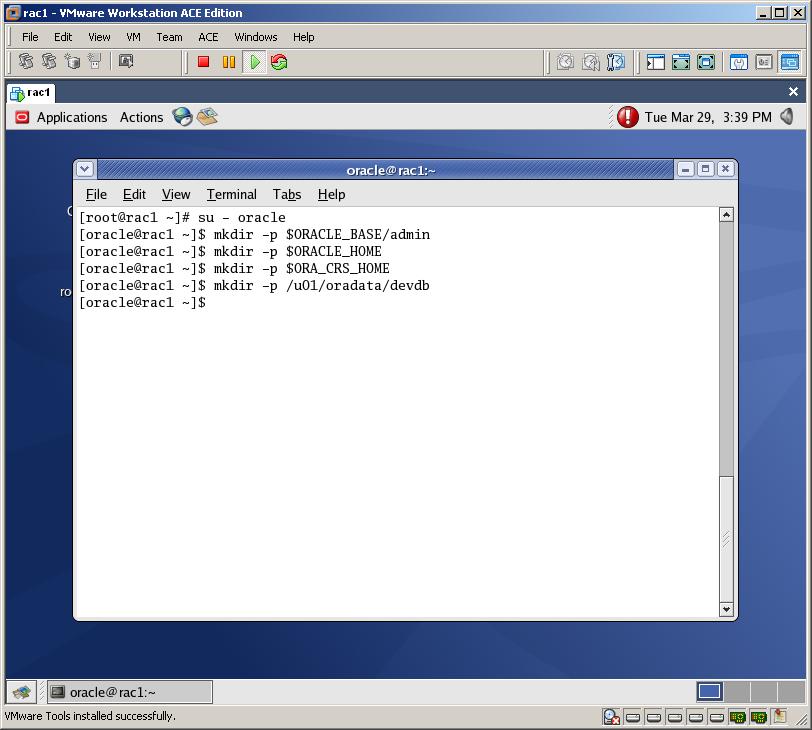
Now switch to oracle user with “su – oracle” command. Make sure all environment variables are set (echo $ORACLE_HOME).  After that, create the following directories:

[code]su – oracle

mkdir -p $ORACLE_BASE/admin

mkdir -p $ORACLE_HOME

mkdir -p $ORA_CRS_HOME

mkdir -p /u01/oradata/devdb[/code]

Note that if environment variables are not set correctly, then the above mentioned directories will not be created.
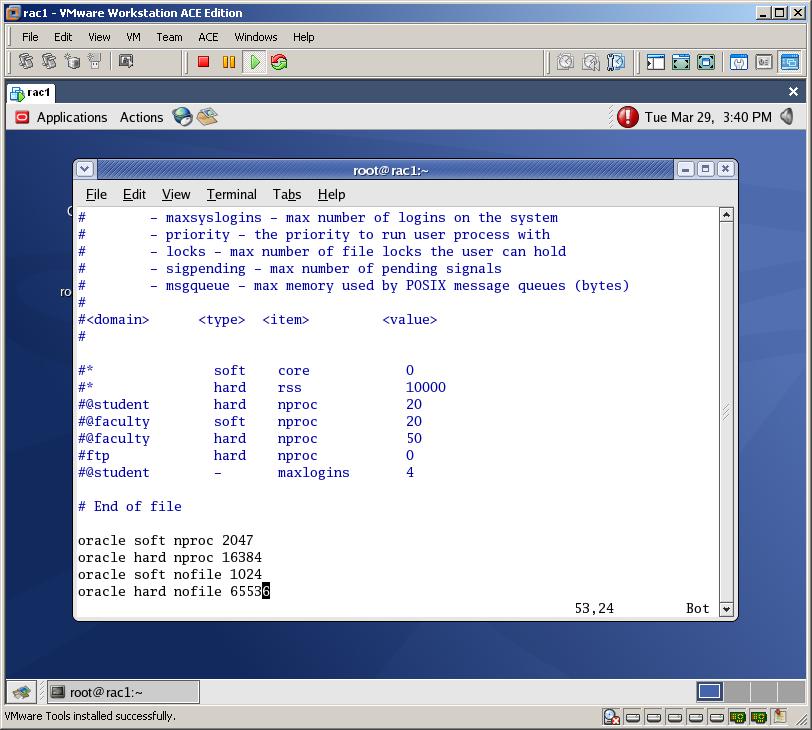
Change /etc/security/limits.conf file with a root user and add following lines:

[code]oracle soft nproc 2047

oracle hard nproc 16384

oracle soft nofile 1024

oracle hard nofile 65536[/code]

Change /etc/pam.d/login file and add the following line:

[code]session required /lib/security/pam_limits.so[/code]
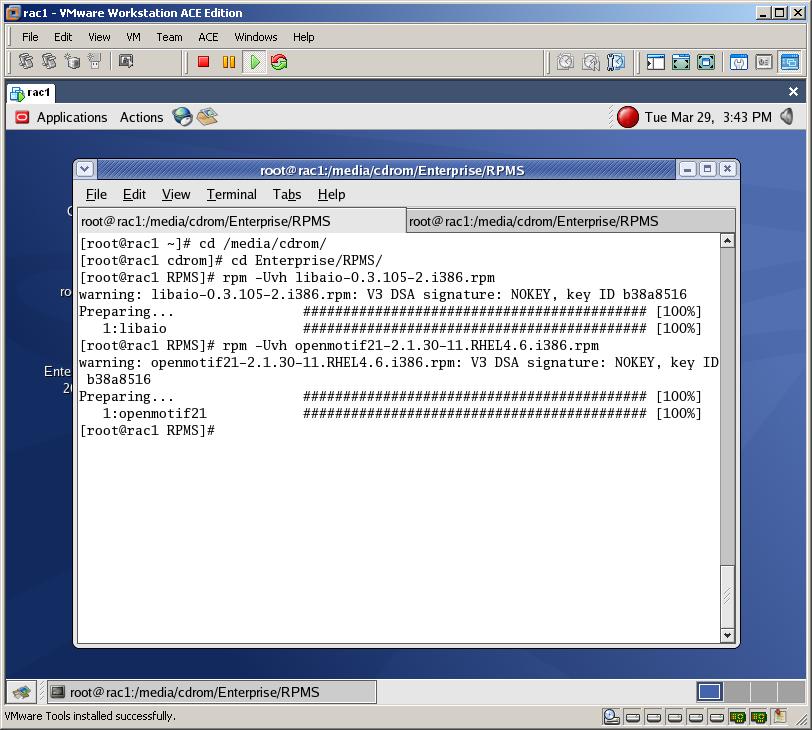
Now mount the third installation cd of the OEL4, connect it and open new terminal. Switch to the RPMS folder inside the cd and install “libaio-0.3.105-2.i386.rpm” and “openmotif21-2.1.30-11.RHEL4.6.i386.rpm” packages

[code]rpm –Uvh libaio-0.3.105-2.i386.rpm

rpm –Uvh openmotif21-2.1.30-11.RHEL4.6.i386.rpm[/code]
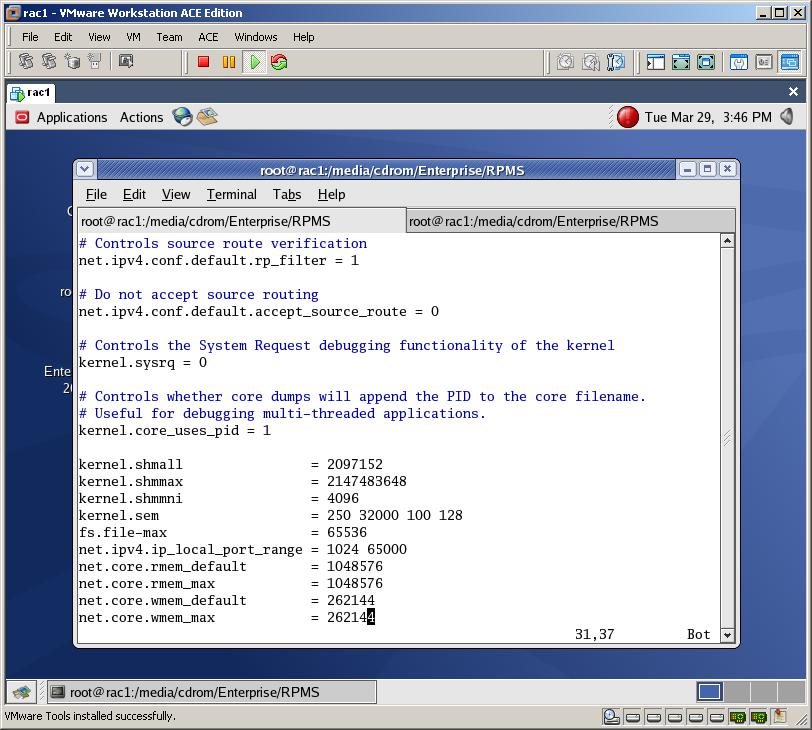
Change /etc/sysctl.conf file and add the following lines:

[code]kernel.shmall                = 2097152

kernel.shmmax                = 2147483648

kernel.shmmni                = 4096

kernel.sem                   = 250 32000 100 128

fs.file-max                  = 65536

net.ipv4.ip_local_port_range = 1024 65000

net.core.rmem_default        = 1048576

net.core.rmem_max            = 1048576

net.core.wmem_default        = 262144

net.core.wmem_max            = 262144[/code]

Then execute the following command for change to take effect:

/sbin/sysctl -p
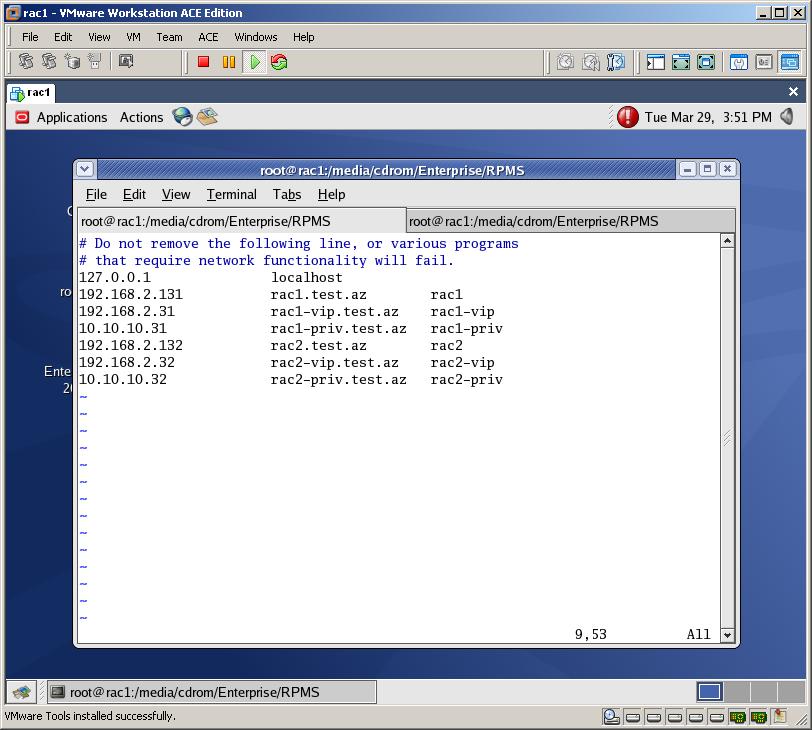
Now let’s configure the network configuration files. For this we need to add IP addresses and hostnames to the /etc/hosts file in each node and test the connection by pinging the hostnames

[code]127.0.0.1               localhost

192.168.2.131           rac1.test.az        rac1

192.168.2.31            rac1-vip.test.az    rac1-vip

10.10.10.31             rac1-priv.test.az   rac1-priv

192.168.2.132           rac2.test.az        rac2

192.168.2.32            rac2-vip.test.az    rac2-vip

10.10.10.32             rac2-priv.test.az   rac2-priv[/code]

Try the connection by pinging all hostnames (don’t ping VIP addresses as they will be created during clusterware installation):

ping rac1.test.az

ping rac1-priv.test.az

and son on
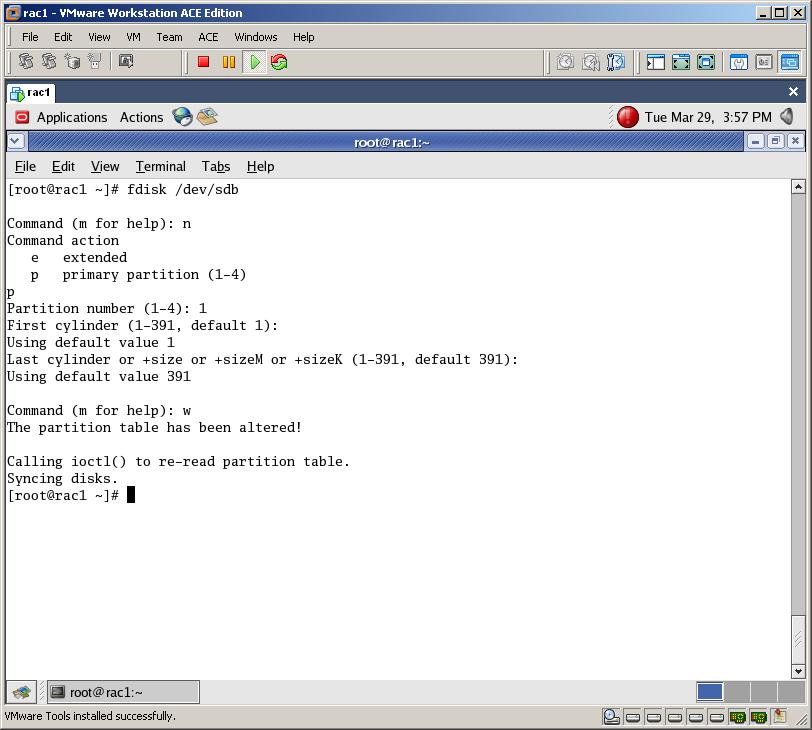
Now start creating disk partitions for OCFS2 and ASM. /dev/sdb will be used for OCFS2 and rest devices will be used for ASM.

fdisk /dev/sdb

Type n (to create new partition)

Type p to create a primary partition

Type 1 to provide the partition number

Double click on Enter and type “w” to save the changes

Perform above steps for all hard disk:

fdisk /dev/sdc

fdisk /dev/sdd

fdisk /dev/sde
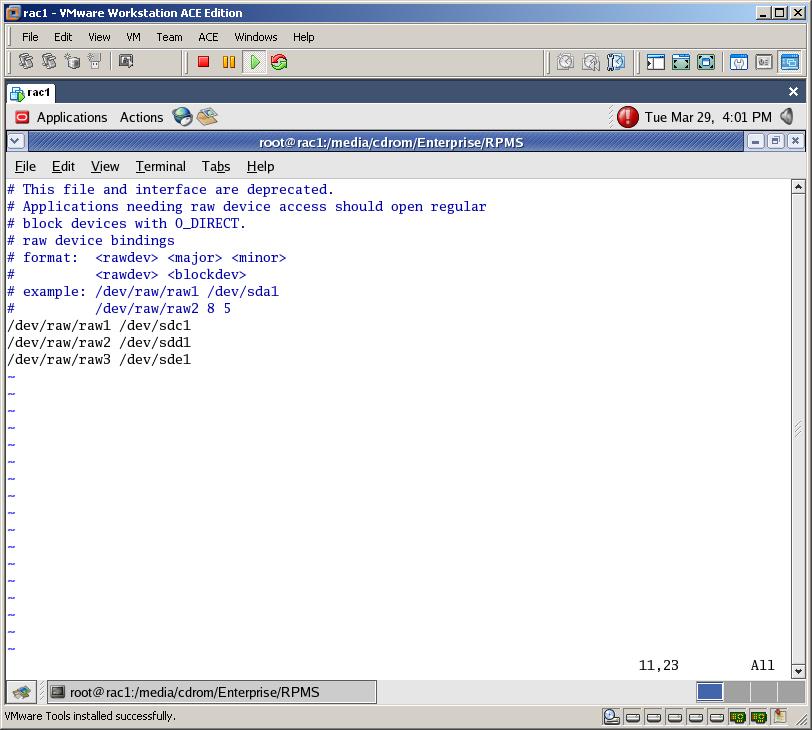
To map the raw devices to the shared partitions, change /etc/sysconfig/rawdevices file:

[code]/dev/raw/raw1 /dev/sdc1

/dev/raw/raw2 /dev/sdd1

/dev/raw/raw3 /dev/sde1[/code]

And run the following command to make it effective

/sbin/service rawdevices restart

Then change the permission for all newly created raw devices:

[code]chown oracle:dba /dev/raw/raw[1-3]

chmod 660 /dev/raw/raw[1-3]

ls -lat /dev/raw/raw*[/code]

Next, switch to the oracle user and create links for raw devices

[code]su – oracle

ln -sf /dev/raw/raw1 /u01/oradata/devdb/asmdisk1

ln -sf /dev/raw/raw2 /u01/oradata/devdb/asmdisk2

ln -sf /dev/raw/raw3 /u01/oradata/devdb/asmdisk3[/code]
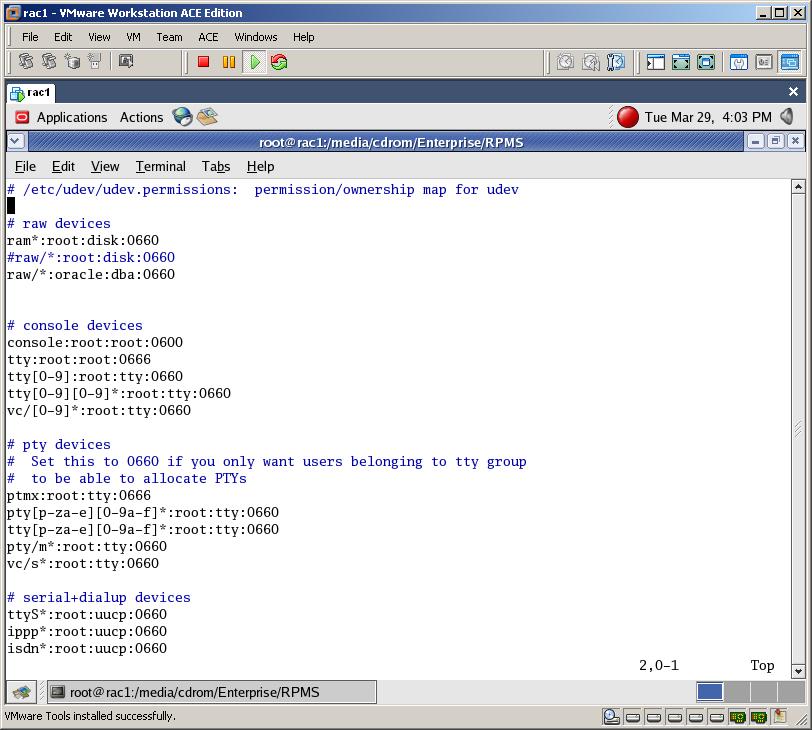
As the raw devices are remapped on boot, change /etc/udev/permissions.d/50-udev.permissions with the root user and add the following lines:

[code]# raw devices

ram*:root:disk:0660

#raw/*:root:disk:0660

raw/*:oracle:dba:0660[/code]

After performing all above steps, shutdown the virtual machine. Then copy all its files to another directory (c:\vmware\rac2)
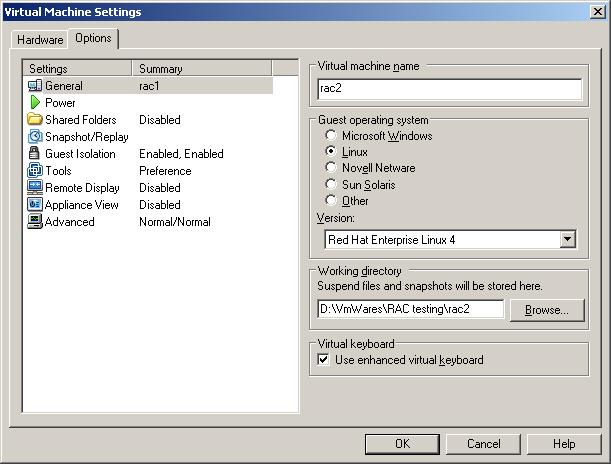
Open it, switch to the Options tab, change its name to “rac2” and start it
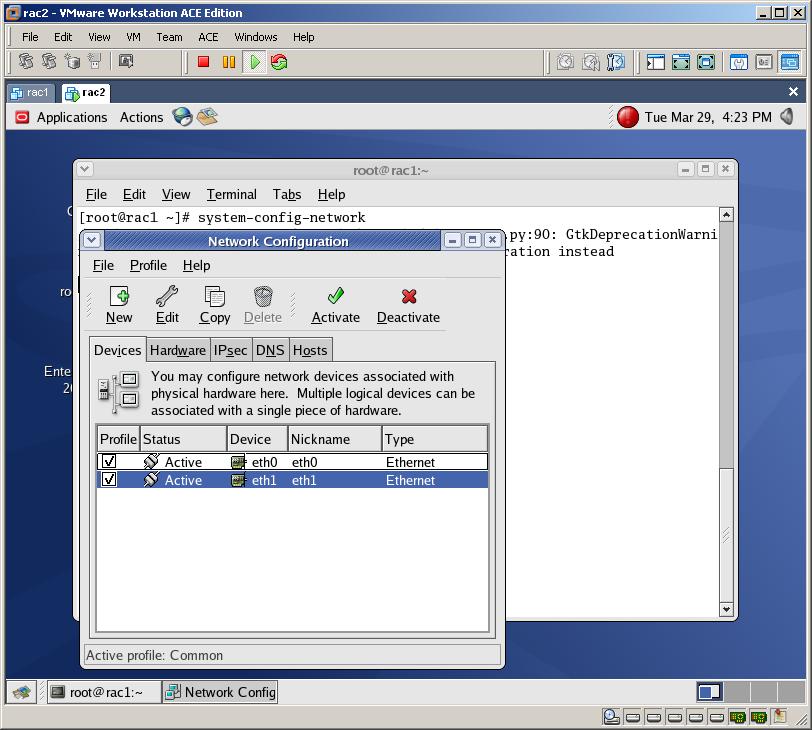
Open Network Configuration and change addresses of each Ethernet device.

eth0 – 192.168.2.132

eth1 – 10.10.10.32

Then from Hardware Device type click on “Probe” button to get new MAC address, enable both network devices, change hostname to rac2.test.az and click Ctrl+S to save the changes. Then add the following line to the /etc/hosts file

127.0.0.1              localhost
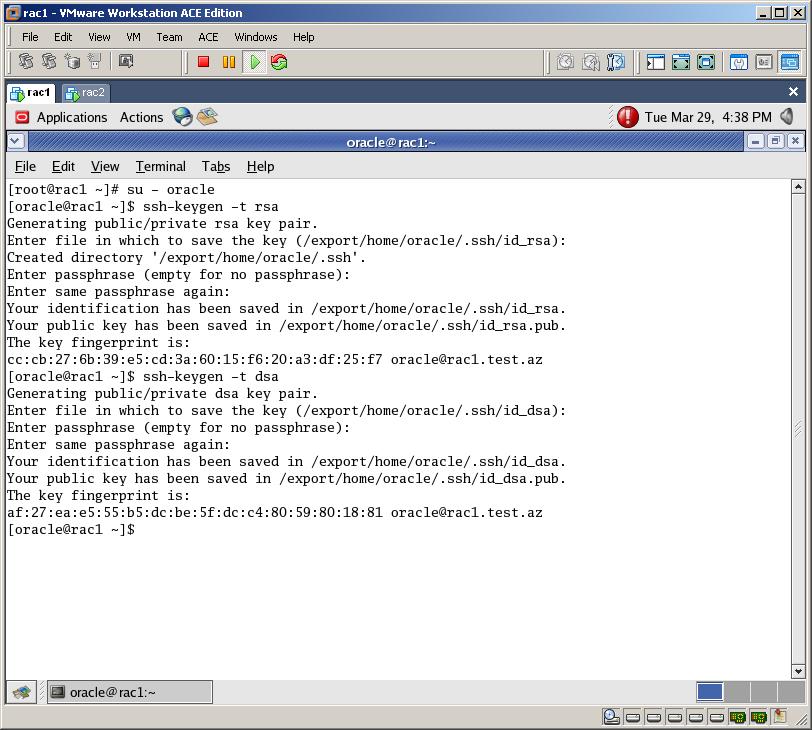
Now it’s time to establish user equivalence with SSH. Oracle Universal Installer installs the binaries in one node and then propagates the files to the other nodes. For this, it uses ssh and scp command in the background during installation to run remote commands and copy files to the other cluster nodes. So SSH must be configured so that these commands not prompt for a password. For this power on the first machine, login with root user, switch to the oracle user and generate RSA and DSA key pairs

su – oracle

ssh-keygen –t rsa (click Enter twice)

ssh-keygen –t dsa (click Enter twice)

Perform above steps in the second node (rac2)
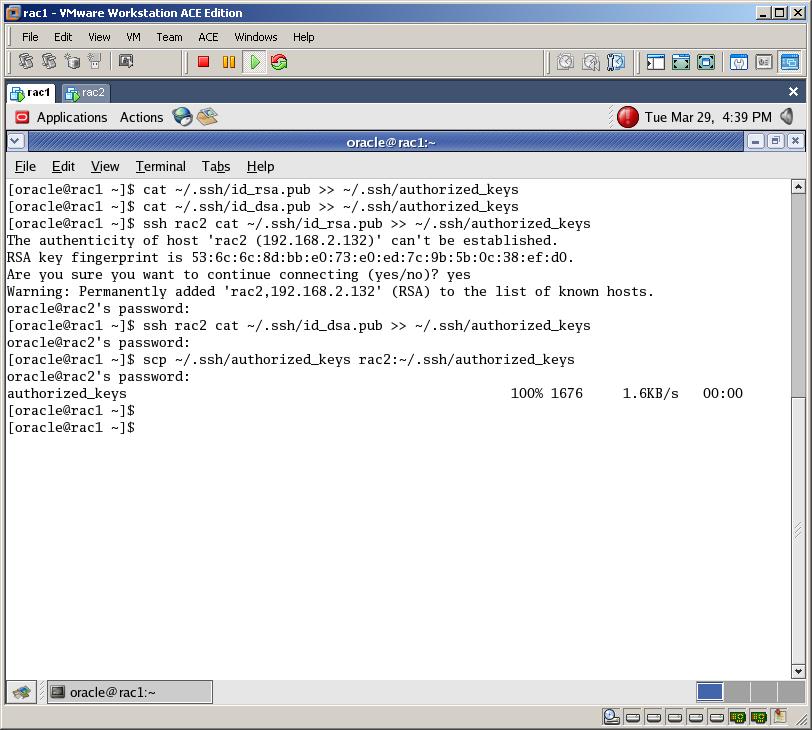
Now (from rac1) add the generated keys to the ~/.ssh/authorized_keys file

[code]cat ~/.ssh/id_rsa.pub &amp;gt;&amp;gt; ~/.ssh/authorized_keys

cat ~/.ssh/id_dsa.pub &amp;gt;&amp;gt; ~/.ssh/authorized_keys[/code]

Then from rac1 SSH to rac2 twice and add the .rsa and .dsa keys to the “authorized_keys” file that locates in the first node:

[code]ssh rac2 cat ~/.ssh/id_rsa.pub &amp;gt;&amp;gt; ~/.ssh/authorized_keys

ssh rac2 cat ~/.ssh/id_dsa.pub &amp;gt;&amp;gt; ~/.ssh/authorized_keys[/code]

Now copy the “authorized_keys” file from rac1 to rac2:

[code]scp ~/.ssh/authorized_keys rac2:~/.ssh/authorized_keys[/code]

After performing all above steps, you should successfully open SSH connection from rac1 to rac2 and vice verse. So run the following commands in both nodes and ensure that you’re not prompted for the password for the second time:

[code]ssh rac1 date

ssh rac2 date

ssh rac1-priv date

ssh rac2-priv date

ssh rac1.test.az date

ssh rac2.test.az date

ssh rac1-priv.test.az date

ssh rac2-priv.test.az date[/code]

I want to note again “Please make sure that after running above commands on each node, you’re not prompted for the password for the second time”

Now let’s configure Oracle ASM (Automatic Storage Management). So run the following commands from both nodes with root user:

/etc/init.d/oracleasm configure

Pass “oracle” as a parameter for “default user”

Pass “dba” as a parameter for “default group”

Pass “y” for the third and fourth parameters

Then create ASM disks on any node (try on the first node – rac1) with a root user:

/etc/init.d/oracleasm createdisk VOL1 /dev/sdc1

Marking disk “/dev/sdc1” as an ASM disk:                   [  OK  ]

/etc/init.d/oracleasm createdisk VOL2 /dev/sdd1

Marking disk “/dev/sdd1” as an ASM disk:                   [  OK  ]

/etc/init.d/oracleasm createdisk VOL3 /dev/sde1

Marking disk “/dev/sde1” as an ASM disk:                   [  OK  ]

Verify that the ASM disks are visible from every node.

/etc/init.d/oracleasm scandisks

Scanning system for ASM disks:                      [  OK  ]

/etc/init.d/oracleasm listdisks

VOL1

VOL2

VOL3
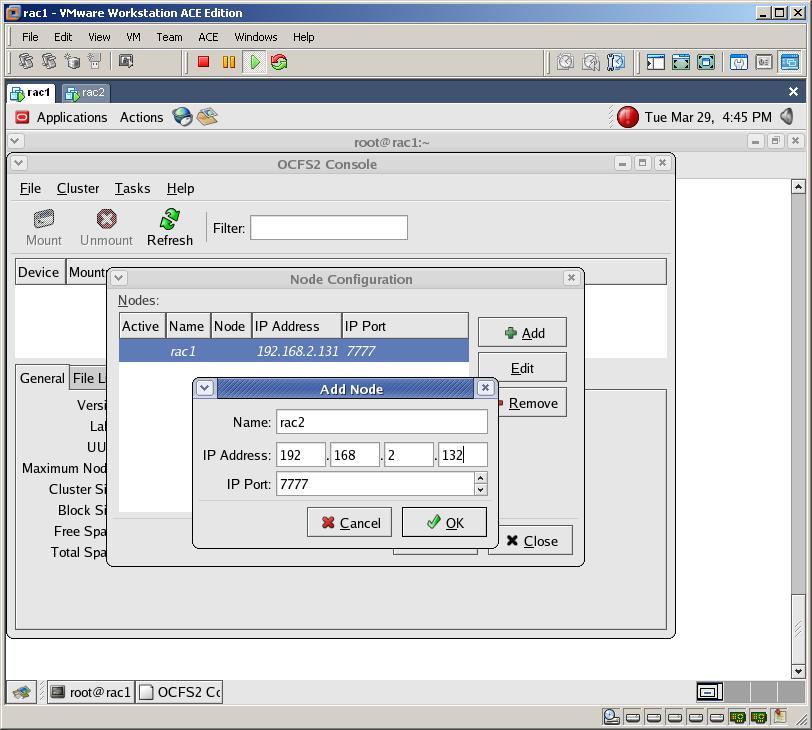
Now let’s configure Oracle Cluster File System (OCFS2). For this, run “ocfs2console” with a root user from the first node. Then from the Cluster menu select Configure Nodes, click Add button and apply both nodes:

rac1

192.168.2.131

7777

rac2

192.168.2.132

7777
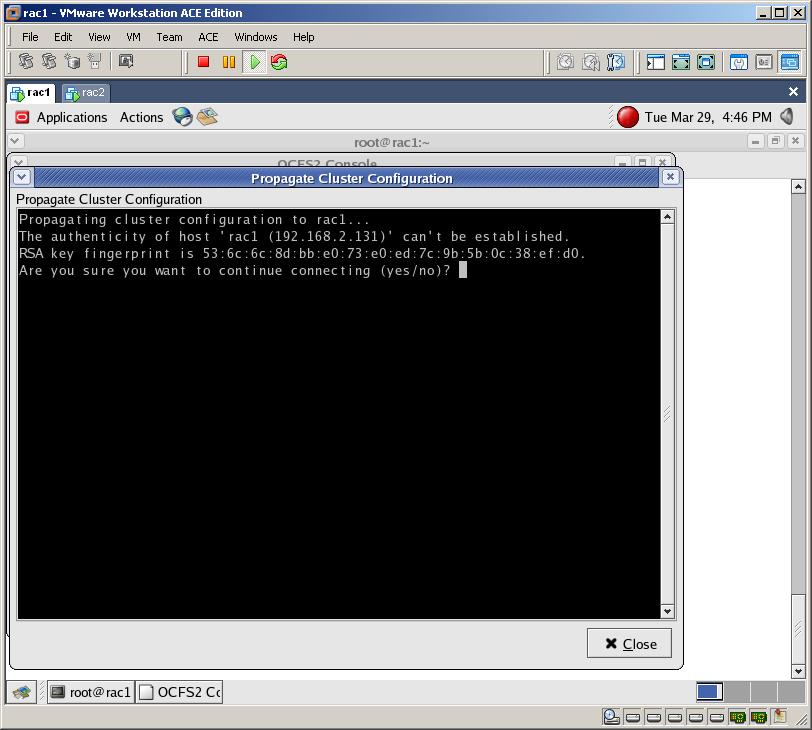
Then propagate the configuration to the second node. For this select “Propagate Configuration” from the Cluster menu.
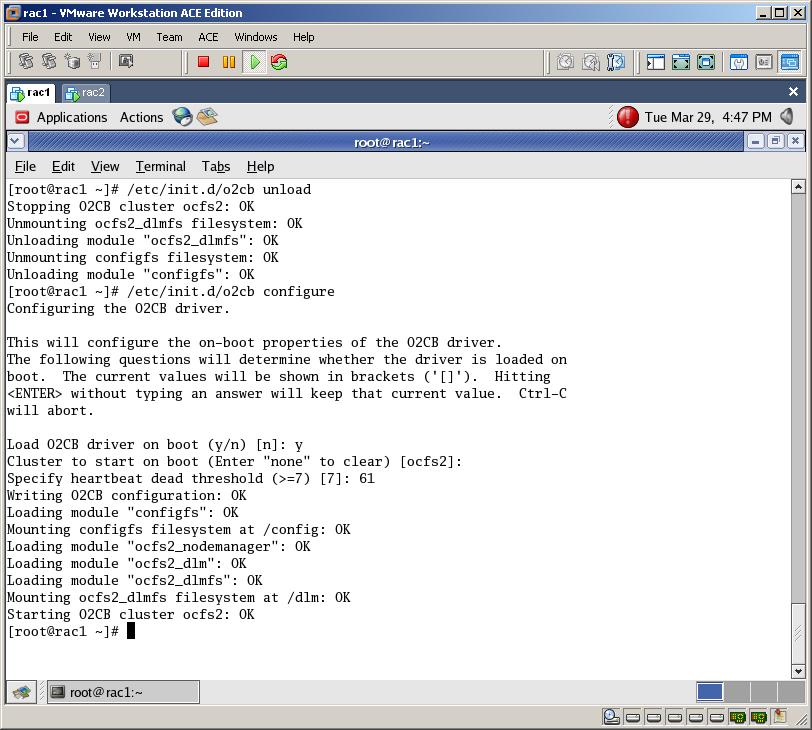
To configure O2CB to start at the boot unload and configure it on both nodes as a root user:

/etc/init.d/o2cb unload

/etc/init.d/o2cb configure

and pass the following parameters

“y”

ocfs2

61
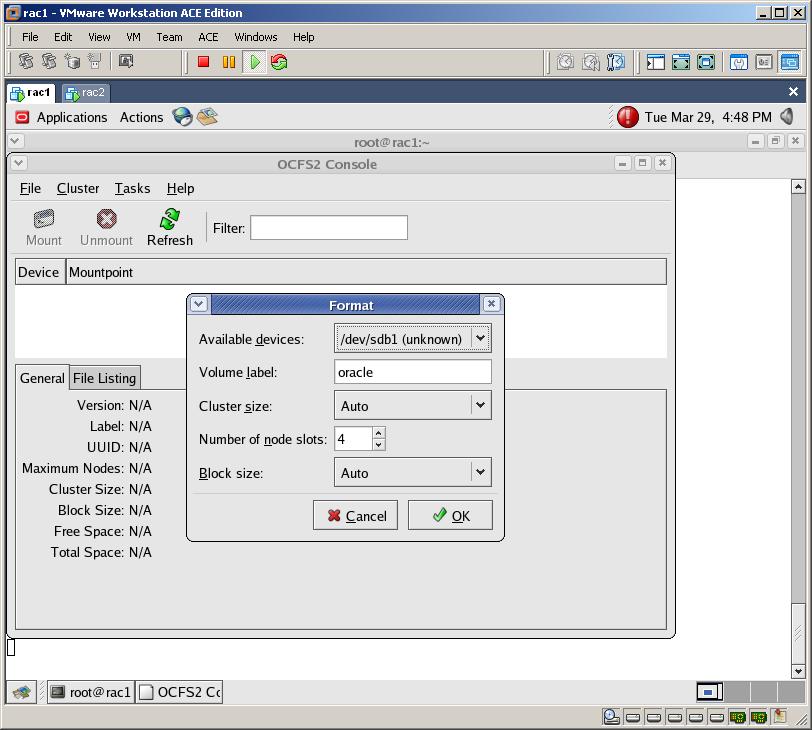
Now format the file system on the first node (rac1). For this run ocfs2console program, select Format from the Tasks menu and click OK to format the drive. Press Ctrl+Q to quit
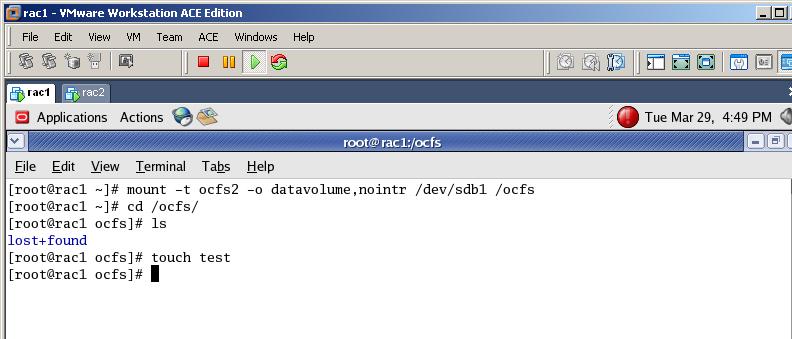
Now execute the following command on both nodes to mount the files system

mount -t ocfs2 -o datavolume,nointr /dev/sdb1 /ocfs

and add the following line to the /etc/fstab to mount the files system on boot

/dev/sdb1 /ocfs ocfs2 _netdev,datavolume,nointr 0 0
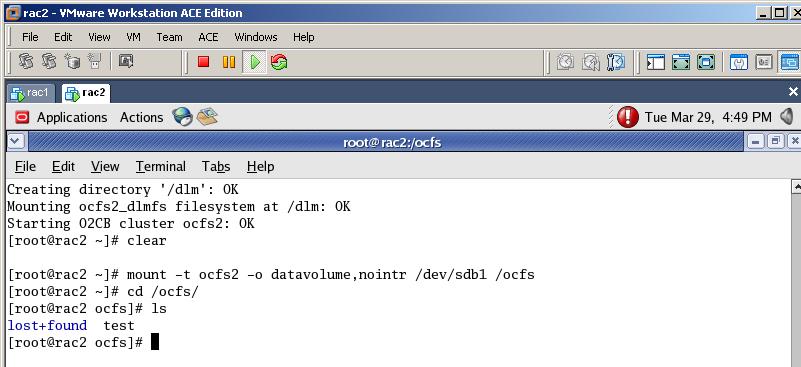
Create a “clusterware” directory under /ocfs folder and change the owner:

[code]mkdir /ocfs/clusterware

chown -R oracle:dba /ocfs[/code]

Now to test the shared device, create a file in the /ocfs directory from the first node (rac1) and check the same folder in the second node.

cd /ocfs

touch test_file

ls

Now download the clusterware installation, copy it under /tmp directory, unzip it and start the installation

./runInstaller

Provide the folder for the Inventory and click Next
Create a “clusterware” directory under /ocfs folder and change the owner:

[code]mkdir /ocfs/clusterware&amp;lt;/span&amp;gt;&amp;lt;/p&amp;gt;
&amp;lt;p class=&quot;MsoNormal&quot; style=&quot;margin: 0 0 10pt;&quot;&amp;gt;&amp;lt;span style=&quot;font-family: Calibri; font-size: small;&quot;&amp;gt;chown -R oracle:dba /ocfs[/code]


Now to test the shared device, create a file in the /ocfs directory from the first node (rac1) and check the same folder in the second node.

cd /ocfs

touch test_file

ls

Now download the clusterware installation, copy it under /tmp directory, unzip it and start the installation

./runInstaller


Provide the folder for the Inventory and click Next

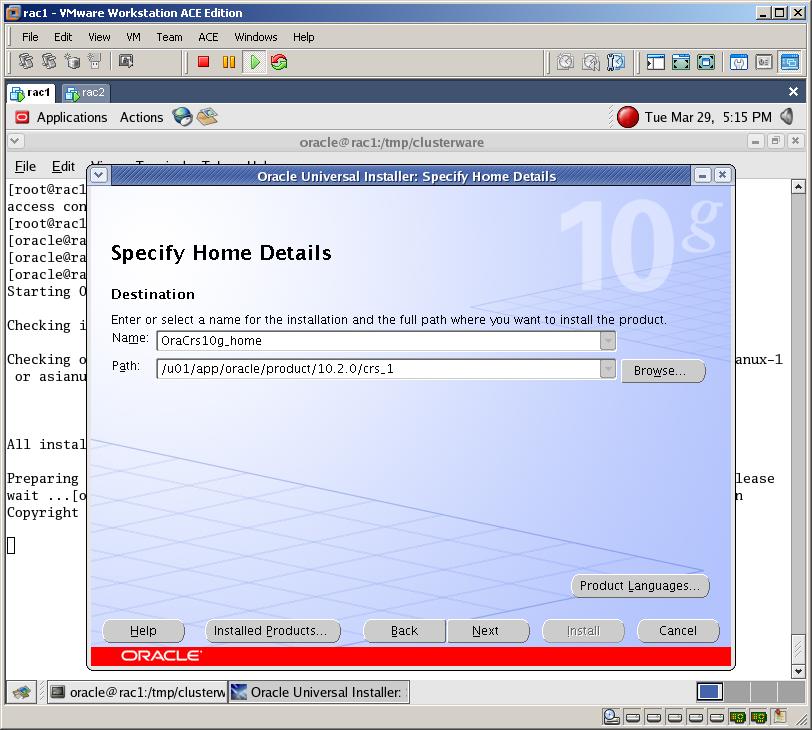
Change the CRS folder to /u01/app/oracle/product/10.2.0/crs_1 and click Next
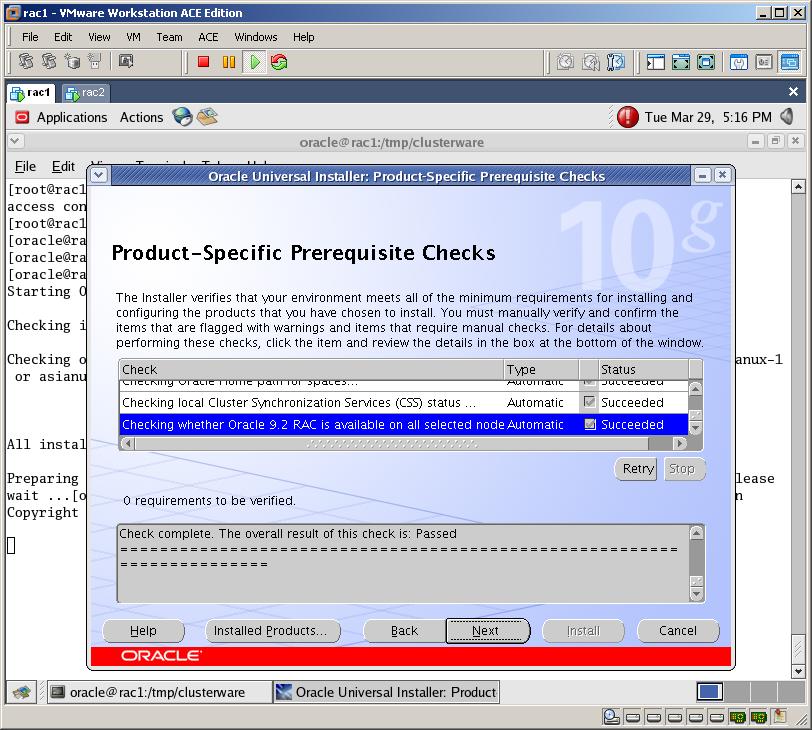
After checking all prerequisites it should not give any warning, so click Next

Click on Add button and provide the information on the second node:

Public Node Name: rac2.test.az

Private Node Name: rac2-priv.test.az

Virtual Host Name : rac2-vip.test.az
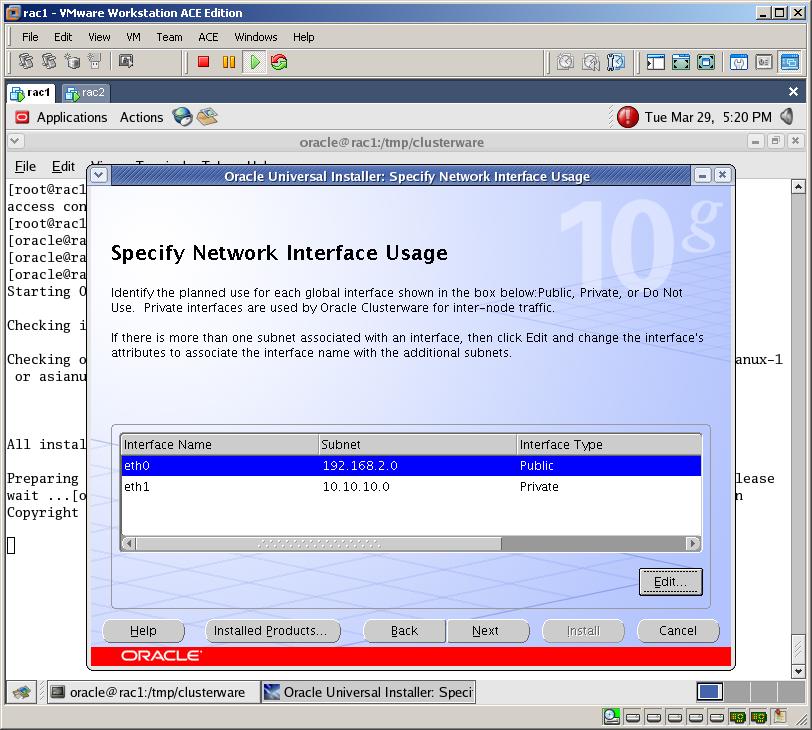
Click on Edit button, change the Interface type of the first Ethernet device (eth0) to “Public” and the second to “Private”
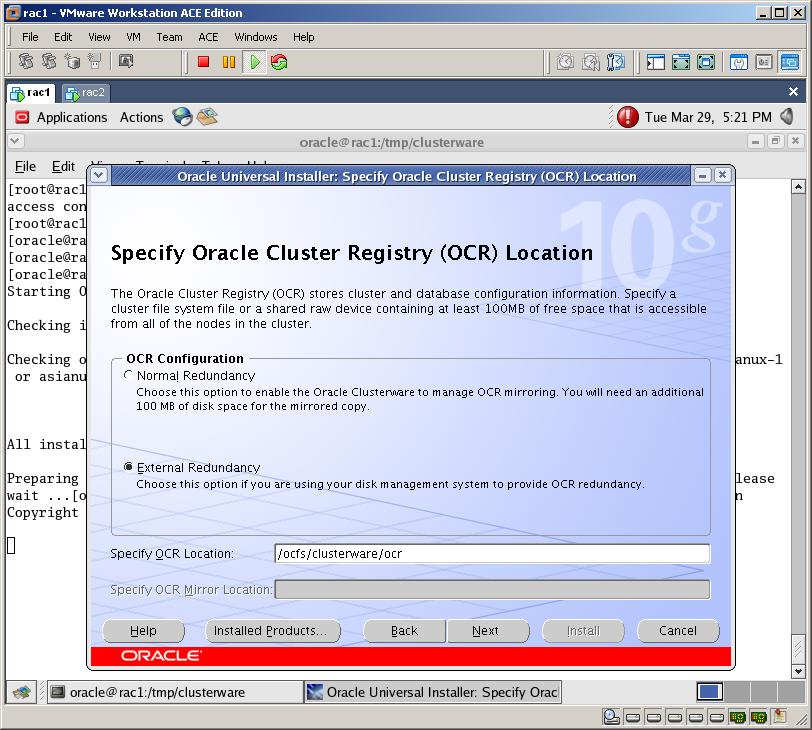
Select External Redundancy and provide the location for OCR :

/ocfs/clusterware/ocr
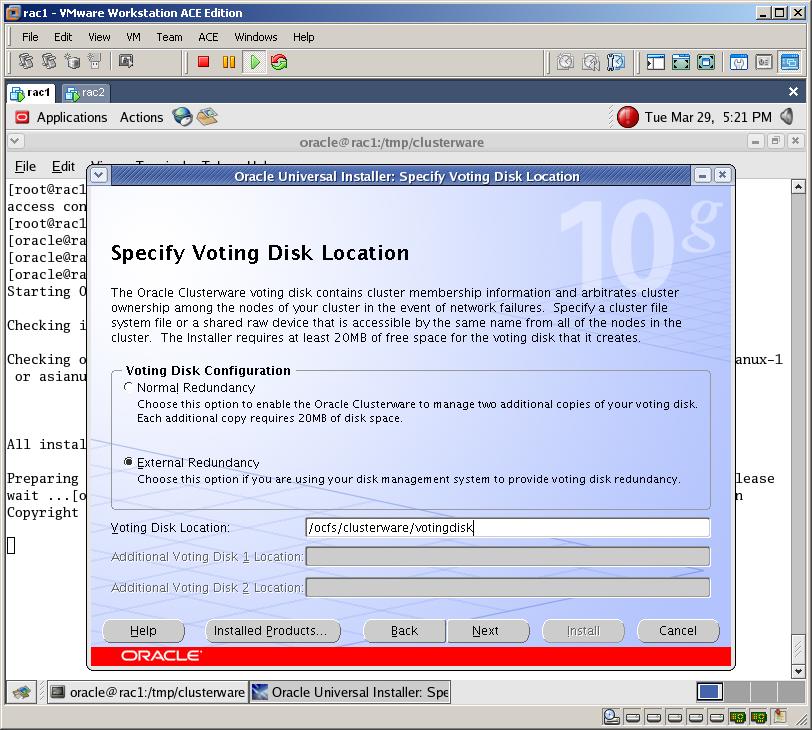
 

Select External Redundancy and provide the location for Voting Disk

/ocfs/clusterware/votingdisk
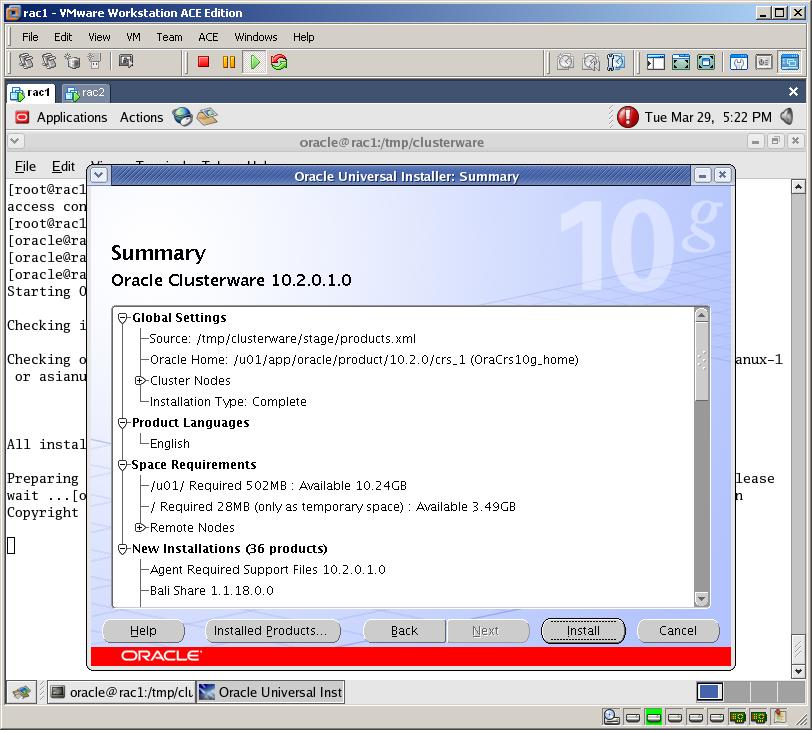
Now click Install button to start the clusterware installation
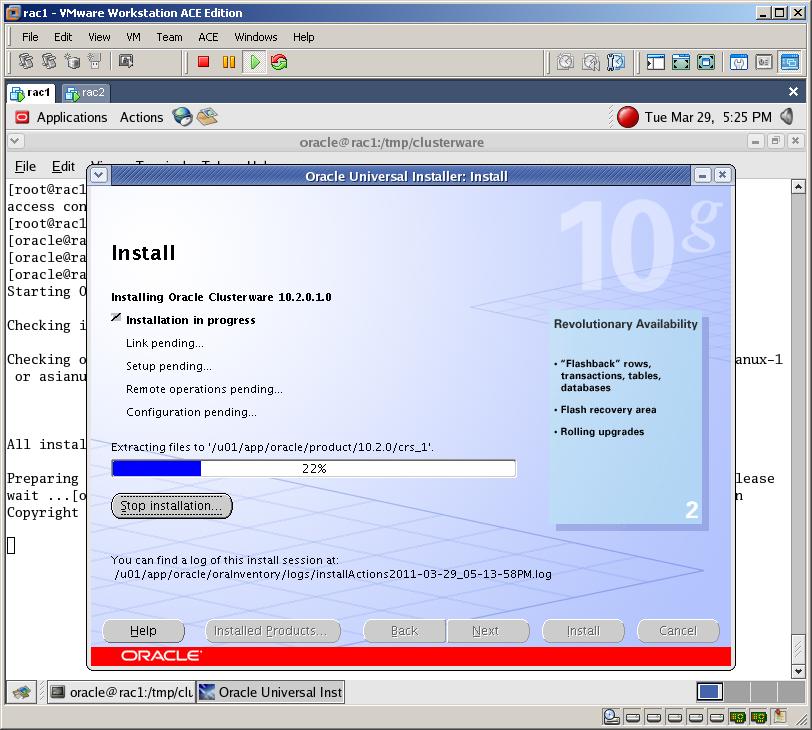
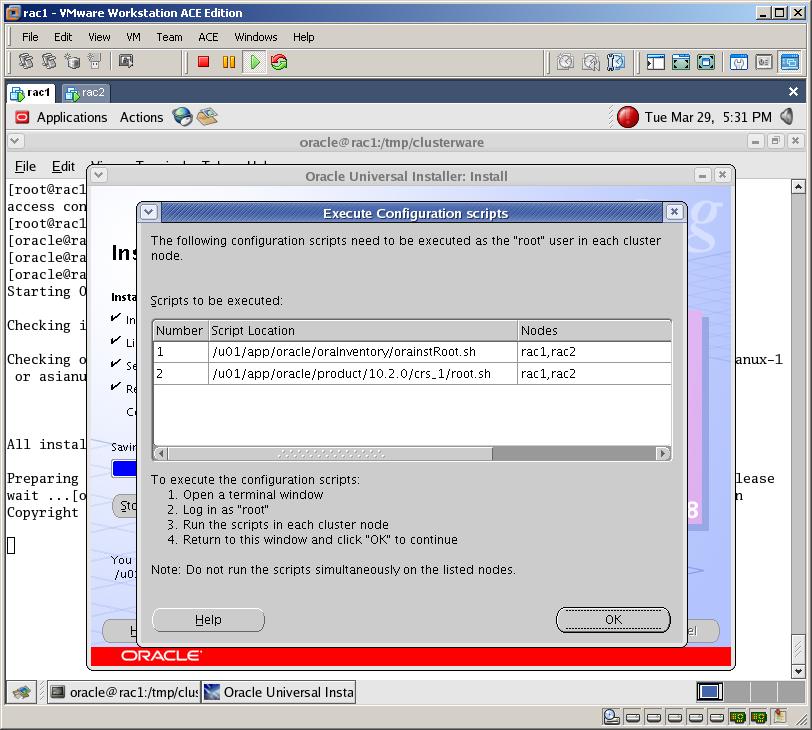
After installation completes, run both scripts on both nodes

Run /u01/app/oracle/oraInventory/orainstRoot.sh on rac1 and rac2 (wait each script to complete before running it on the second node)

Run /u01/app/oracle/product/10.2.0/crs_1/root.sh on rac1 and rac2 (wait each script to complete before running it on the second node)
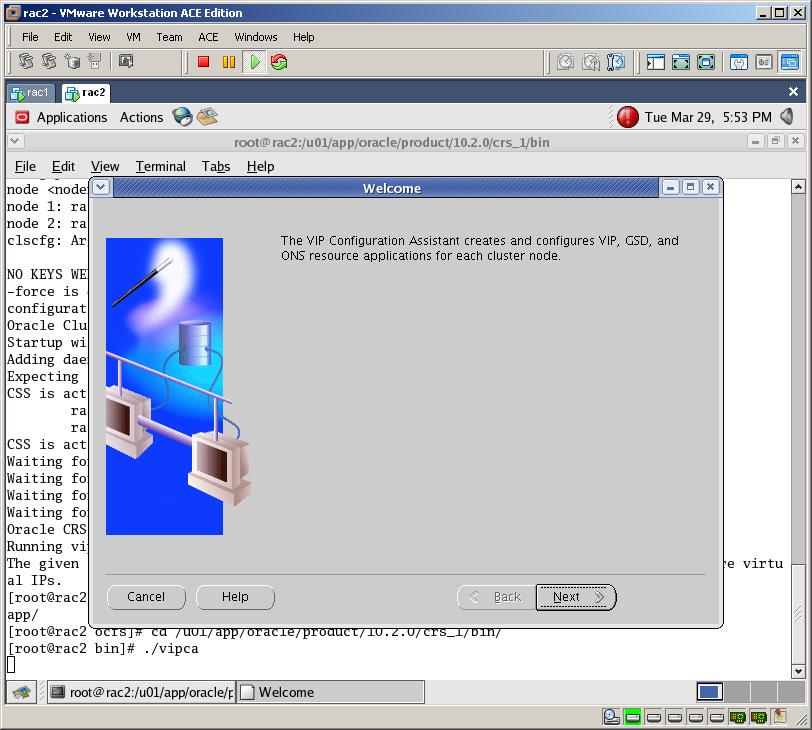
After running the second script on the second node (rac2) you’ll get an error (on running VIPCA), so you need to run it manually. Switch to the following directory

cd /u01/app/oracle/product/10.2.0/crs_1/bin

and run the ./vipca to create and configure VIP

Select the first Ethernet device and Click Next
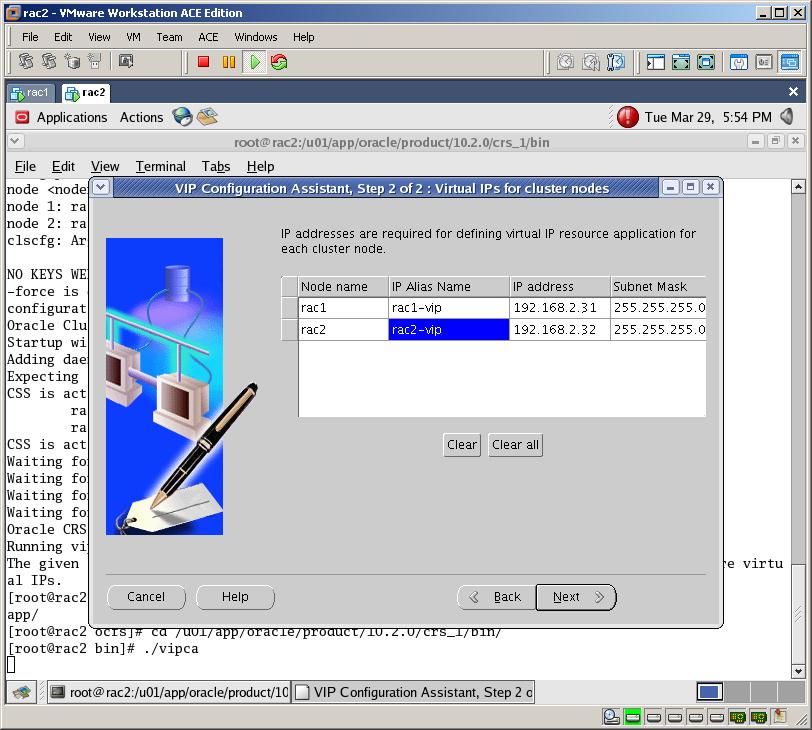


Type “rac1-vip” on the IP Alias Name for the first node (rac1). The rest boxes will be filled automatically. Click Next
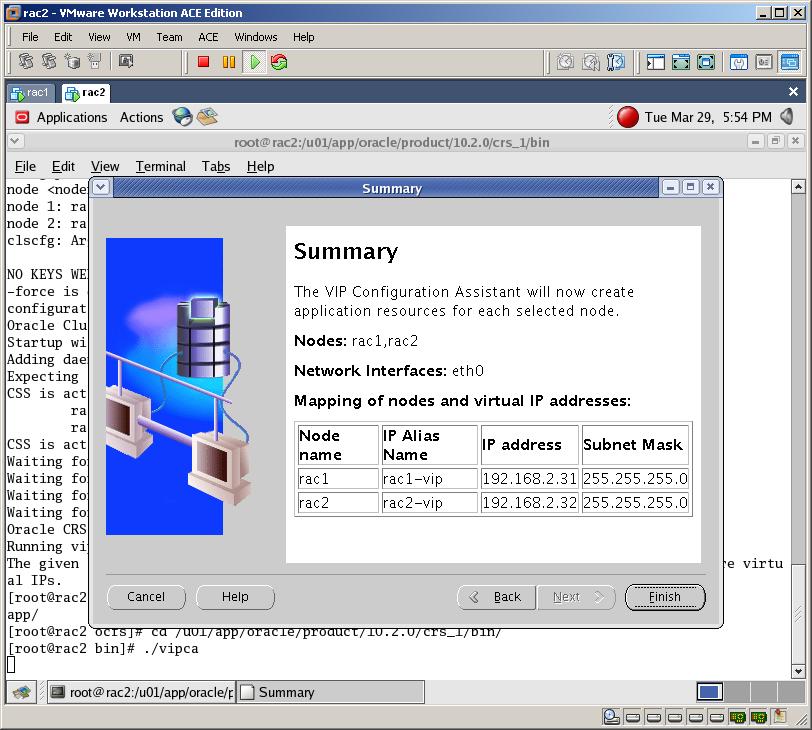
Click Finish to start the installation

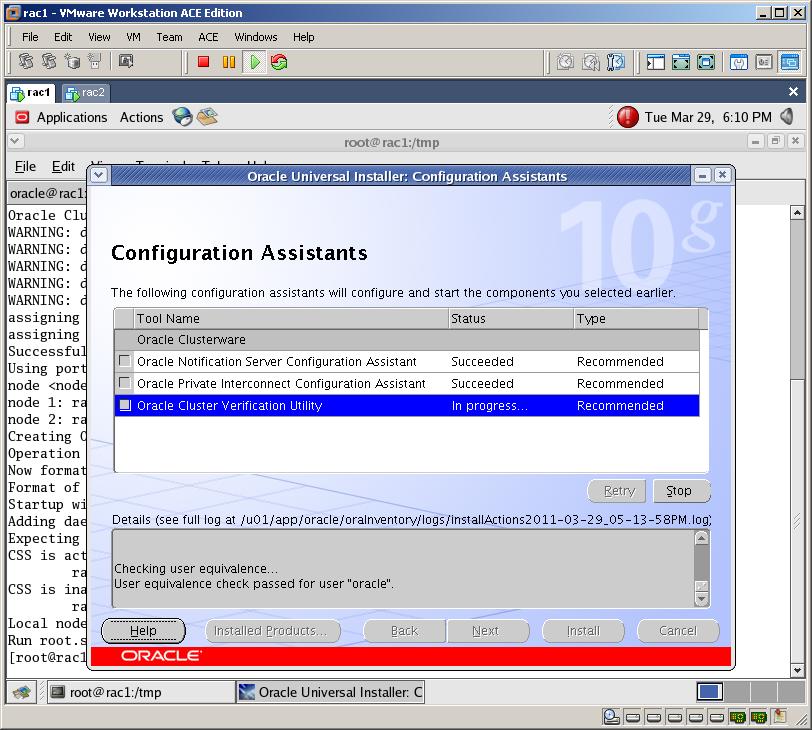
After vipca finished successfully, switch to the first node and click OK button on the “script running” window.
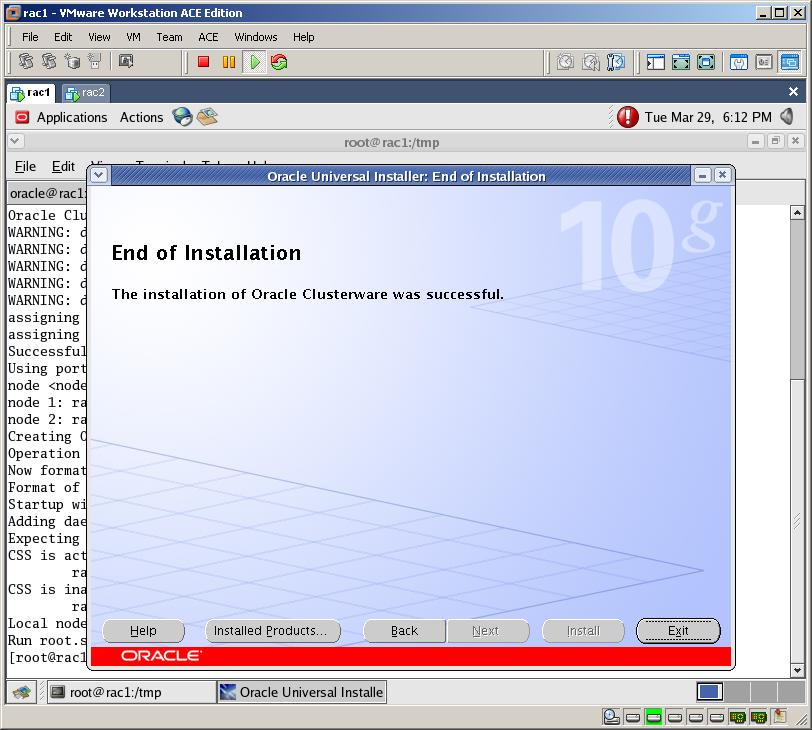
Click Exit button to exit the installation of an Oracle Clusterware
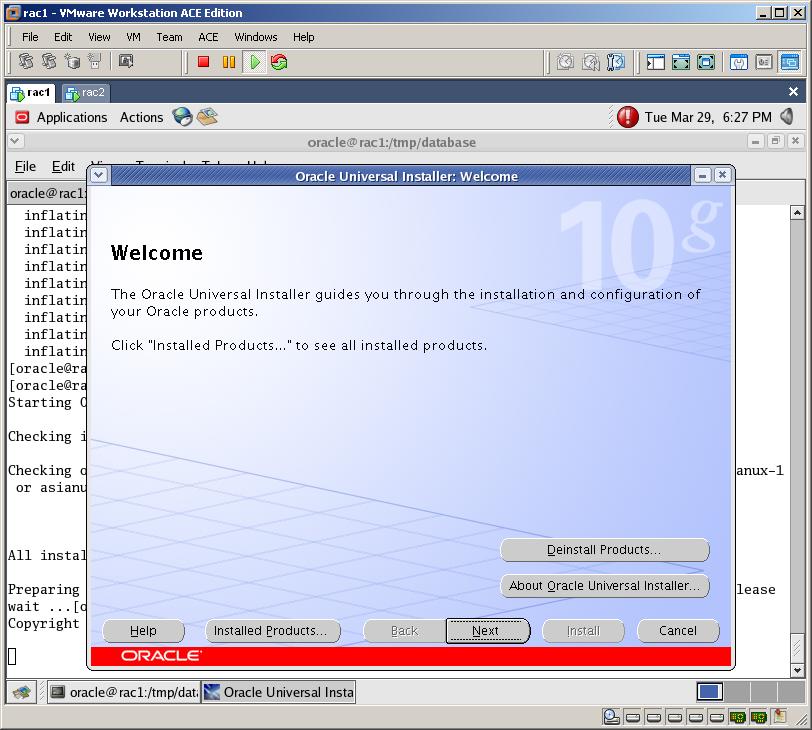
Now copy the installation of the database (Oracle 10gR2) to the /tmp directory, unzip and start the installation. You need to start the installation with an oracle user, so run “xhost +” from the root user to allow the connection to the X server and switch to the oracle user

xhost +

su – oracle

./runInstaller
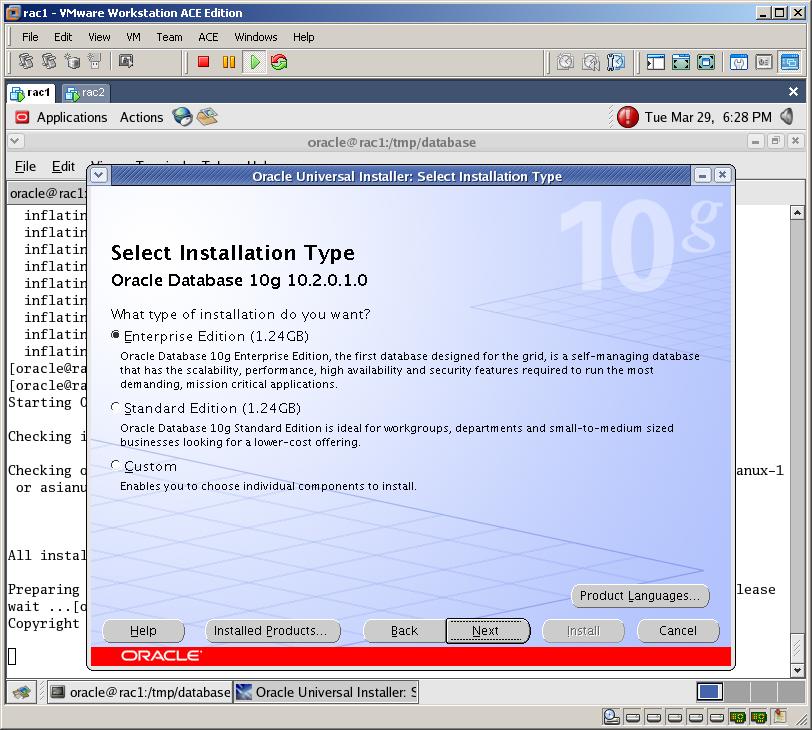
Select “Enterprise Edition” and click Next
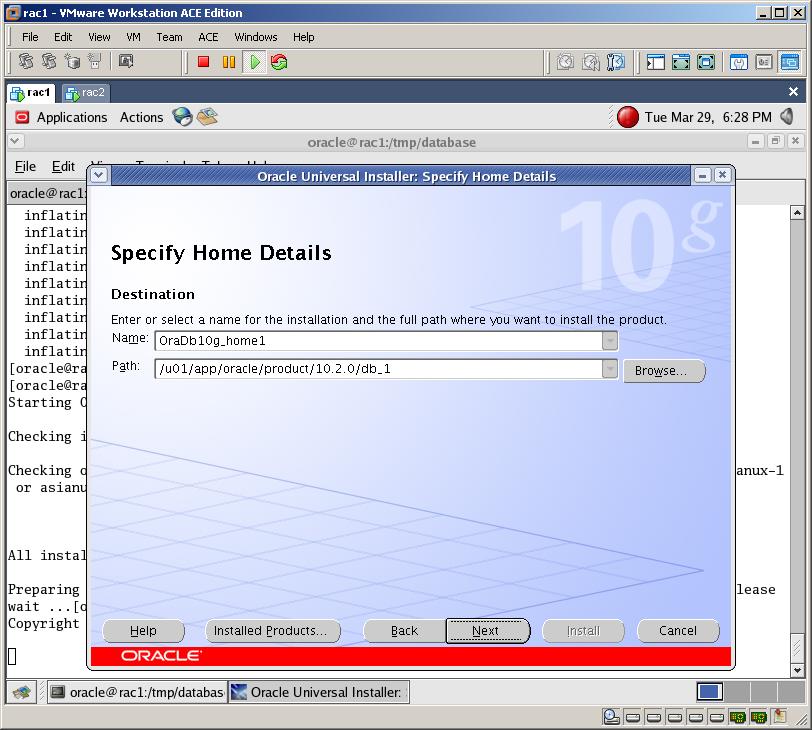
Provide the installation directory (/u01/app/oracle/product/10.2.0/db_1)
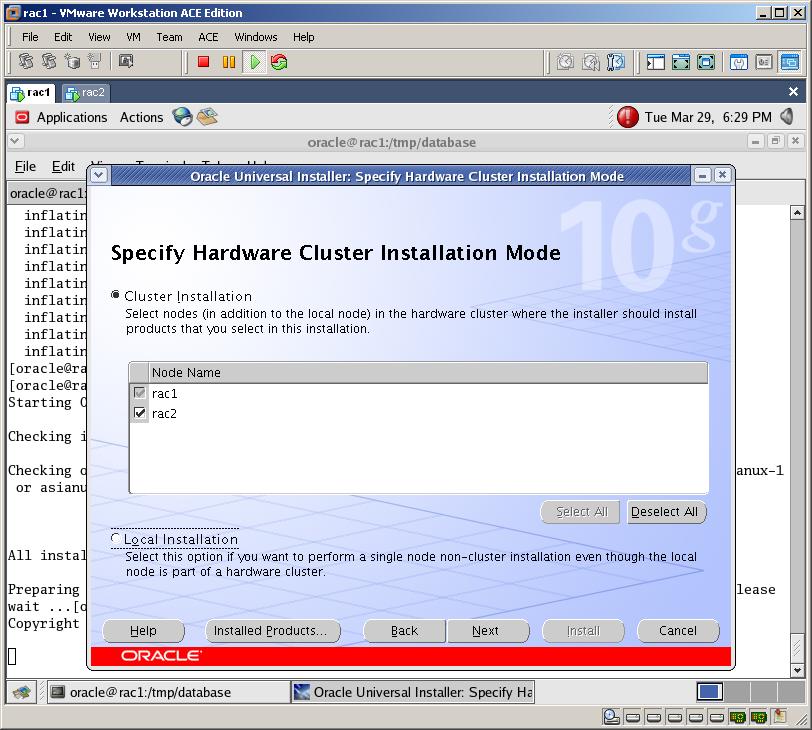
Select both nodes and click Next
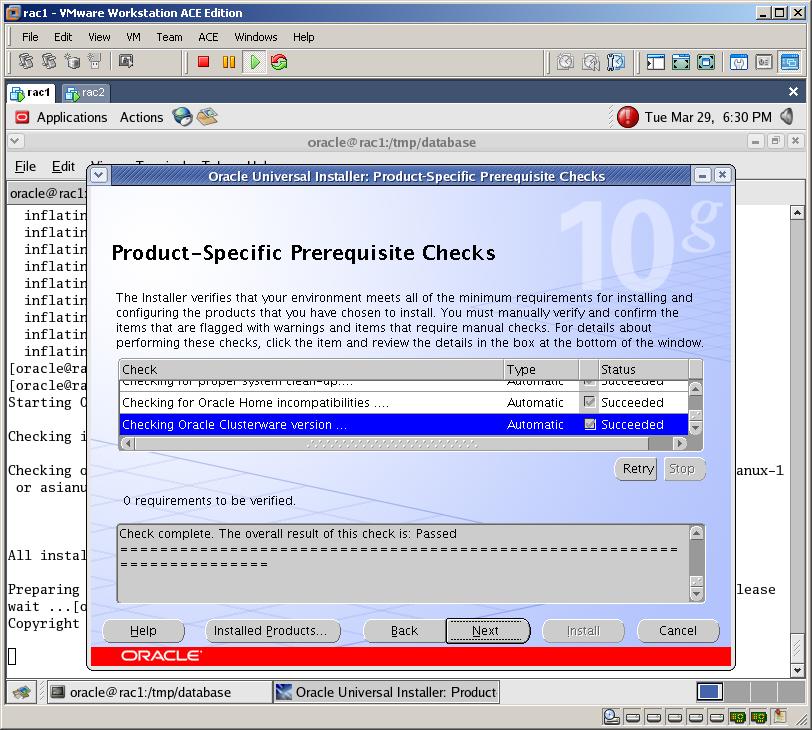
The prerequisite check should be successful, so click Next
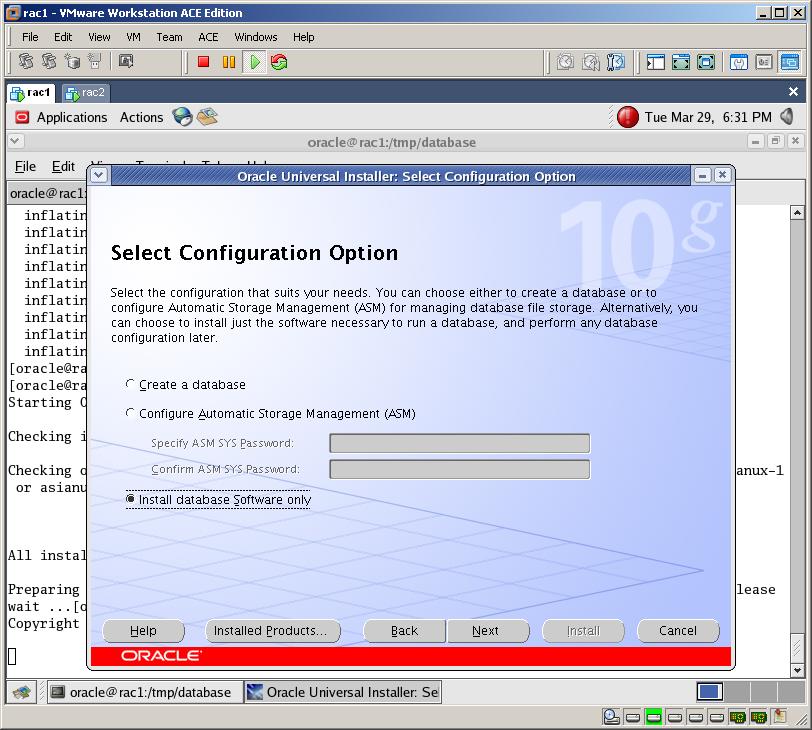
Let’s install just a software, so check “Install database Software only” and click Next
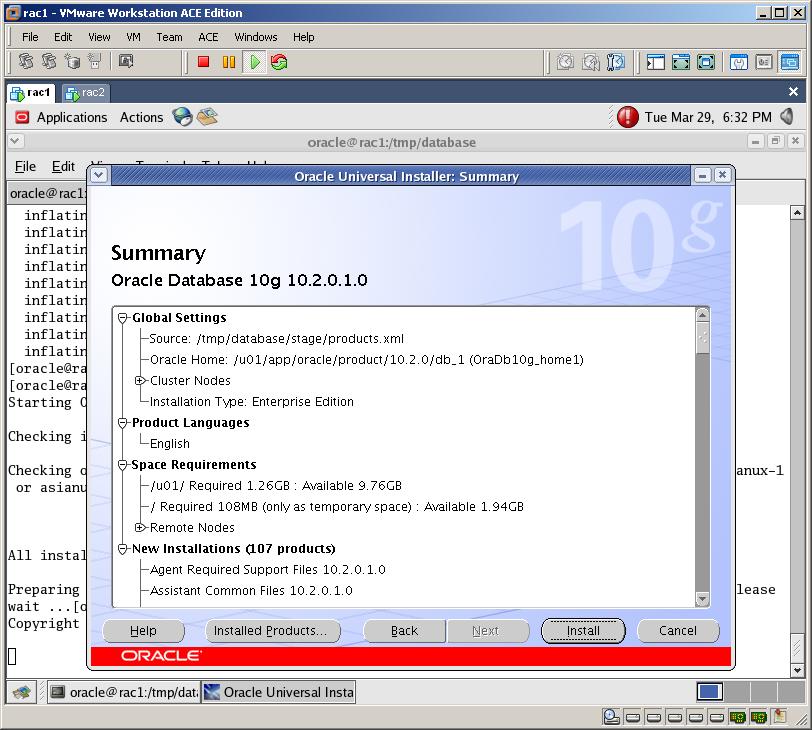
Click Install to start the installation

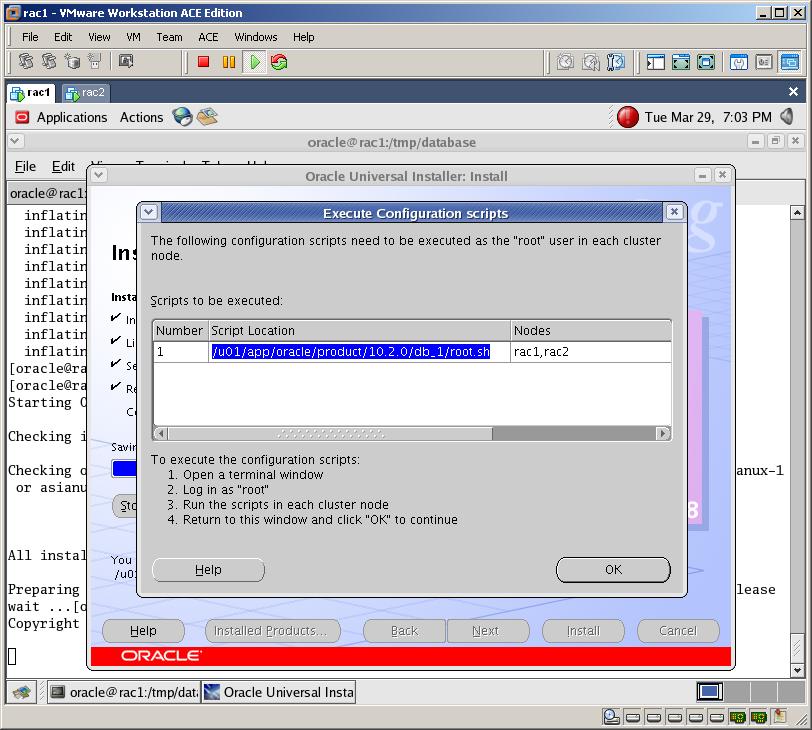
Execute the mentioned script on both nodes (wait for the script to finish before running it on the second node)

After installation finishes, run “dbca” (Database Configuration Assistant), select “Oracle Real Application Clusters database” and click Next
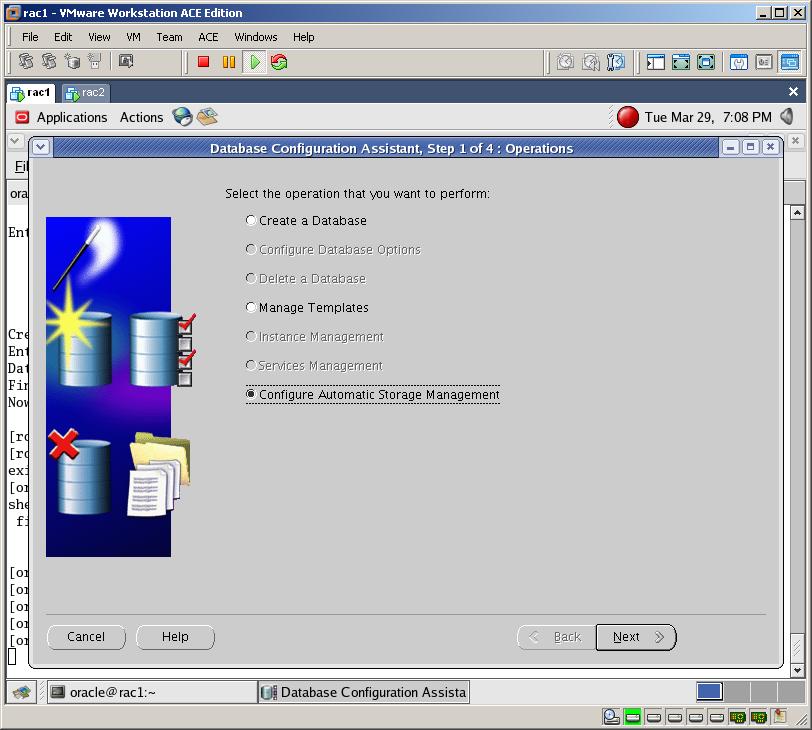
Select “Configure Automatic Storage Management” and click Next
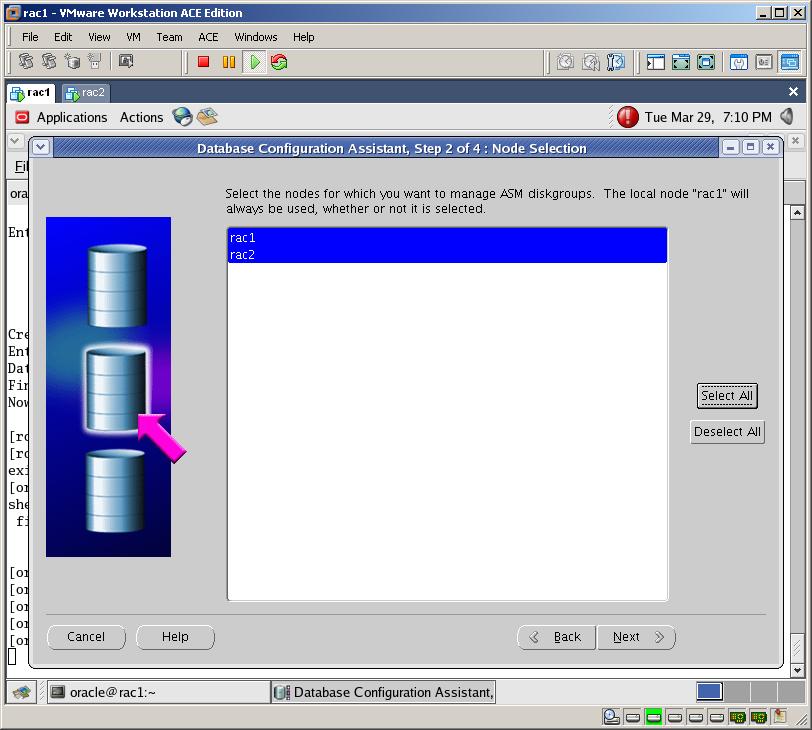
Select both nodes and click Next
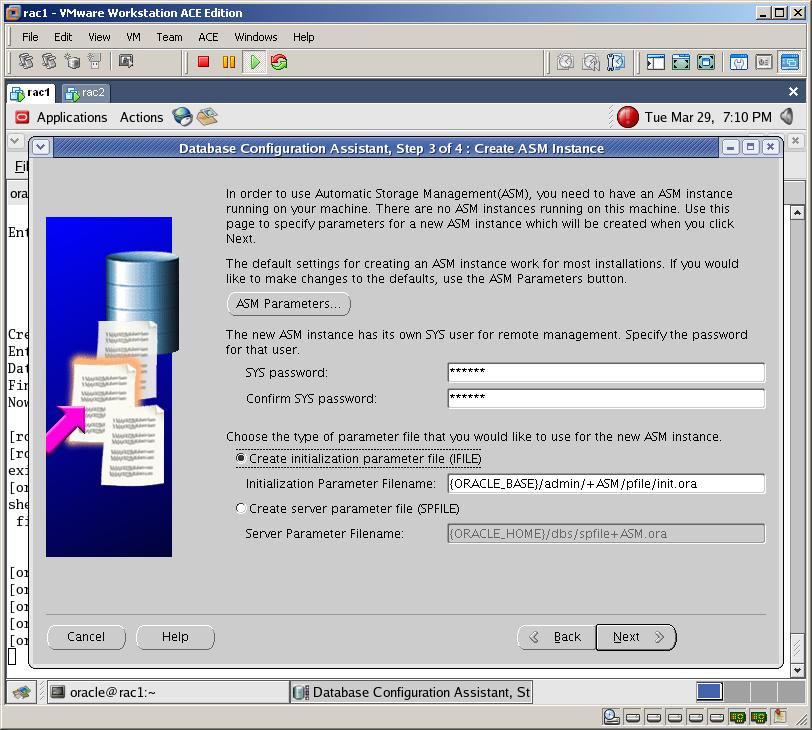
Provide the password for an ASM instance, select “Create initialization parameter file (IFILE)” and click Next
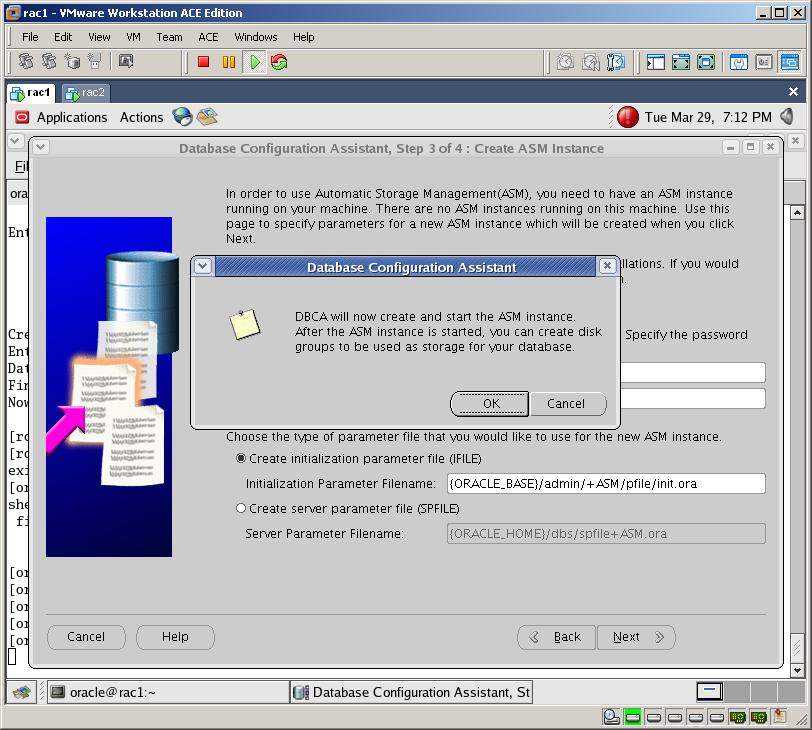
Click OK to create and ASM instance on both nodes
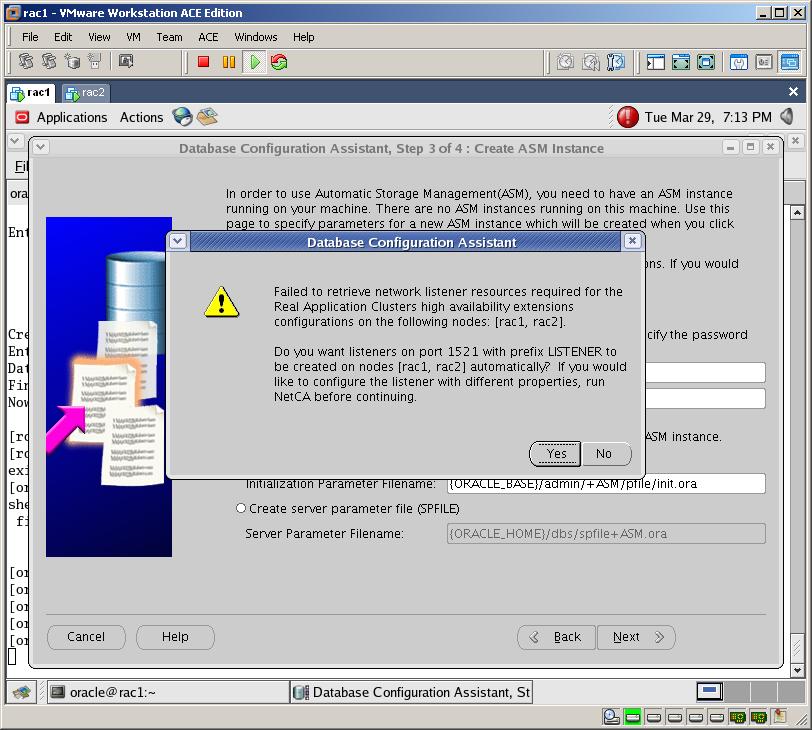
Click YES to create listener on both nodes
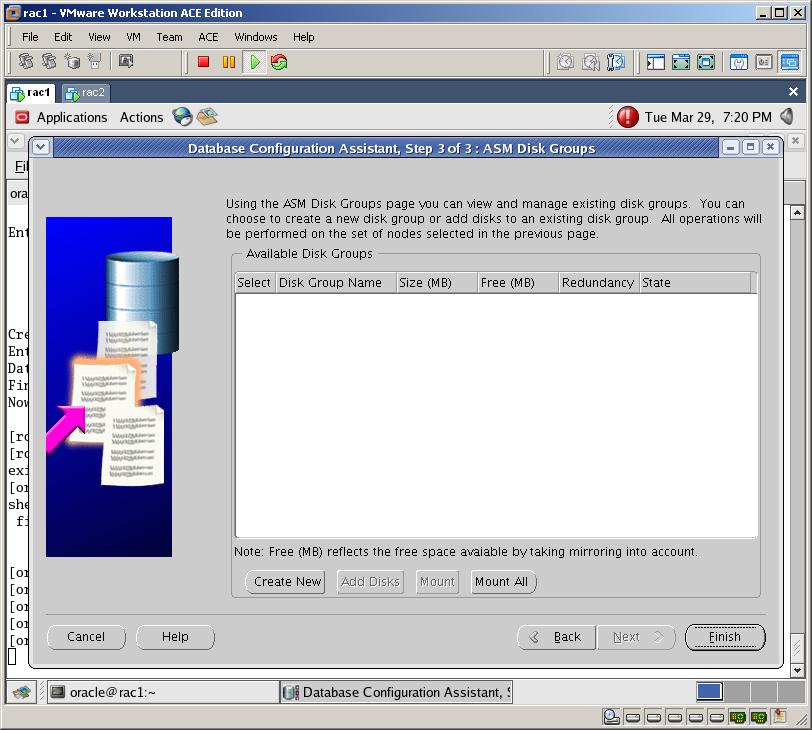
Now let’s create an ASM disks. For this, click “Create New” button
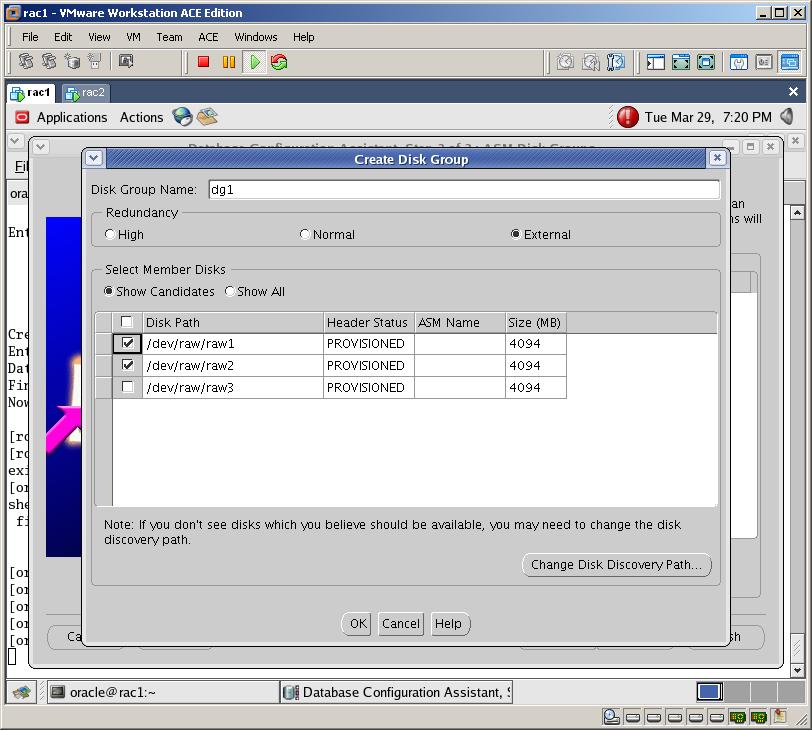
Provide the name of the diskgroup “dg1”, select the “External” redundancy, select two disks “raw1,raw2” and click OK
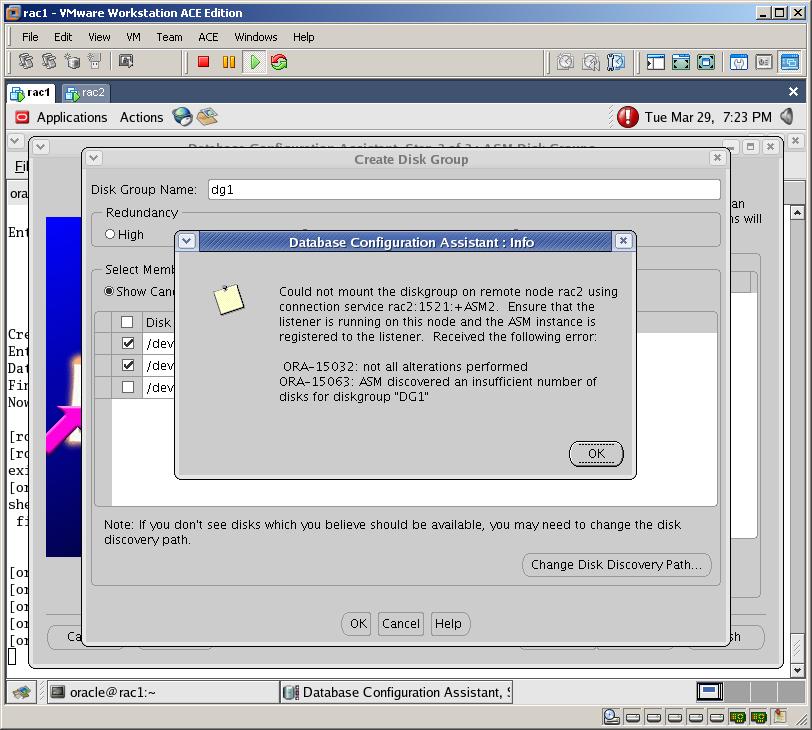
The disk group will not be mounted in the second node, so omit this warning. The second node should be restarted (but not now)
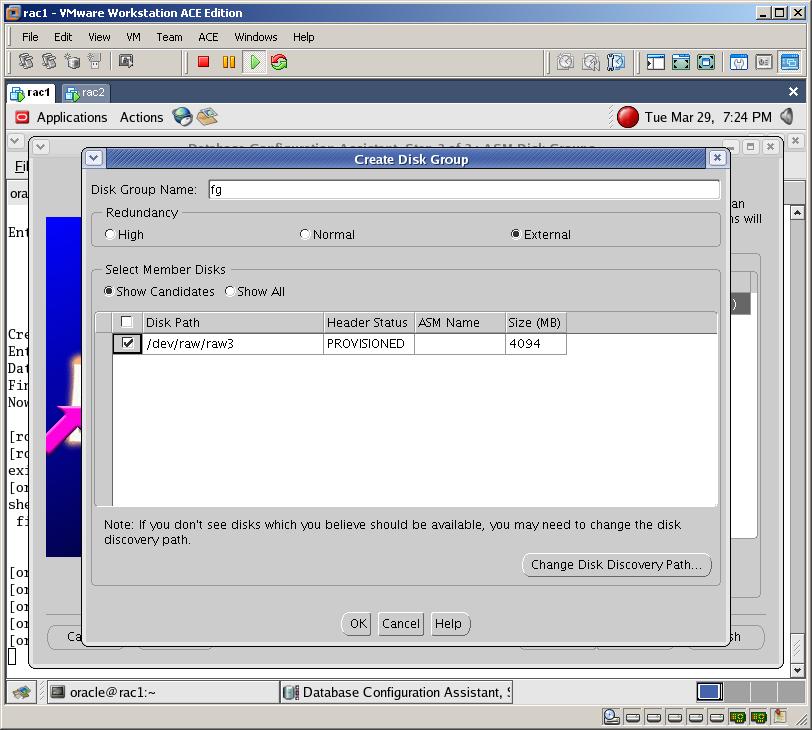
Create the second disk group for flash recovery area (fg), select an “External” redundancy, select the last device (raw3) and click Ok
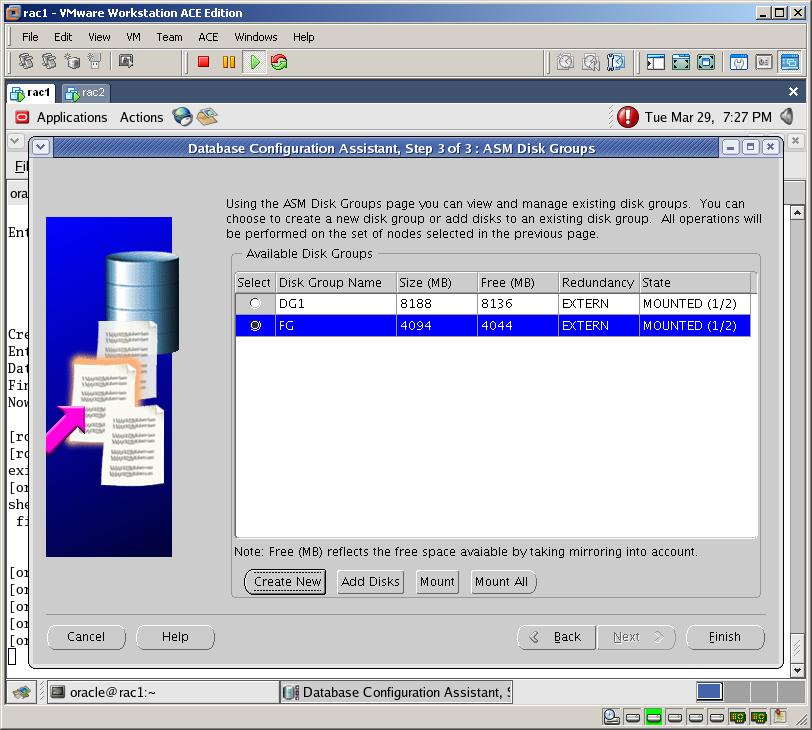
As you see, the state of disk group shows that it’s not mounted on the second node. For this, we need to restart the second node. Click on Finish and restart the second node. After it starts, login with root user and call dbca from the first node again.

Move to the above window again and you’ll see that the disk group is mounted on both nodes. Click on Finish button
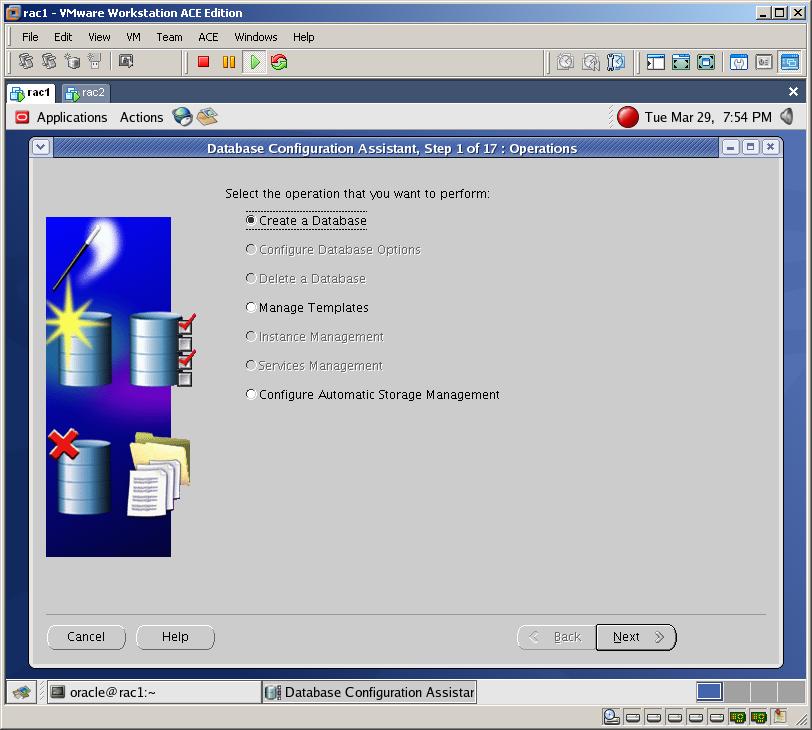
Run dbca again and select “Create a Database”

Select both nodes and click Next
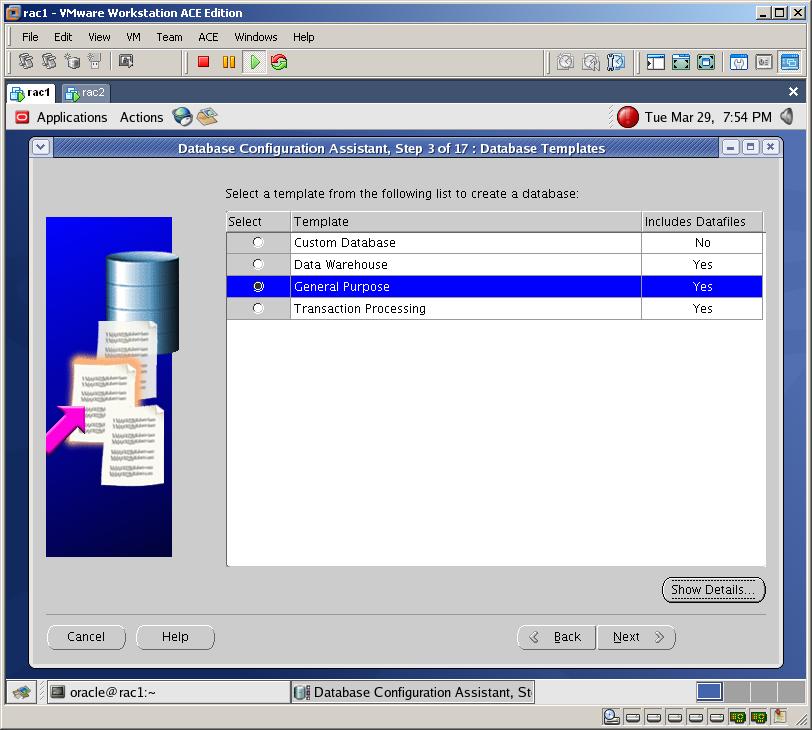
Select “General Purpose” and click Next
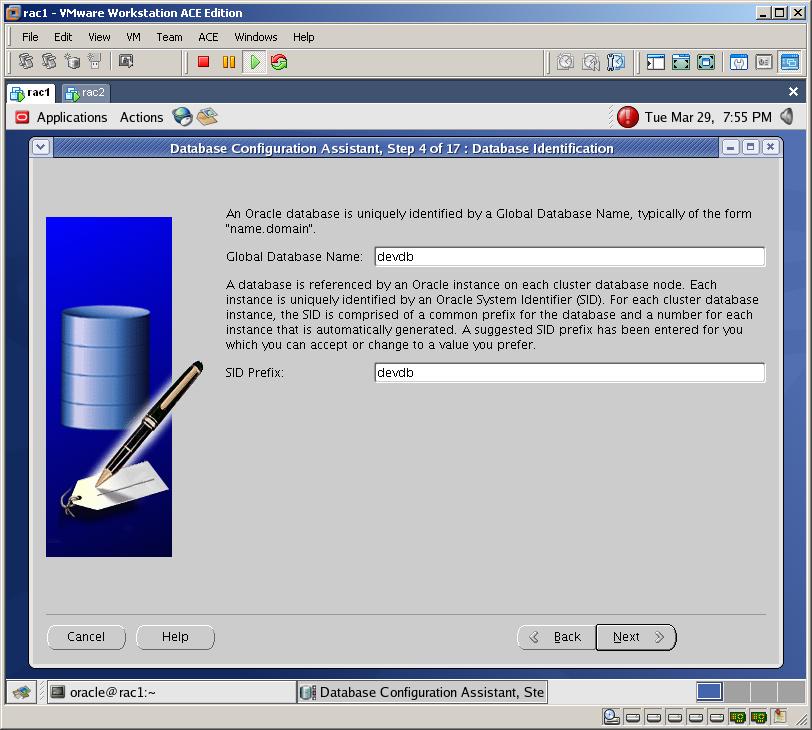
Provide the database name “devdb” and click Next
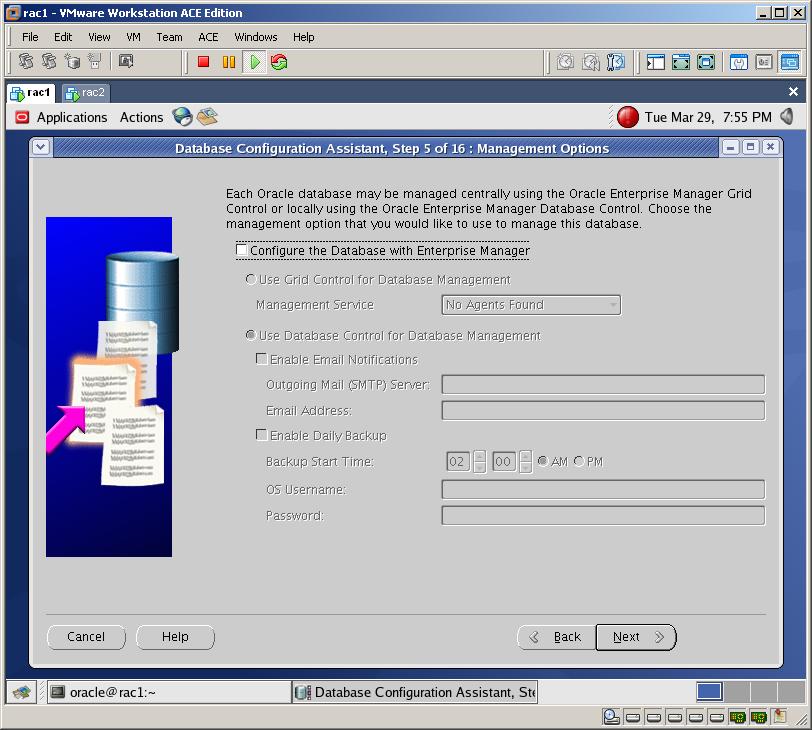
Uncheck “Configure the Database with Enterprise Manager” as it’s taking too much (some hours) to finish (however, if you have enough RAM, you can check it) and click Next
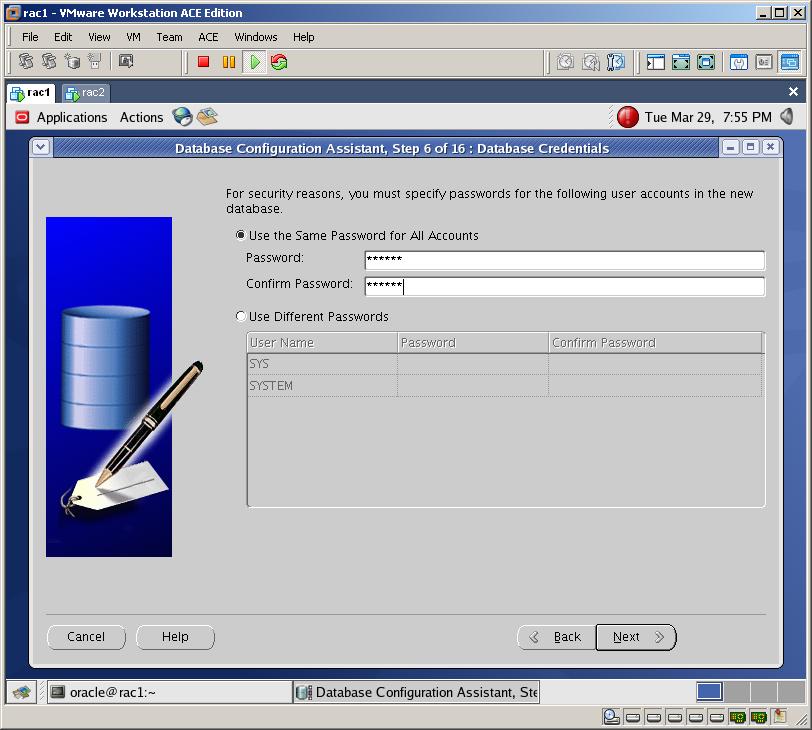
Provide the password for the SYS user and click Next
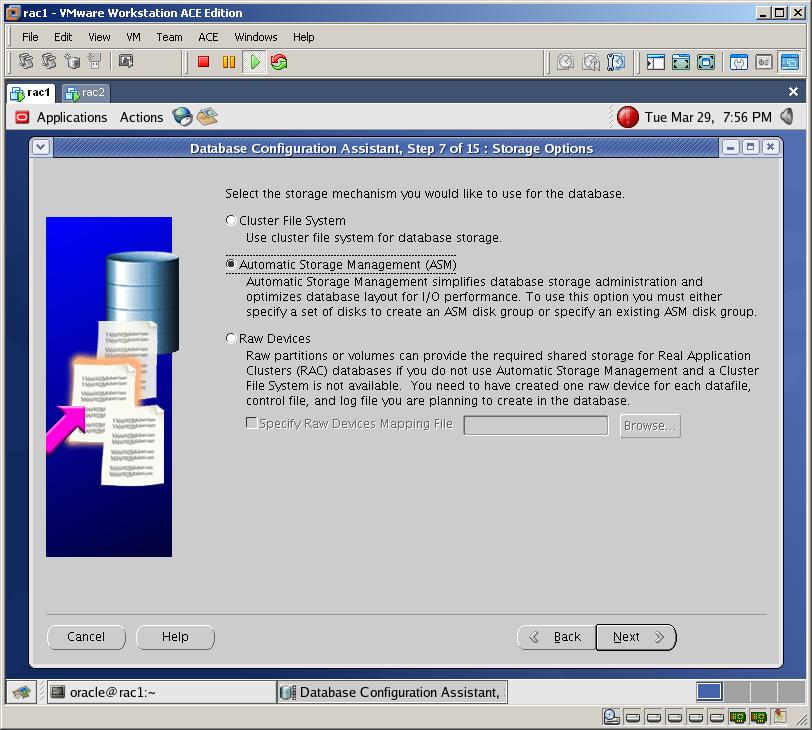
Select “Automatic Storage Management” and click Next
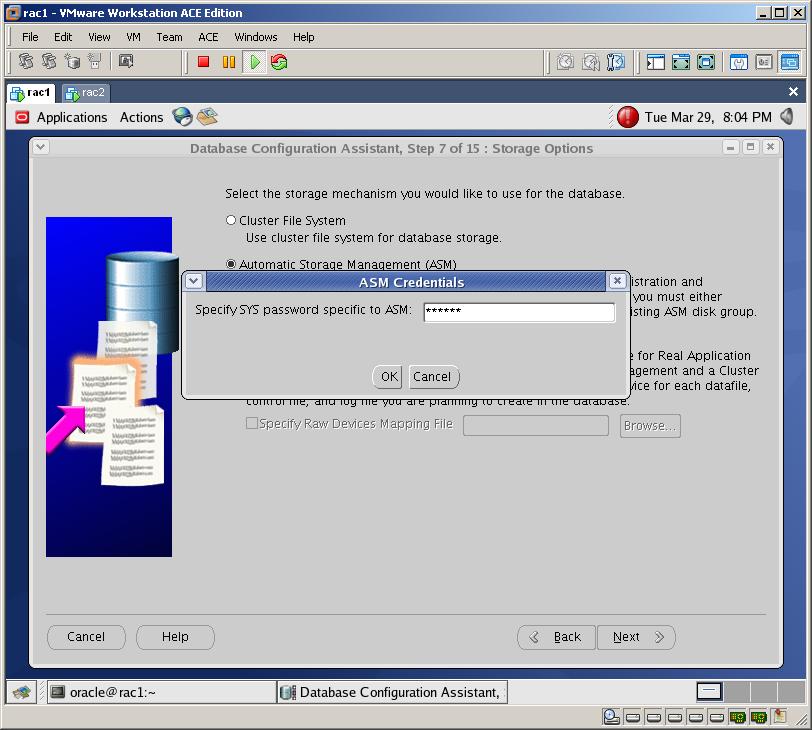
Provide the password for ASM and click OK
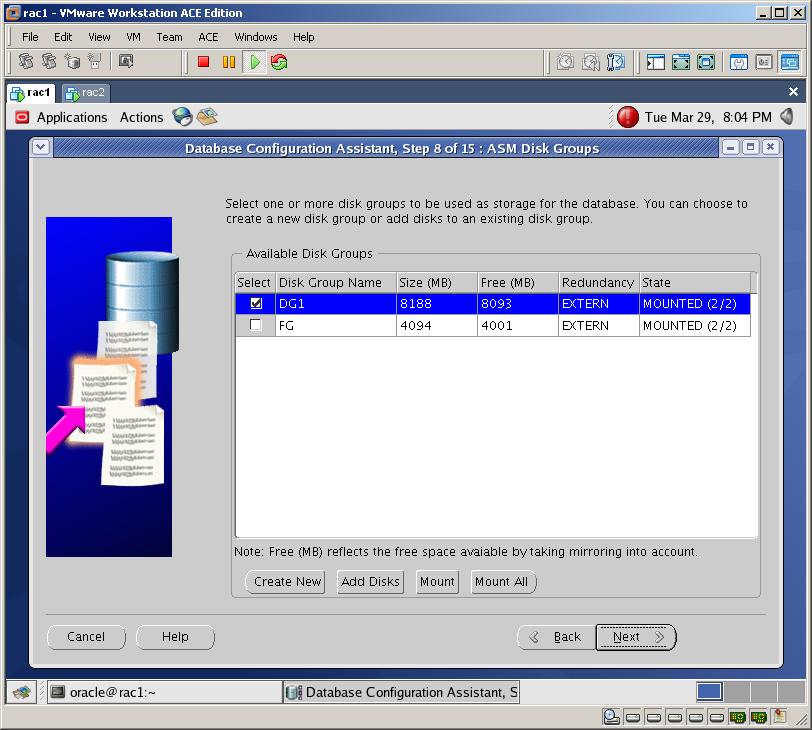
Select the first disk group and click Next
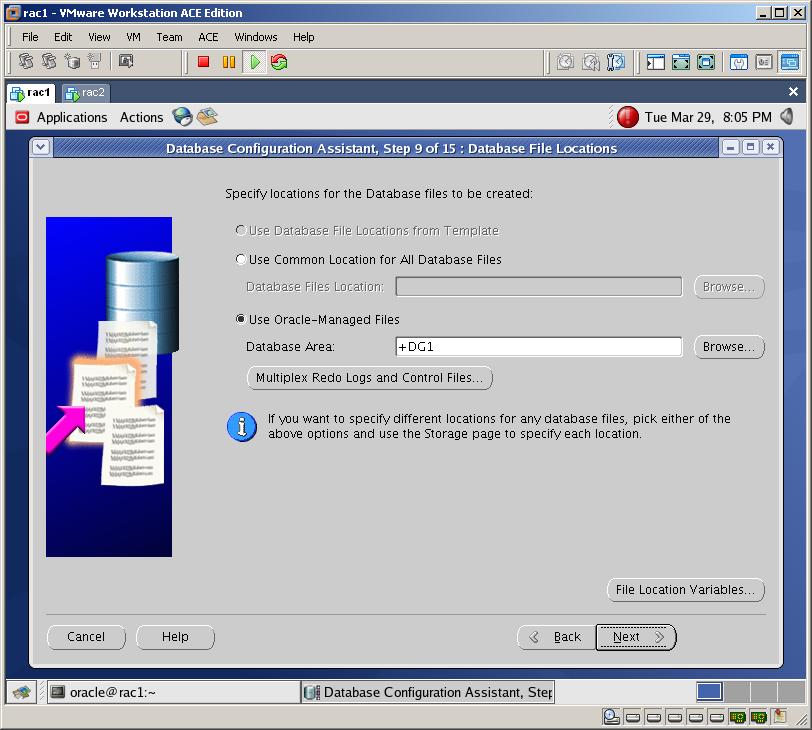
Select “Use Oracle-Managed Files” and click Next
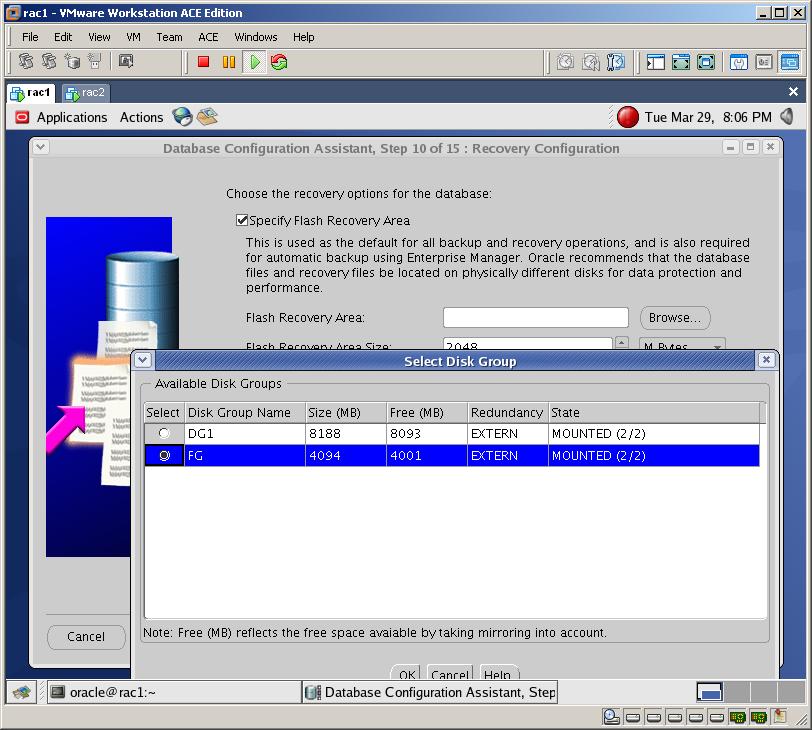
Check “Specify Flash Recovery Area” and chose “FG” disk group and click Next
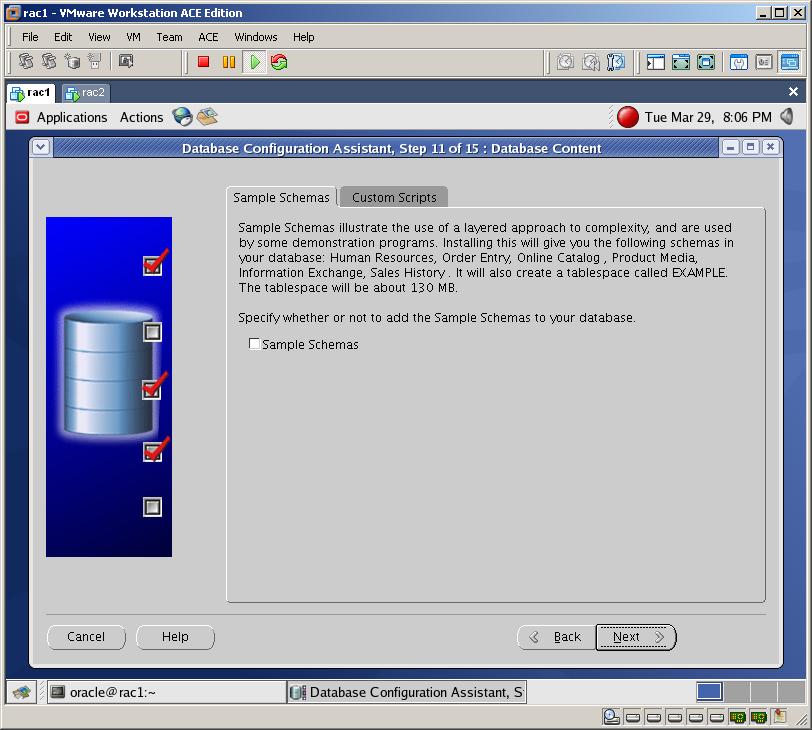
Click Next

Click Next (We’ll create TAF afterwards)
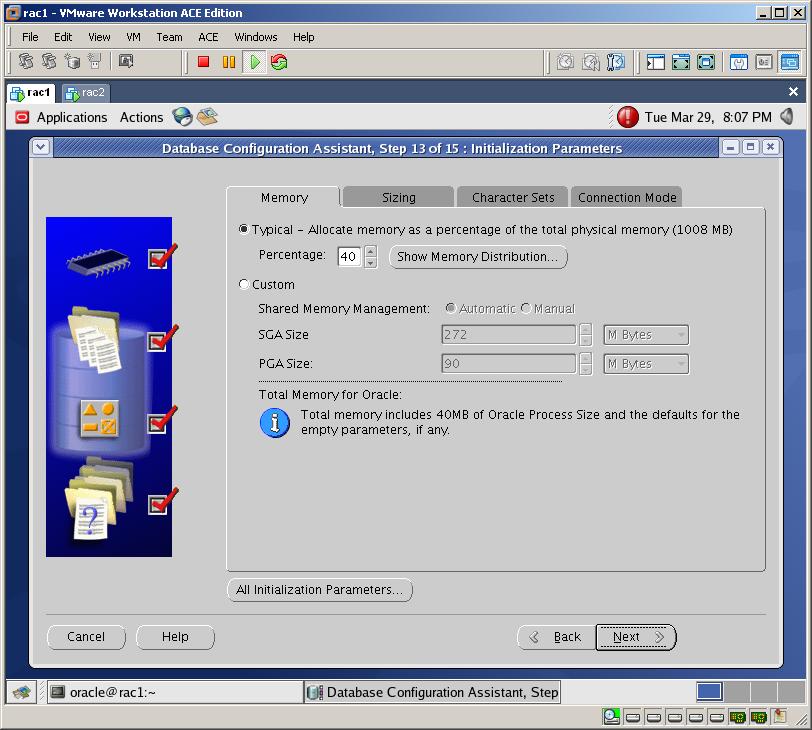
Click Next
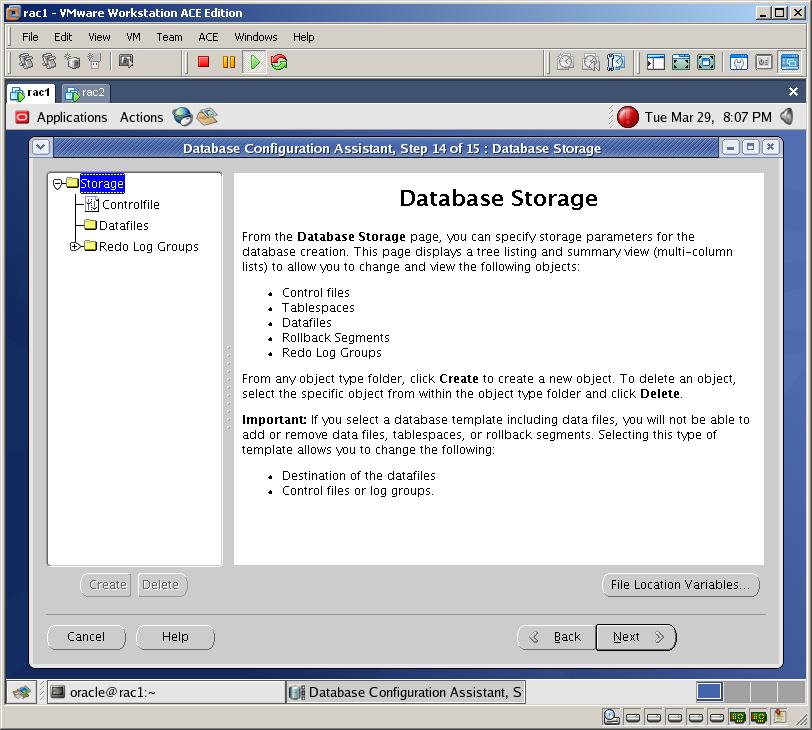
Click Next
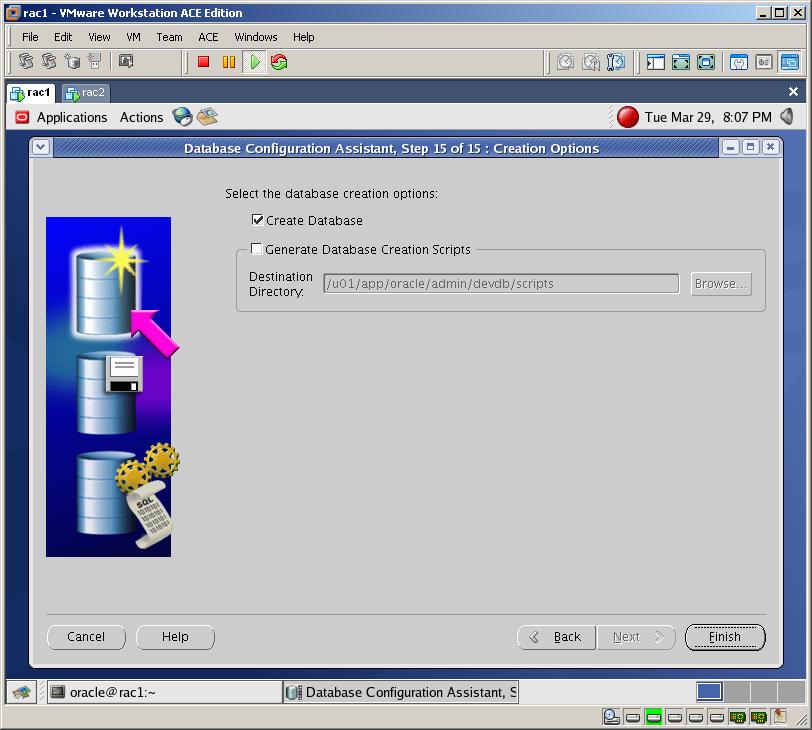
Click Finish to start the installation
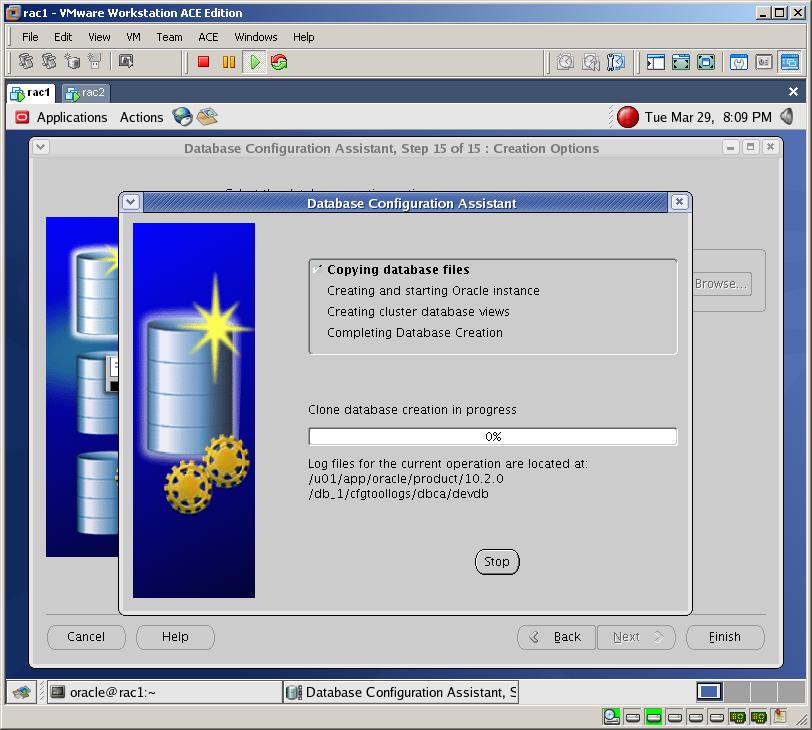
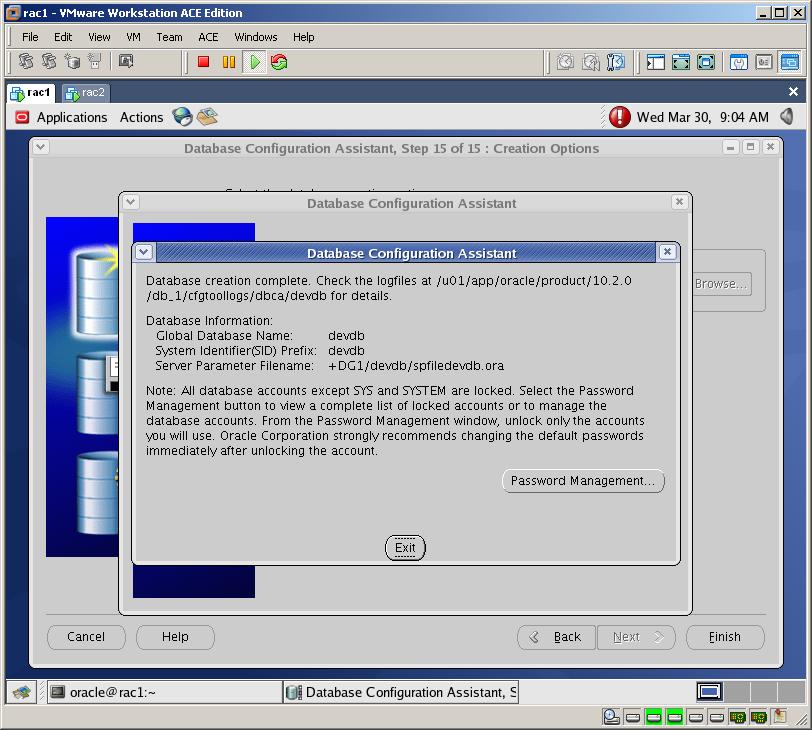
After some hours (as I was running each virtual machine with 1GB RAM) this screen appears. Click Exit
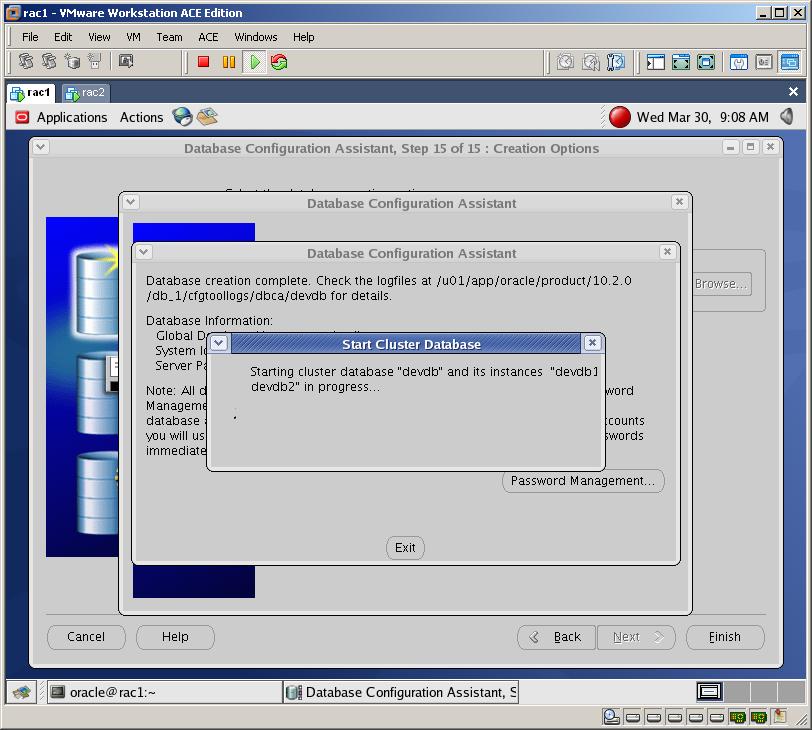
Now both instances will be started.
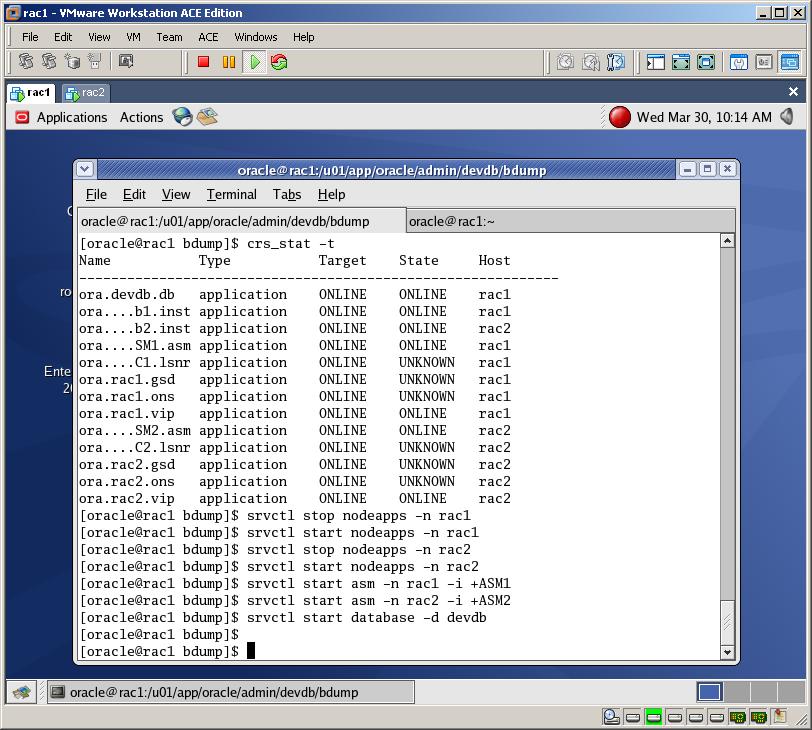
After all, check the status of the Clusterware. As you see, some applications are with “OFFLINE” state. To make them online, stop and start them with SRVCTL utility as it’s shown above
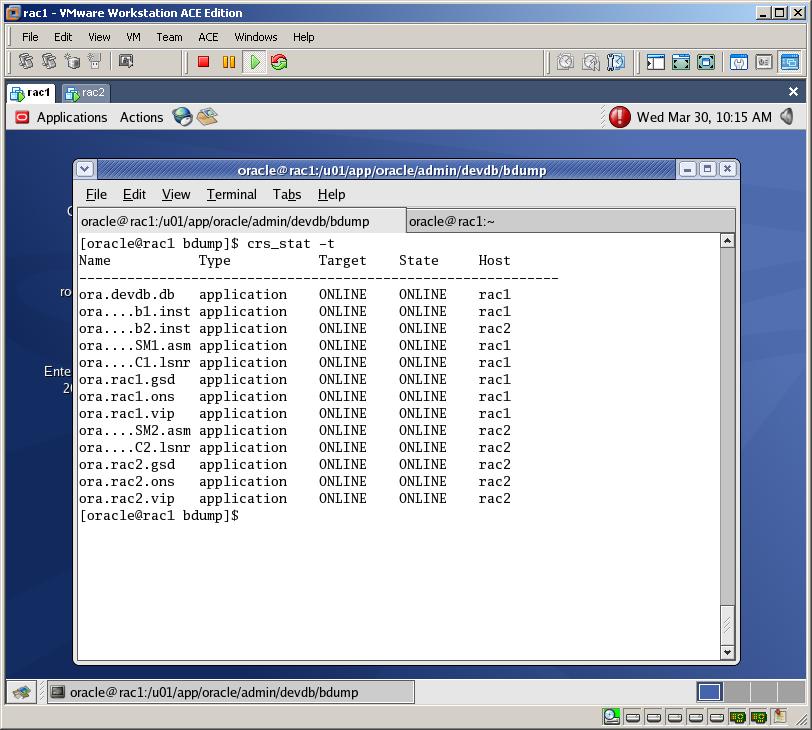
After all, check the CRS status again. As you see, the State column of all applications are ONLINE
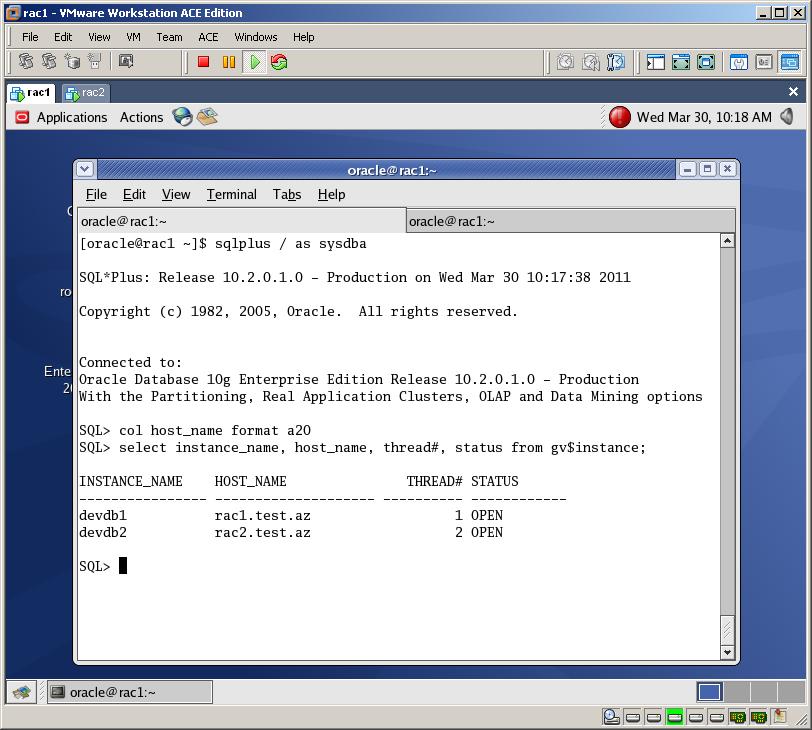
Now connect to the database from the first node (rac1) and run the following query

SQL>col host_name format a20

SQL>SELECT instance_name, host_name, thread#, status from gv$instance;

Try the conection to both instances:

[code]

[oracle@rac1 ~]$ sqlplus system@devdb1

SQL*Plus: Release 10.2.0.1.0 – Production on Wed Mar 30 10:38:40 2011

Copyright (c) 1982, 2005, Oracle.  All rights reserved.

Enter password:

Connected to:
Oracle Database 10g Enterprise Edition Release 10.2.0.1.0 – Production
With the Partitioning, Real Application Clusters, OLAP and Data Mining options

SQL&amp;gt;exit

[oracle@rac1 ~]$ sqlplus system@devdb2

SQL*Plus: Release 10.2.0.1.0 – Production on Wed Mar 30 10:39:04 2011

Copyright (c) 1982, 2005, Oracle.  All rights reserved.

Enter password:

Connected to:
Oracle Database 10g Enterprise Edition Release 10.2.0.1.0 – Production
With the Partitioning, Real Application Clusters, OLAP and Data Mining options

SQL&amp;gt;

[/code]

Let’s query datafiles and logfiles:

[code]

[oracle@rac1 ~]$ sqlplus system@devdb1

SQL&amp;gt; col file_name format a45
SQL&amp;gt; select file_name, bytes/1024/1024 size from dba_data_files;

SQL&amp;gt; select file_name, bytes/1024/1024 &quot;size&quot; from dba_data_files;

FILE_NAME                                           size
——————————————— ———-
+DG1/devdb/datafile/users.259.747087235                5
+DG1/devdb/datafile/sysaux.257.747087221             240
+DG1/devdb/datafile/undotbs1.258.747087233            25
+DG1/devdb/datafile/system.256.747087209             480
+DG1/devdb/datafile/undotbs2.264.747088231            25

SQL&amp;gt;

SQL&amp;gt; col member format a45
SQL&amp;gt; select group#, type, member from v$logfile;

    GROUP# TYPE    MEMBER
———- ——- ———————————————
         2 ONLINE  +DG1/devdb/onlinelog/group_2.262.747087539
         2 ONLINE  +FG/devdb/onlinelog/group_2.258.747087547
         1 ONLINE  +DG1/devdb/onlinelog/group_1.261.747087519
         1 ONLINE  +FG/devdb/onlinelog/group_1.257.747087533
         3 ONLINE  +DG1/devdb/onlinelog/group_3.265.747132209
         3 ONLINE  +FG/devdb/onlinelog/group_3.259.747132221
         4 ONLINE  +DG1/devdb/onlinelog/group_4.266.747132235
         4 ONLINE  +FG/devdb/onlinelog/group_4.260.747132249

8 rows selected.

SQL&amp;gt;[/code]

Now connect to an ASM instance and query the diskgroups:

[code]

export ORACLE_SID=+ASM1
sqlplus / as sysdba

SQL&amp;gt; col name format a20

SQL&amp;gt; select group_number, name, state, type, total_mb, usable_file_mb from v$asm_diskgroup;
GROUP_NUMBER NAME                 STATE       TYPE     TOTAL_MB USABLE_FILE_MB
———— ——————– ———– —— ———- ————–
           1 DG1                  MOUNTED     EXTERN       8188           7048
           2 FG                   MOUNTED     EXTERN       4094           3760

SQL&amp;gt;

[/code]

Now let’s create a Service. Services are used to manage the workload in an RAC environment and provide high availability.  To create the service run “dbca”
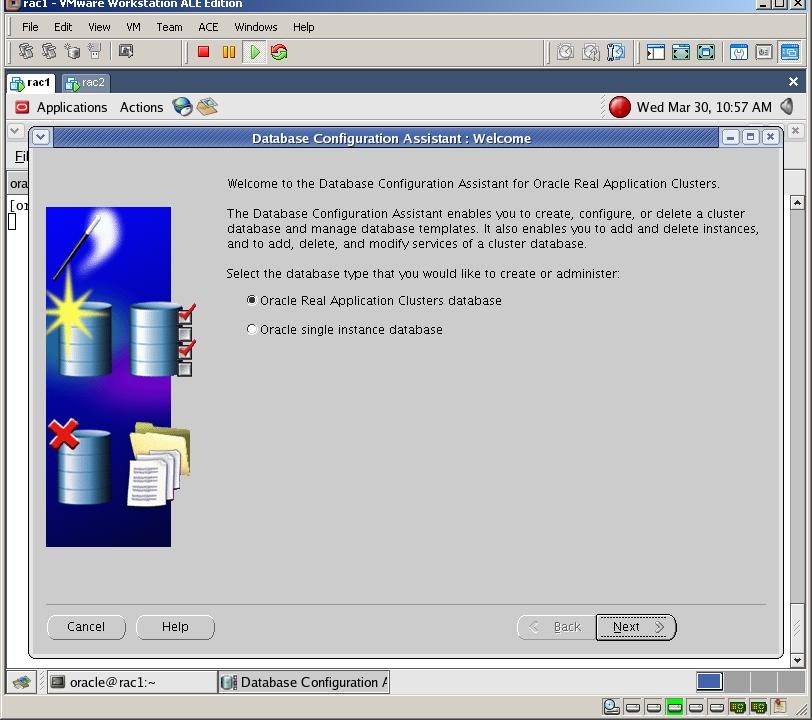
Select the first option and click Next
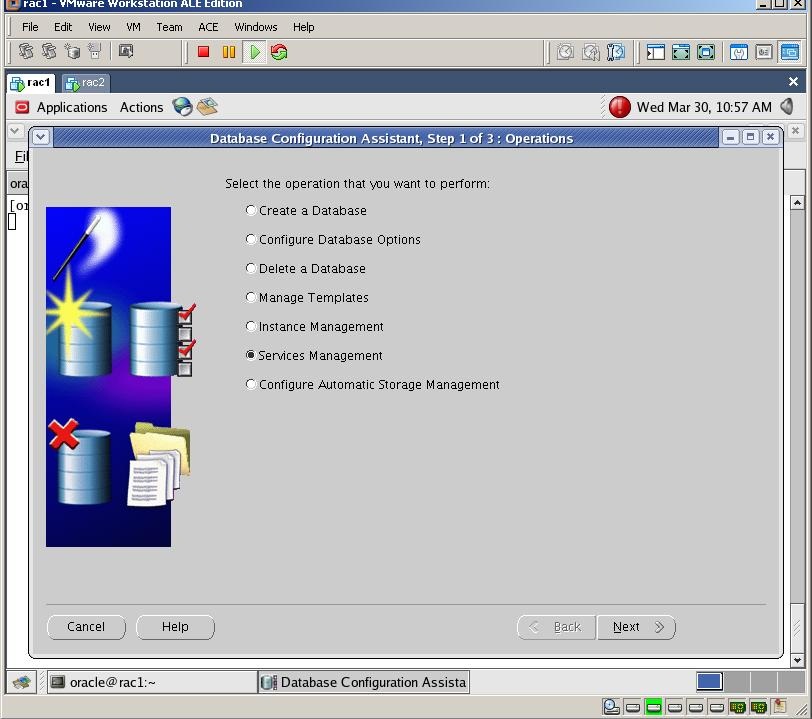
Select “Service Management” and click Next
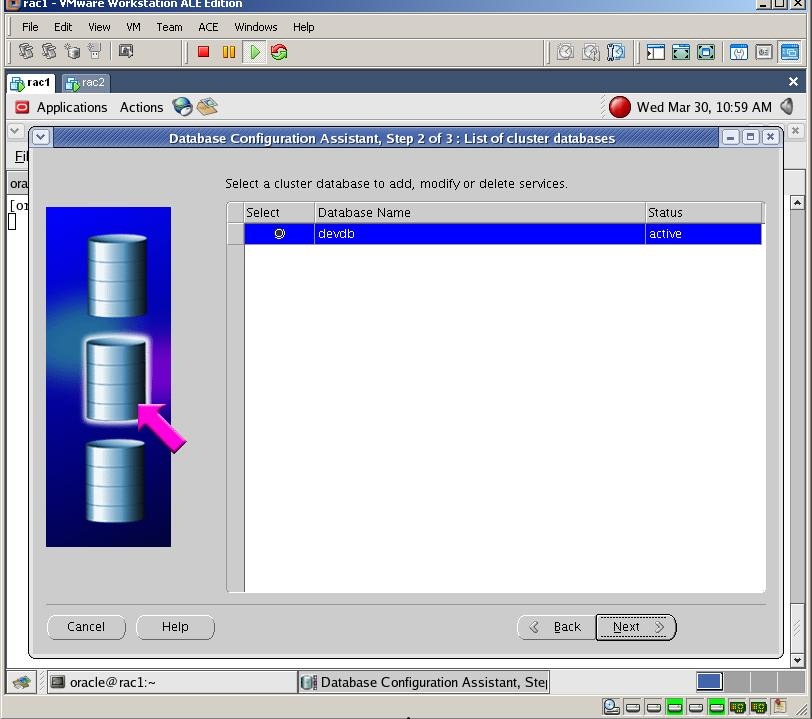
Select the first database and click Next

Provide the name of the Service and click Next
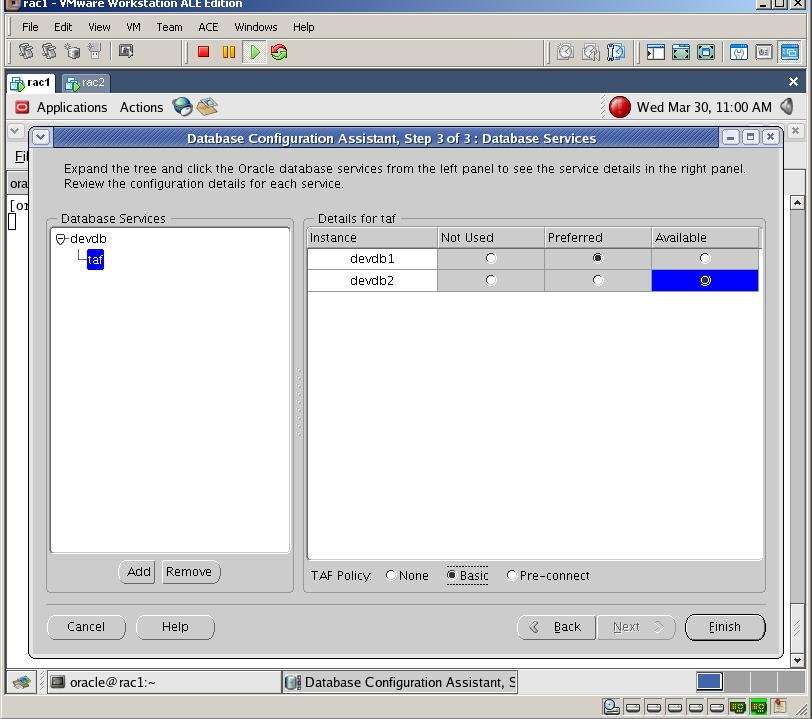
When you specify PREFERRED instances, you are specifying the number of instances on which a service will normally run. The Oracle Clusterware attempts to ensure that the service always runs on the number of nodes for which you have configured the service. Afterwards, due to either instance failure or planned service relocations, a service may be running on an AVAILABLE instance

Select Preferred for the first instance, and Available for the second instance, change the TAF policy to Basic and click Finish

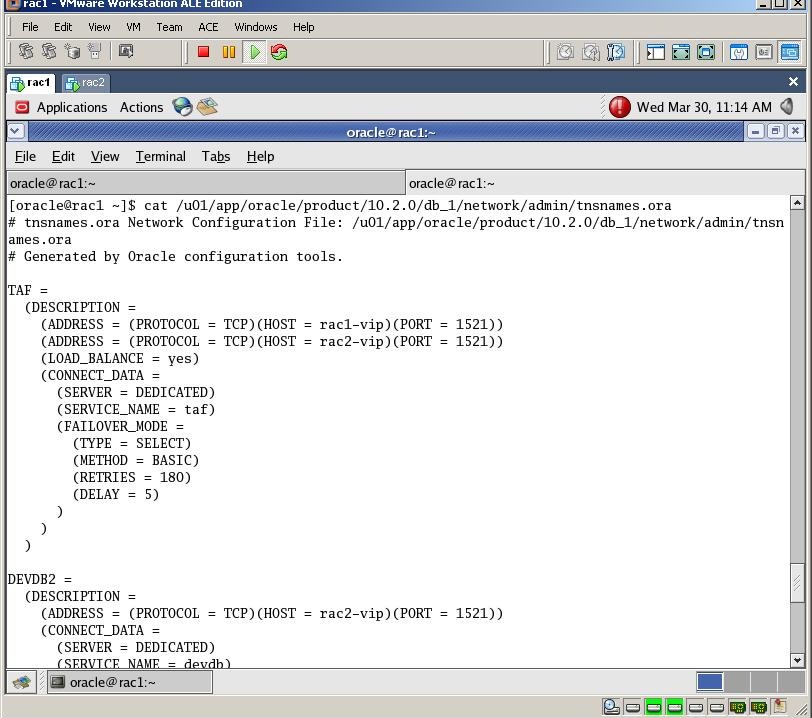
After the Service created automatically, check tnsnames.ora file and you’ll see that the new entry is added
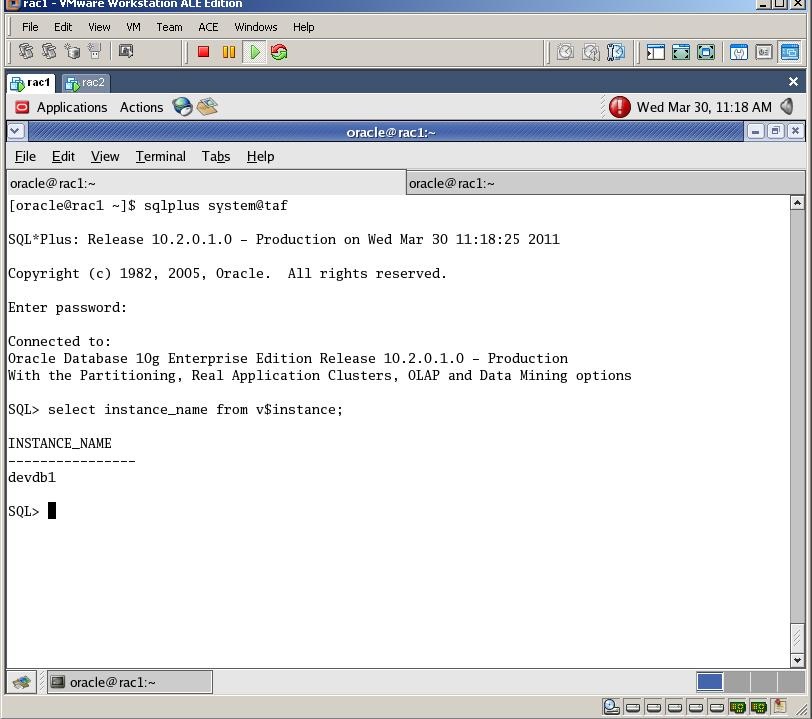

Try to connect to the database using this service. As you see, we’ll automatically connect to the first instance. Now let’s check the RAC high availability
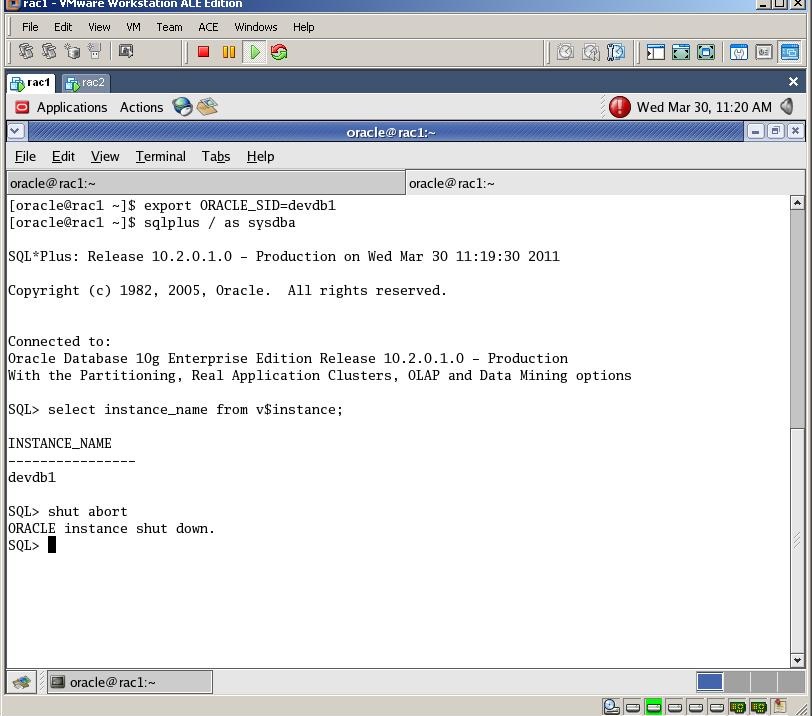
For this, while connecting to the first instance (devdb1) using a “service”, open new terminal, connect to the first instance and shut it down

Now go back to the first session and query the v$instance view again. As you see, you’ll be automatically forwarded to the second instance

In this step by step tutorial I’ve shown you the deep step by step guide using 150 screenshots to make the RAC installation easier for you. I hope you’ll successfully install RAC and make your own tests. Good Luck!


Posted in Administration, RAC issues | 176 Comments »

ORA-00600: internal error code, arguments: [kzdlk_zt2 err]

Posted by Kamran Agayev A. on 1st April 2011

While creating a database link between two databases and querying the remote object, I got the following internal error

[code]

SQL>   CREATE PUBLIC DATABASE LINK "DBTST"
  2     CONNECT TO "USERNAME" IDENTIFIED BY VALUES ‘548674B80234E4BDF8686’
  3     USING ‘DBTST’;

Database link created.

SQL> select name from v$database@DBTST;
Warning: Entry/Exit code is optimized.  Cannot restore context (UNWIND 22)
select name from v$database@DBTST
                            *
ERROR at line 1:
ORA-00600: internal error code, arguments: [kzdlk_zt2 err], [18446744073709551603], [], [], [], [], [], []

[/code]

After a metalink search I found that it’s a bug

Bug:5576894 – Abstract: GET ORA-600 [KZDLK_ZT2_ERR] WHEN LINK CREATED WITH ‘IDENTIFIED BY VALUES’
ORA-00600: [Kzdlk_zt2 Err] While Selecting Using a Database Link [ID 456320.1]

The reason was the in Oracle 10g dblink passwords are stored in special encrypted form to improve database link security. For more information, you can go to the above link

As a solution, you need to create a database link without “IDENTIFIED BY VALUES” clause

[code]

SQL> drop public database link dbtst;

Database link dropped.

SQL>   CREATE PUBLIC DATABASE LINK "DBTST"
  2     CONNECT TO "username" IDENTIFIED BY password
  3     USING ‘DBTST’;

Database link created.

SQL> select name from v$database@DBTST;

NAME
———
DBTST

[/code]

Posted in Administration | No Comments »