Kamran Agayev's Oracle Blog

Oracle Certified Master

Step by step guide – create a primary and standby database in the Cloud!

Posted by Kamran Agayev A. on December 6th, 2016

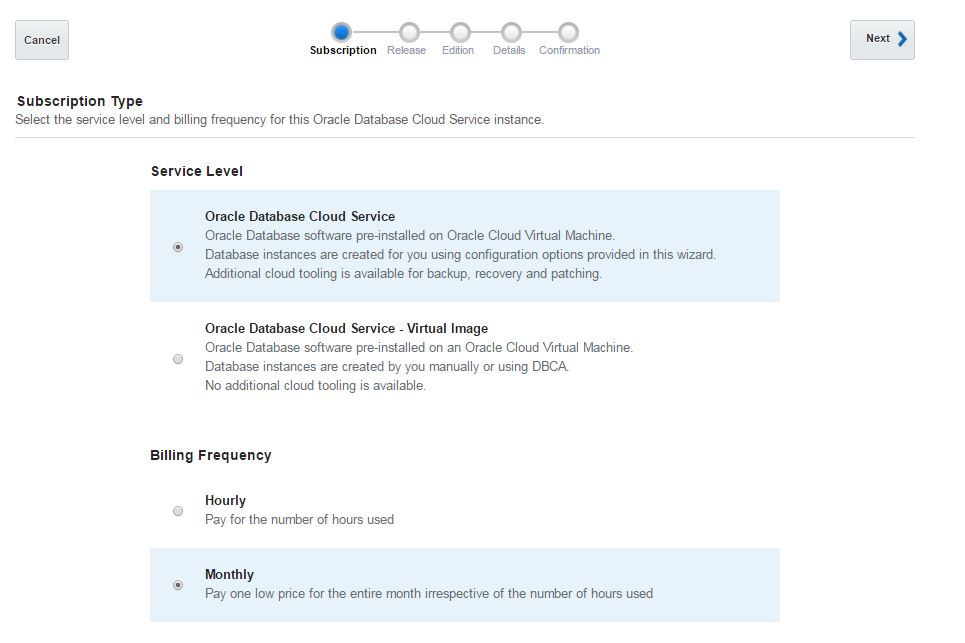
In this guide, I will show you how to create a primary and standby database in the cloud. Login to your cloud account, switch to the Oracle Database Cloud Service page and create a new service. Select “Oracle Database Cloud Service” as a subscription type and click Next.

image-1


Select a database release and click Next.

image-2


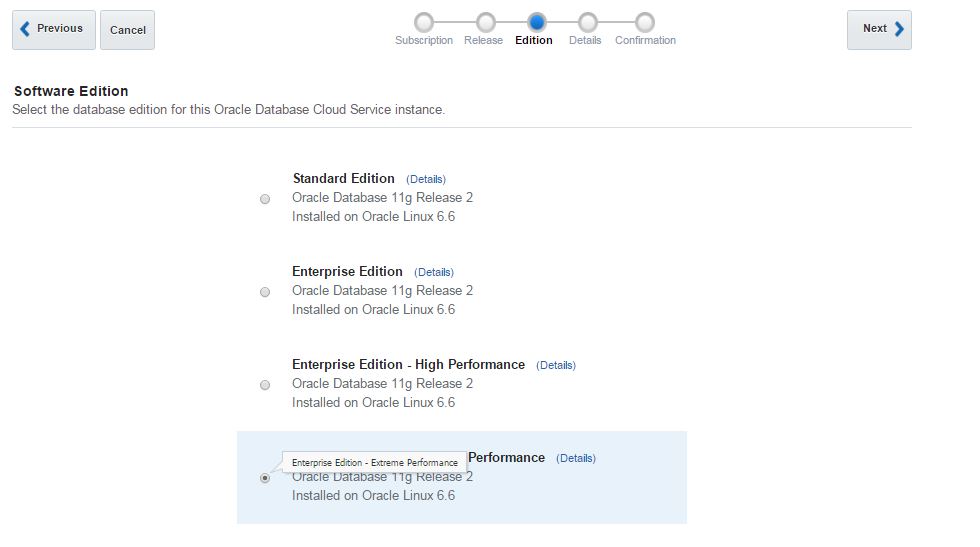
Select “Enterprise Edition – Extreme Performance” as a Software Edition and click Next


image-3


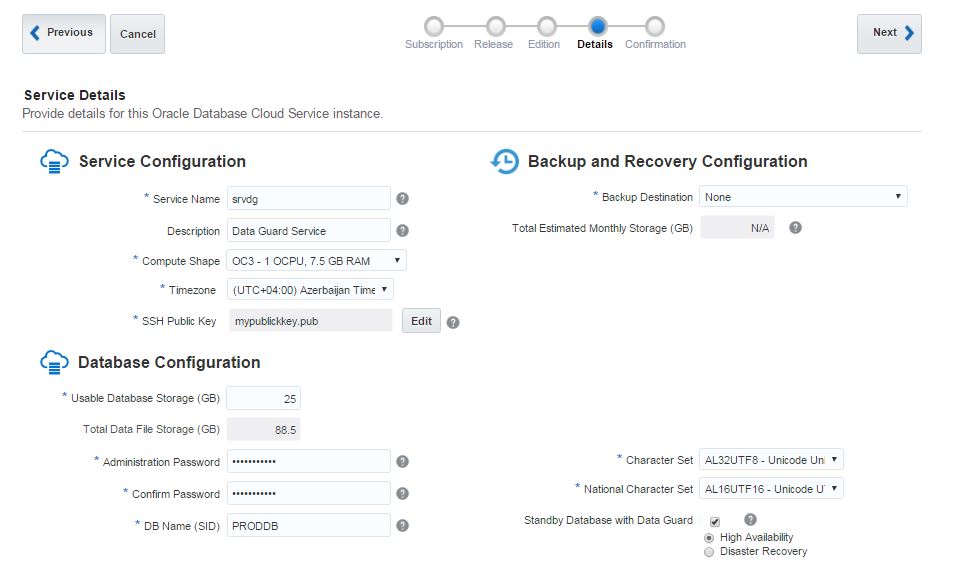
Provide the service name, SSH public key and select “Standby Database with Data Guard” option, select “High Availability” and click Next

image-4


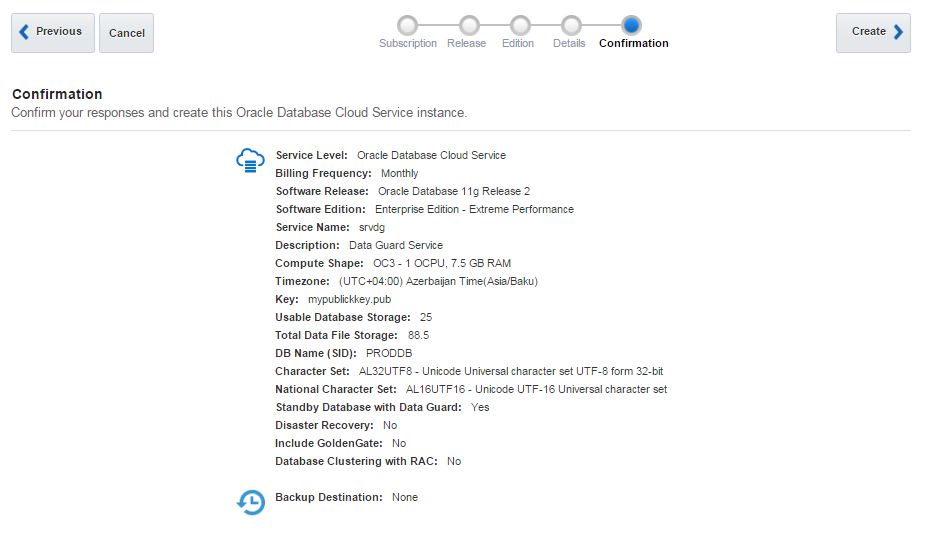
Review the configuration settings and click Create to create a primary and a standby database

image-5


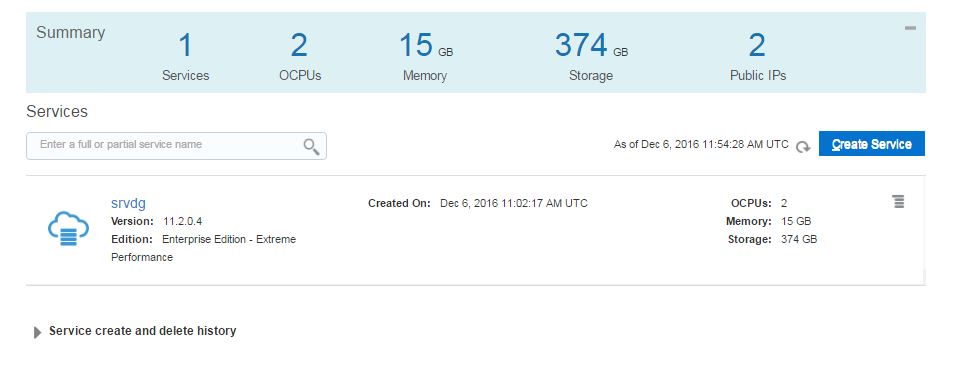
After a few minutes the primary and standby database will be created successfully

image-6


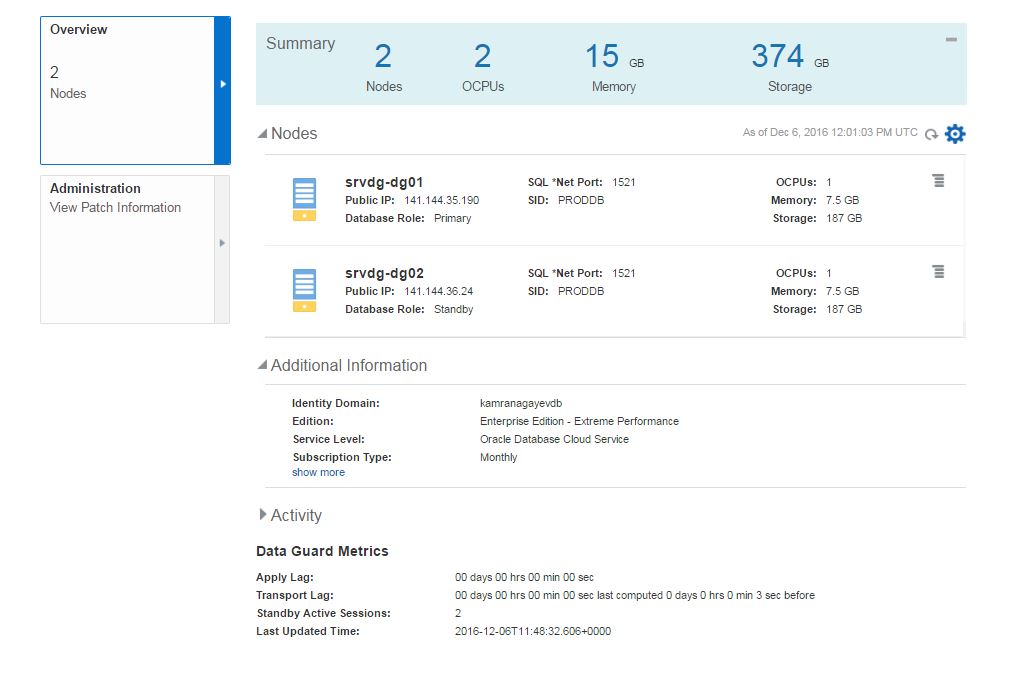
Click on the service name (srvdg) to open the home page of both databases


image-7


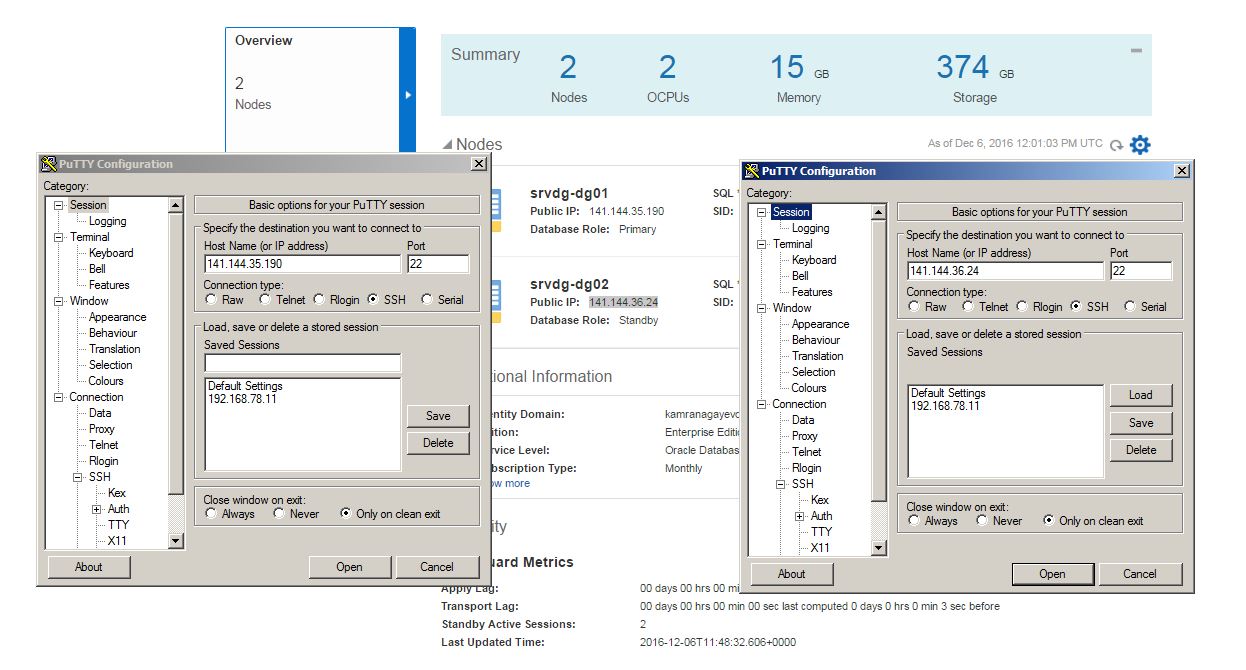
Now open two different Putty executables and connect to the both machines


image-8


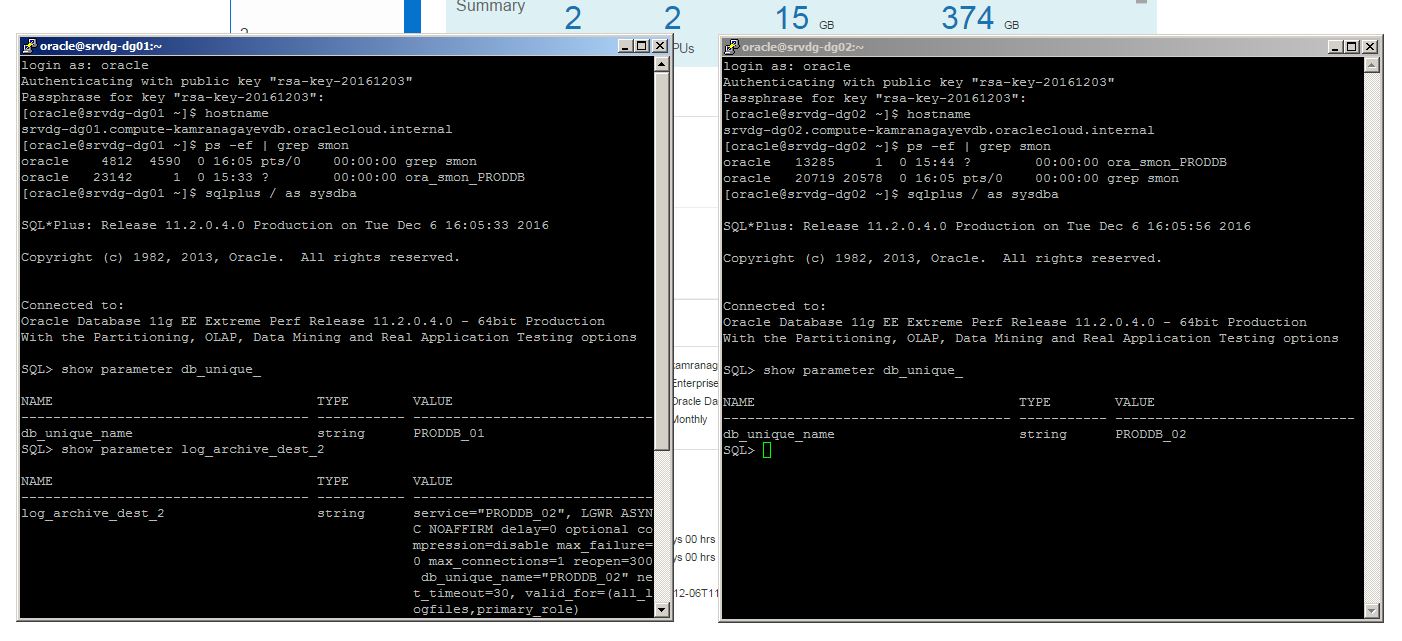
Connect to the both databases and check the DB_UNIQUE_NAME parameter. PRODDB_01 is set to the primary database, PRODDB_02 for the standby database. Also check LOG_ARCHIVE_DEST_2 parameter on the primary database. As you see, archived log files are shipped to the standby database using PRODDB_02 service.

image-9


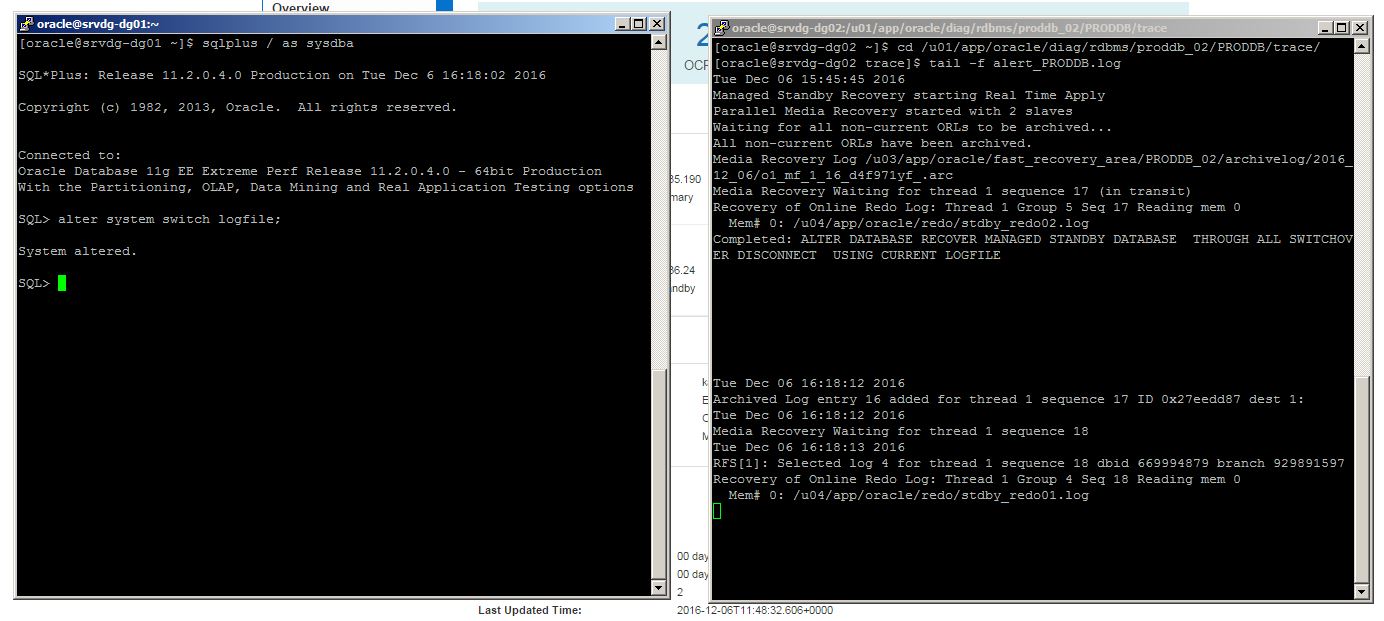
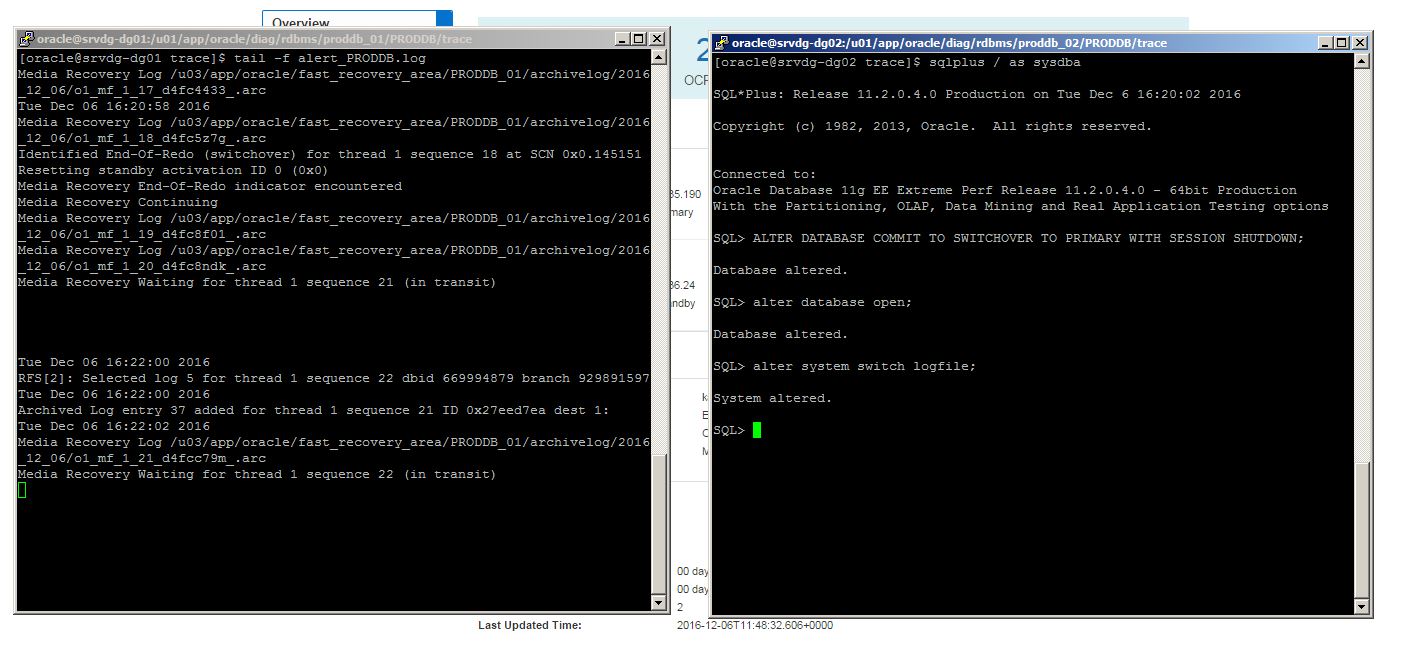
Now let’s test the functionality of the standby database. First of all, open an alert.log file of the standby database, switch the log file on the primary database and check if the log file is applied


image-10


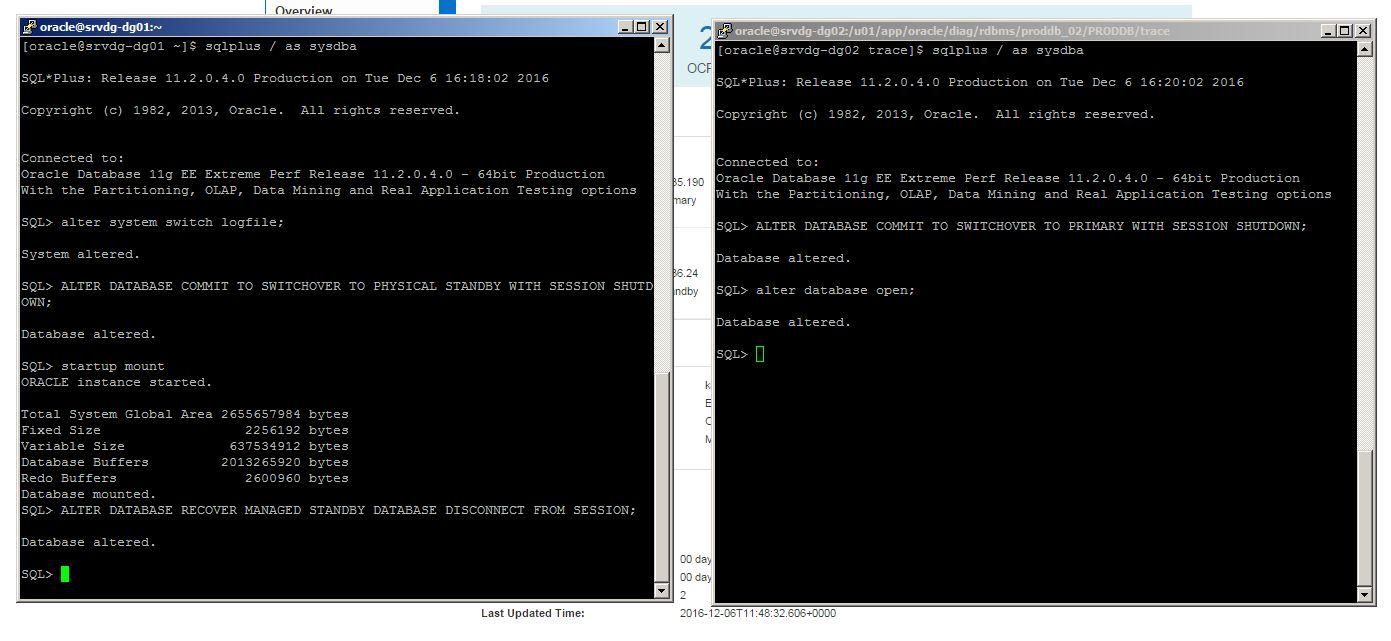
Now perform a switchover


image-11


Switch the log file and see if it is applied to the new standby database

image-12


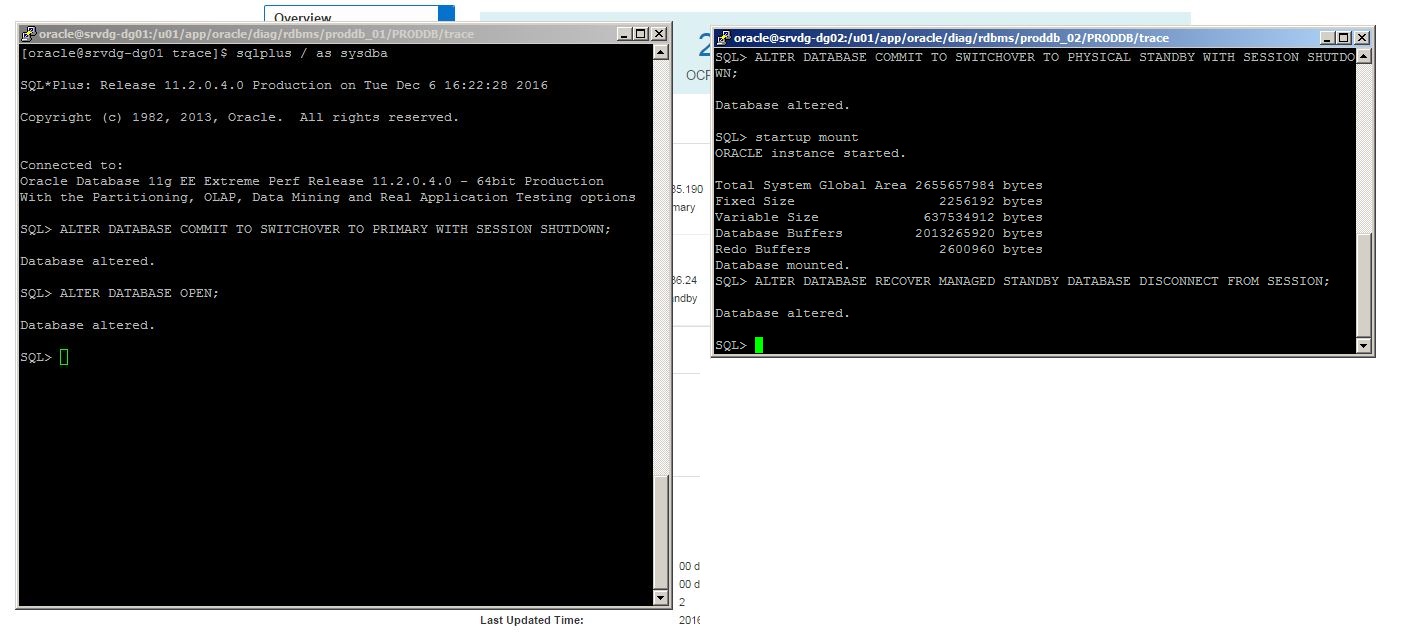
It worked. Now switch back


image-13


As you see, it’s very easy to create a database with its own standby database in the cloud!

Posted in Oracle Cloud | No Comments »

Step by step guide to create an Oracle Database in the Cloud

Posted by Kamran Agayev A. on December 5th, 2016

In this blog post I will share the steps to create an Oracle Database in Cloud. We will create a database service, create a second database in the same machine in a silent mode, access to the cloud machine with SSH and monitor the database with OEM.

First of all, make sure you have an Oracle account. Open oracle.com and click on Register link to get a free oracle account. Next, open cloud.oracle.com, select “Compute” from Infrastructure menu and click “Try It” button to get a free trial account for 1 month. Next, login with your oracle account and register for cloud account. Make sure you don’t apply with generic email addresses like hotmail, gmail and etc. Instead, use your company address.

After successfully registering you will get an email with your credential information. Click on the link specified in the email, provide username/password and login to your cloud account. Click Oracle Database Cloud Service link.


image-1


Click on the link under “My Service URL” to access list of cloud services you have.


image-2


If you haven’t signed in yet, sign in page will appear. Use the username and password provided in the email you got during the registration and login

image-3


Next, Oracle Cloud Services dashboard will appear.


image-4


To create and manage database instances, click on the “Open Service Console” menu of the Database tab as shown below:


image-5


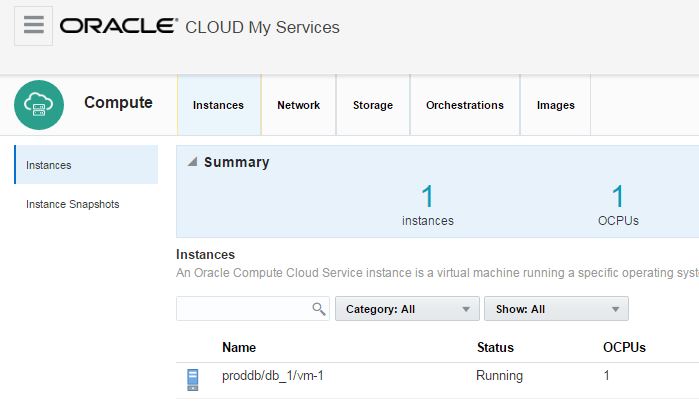
In this page you will get list of database services. Here, I have two database services (myfirstdb, myseconddb). I have 7.5G memory and 150gb of storage provided for each service.

image-6


Click Delete on the drop down menu for each service and delete both services.


image-7


After successfully deleting available instances, click on “Create Service” button to create a new database instance:

image-8


Select “Oracle Database Cloud Service” option to create a database using a wizard. For the billing frequency you have two options: Hourly and Monthly. It doesn’t make sense when you use a trial account. So select any of them and click Next.


image-9


For the software release you have 3 options: 11.2, 12.1 and 12.2. Choose any of them and click Next.


image-10


As a software edition, you have 4 options:

Standard Edition

Enterprise Edition

Enterprise Edition – High Performance

Enterprise Edition – Extreme Performance

To get more information and features that each edition provides, check the following documentation:


Home / Cloud / Oracle Database Cloud Service/ Using Oracle Database Cloud Service/ About Database Cloud Service Database Deployments/ Oracle Database Software Package

https://docs.oracle.com/cloud/latest/dbcs_dbaas/CSDBI/GUID-660363B8-0E2F-4A4F-A9BD-70A43F332A16.htm#GUID-6C0B1E17-98A5-4522-A3B9-36EFA05E64F9

Select “Enterprise Edition” option and click Next


image-11


In the next page you will be asked to provide a SSH Public Key for the cloud service. For this, use Putty Key Generator executable to generate a SSH public key. Click on Generate button, move your mouse over the blank are to generate some action.
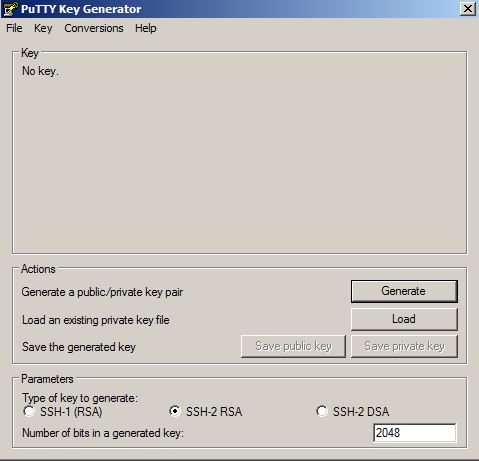
 

image-12


The SSH key will be generated as follows. Provide a password and click on “Save private key” button to save this key as a private key
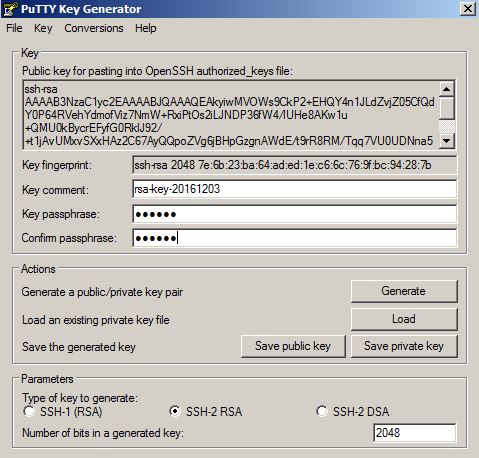
 

image-13


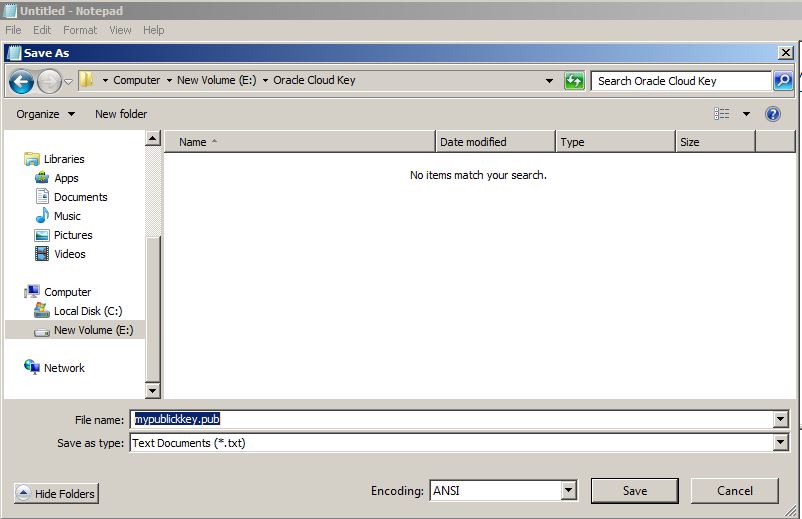
To save a key as a public key, copy the text and save it.
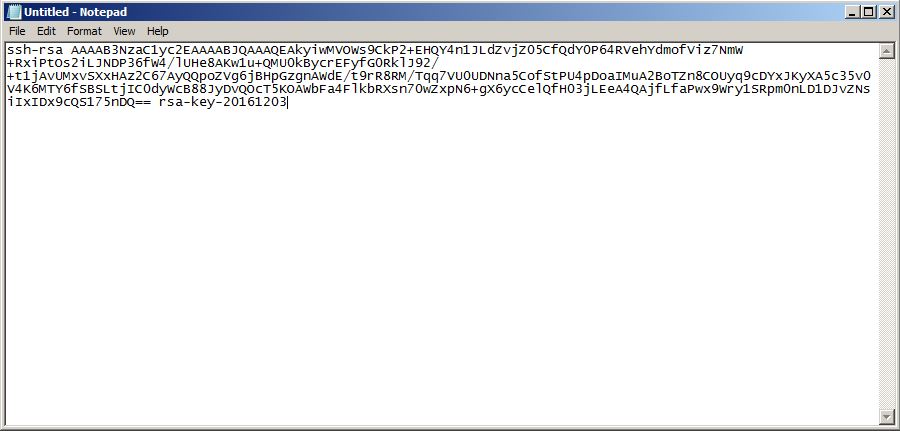
 

image-14


image-15


Provide this file for the “SSH Public Key” field of the database service creation wizard.
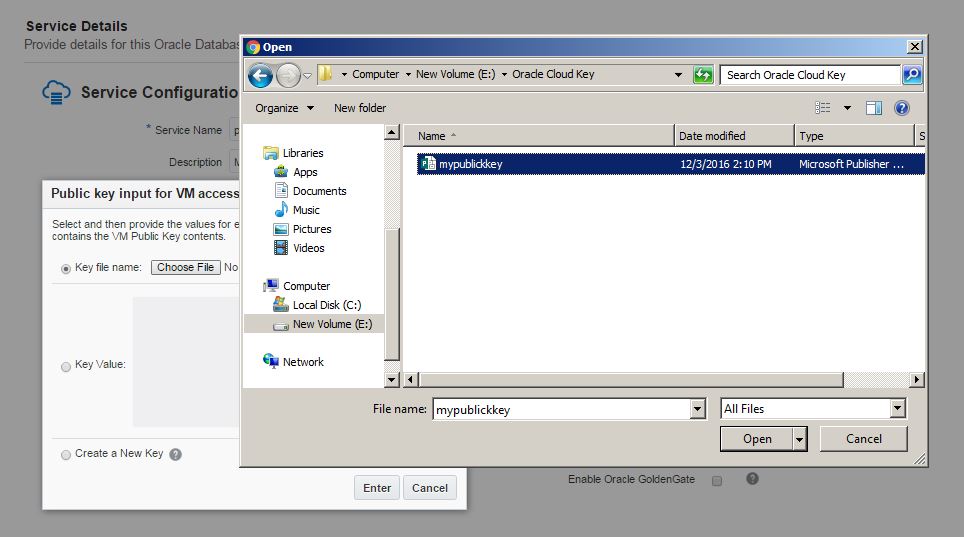
image-16


Provide the service name, database storage, select necessary compute shape and click Next.
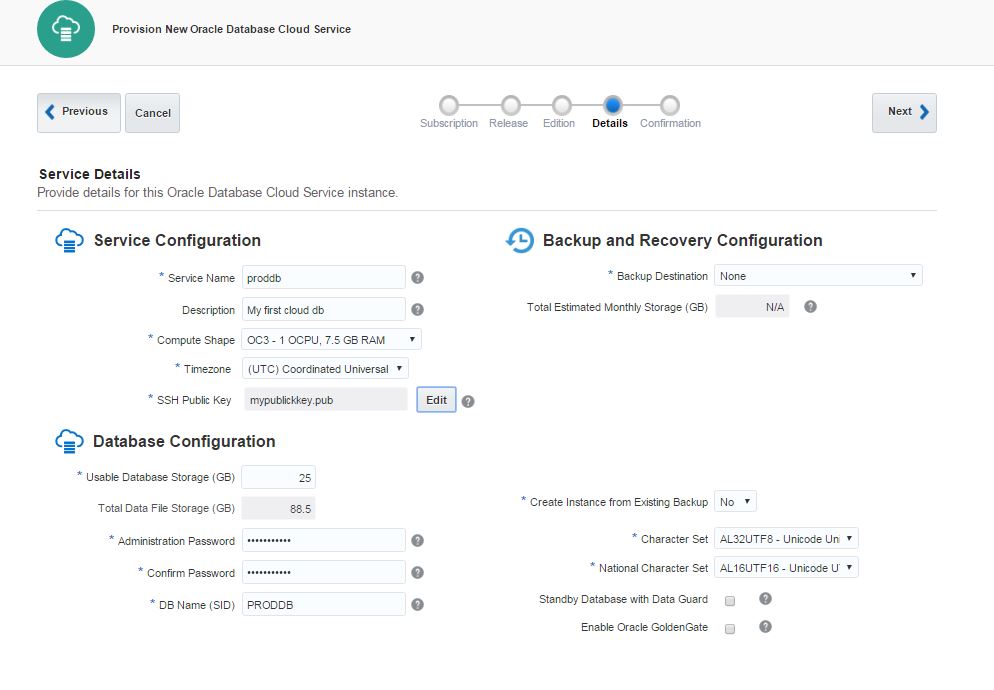
image-17


Review the information and click Create button to create a service
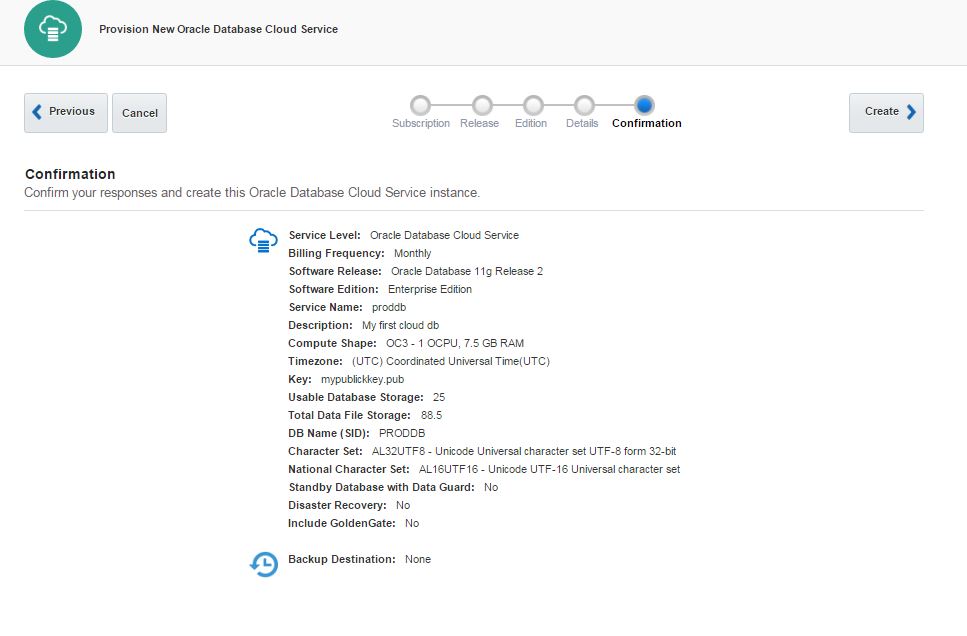
image-18


Click “In Progress” link to check the service creation progress.
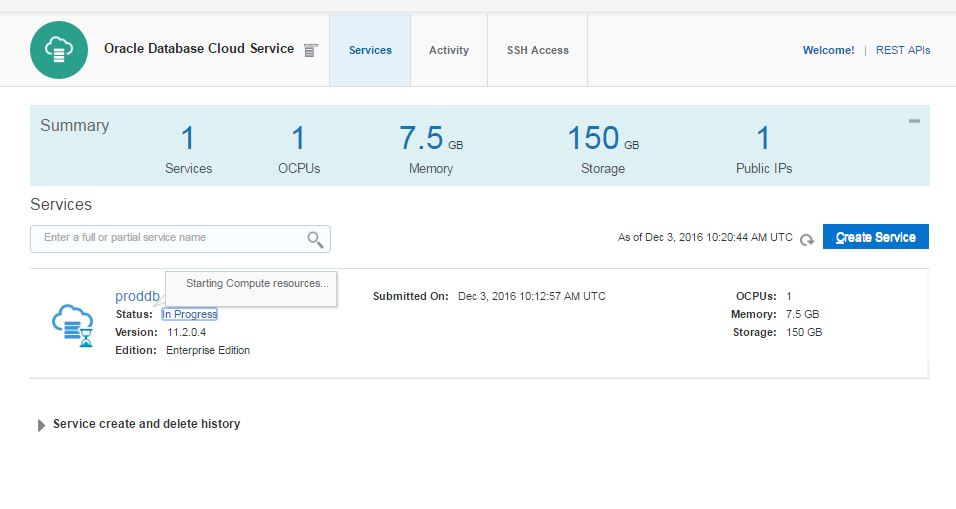
image-19


After a while, the service will be created successfully.
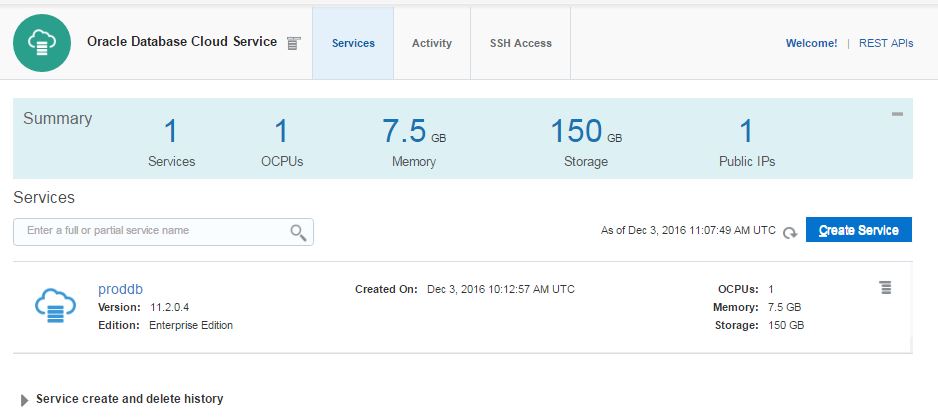
 

image-20


Click on proddb link to open the service.
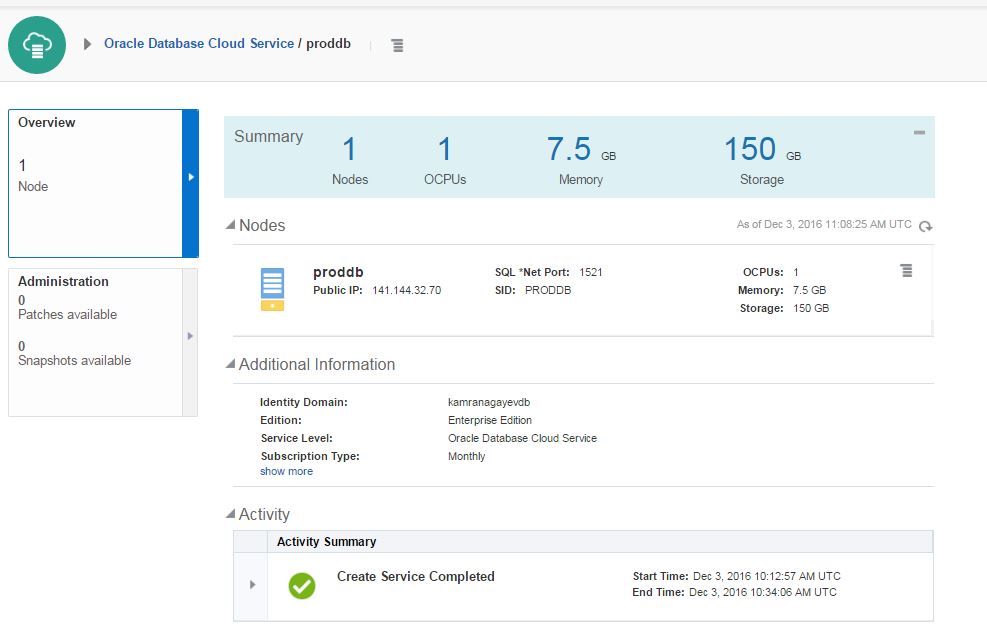
 

image-21


Before trying to connect to the database in the cloud from outside, you should enable dblistener security rule. Open “Oracle Database Cloud Service” dashboard.
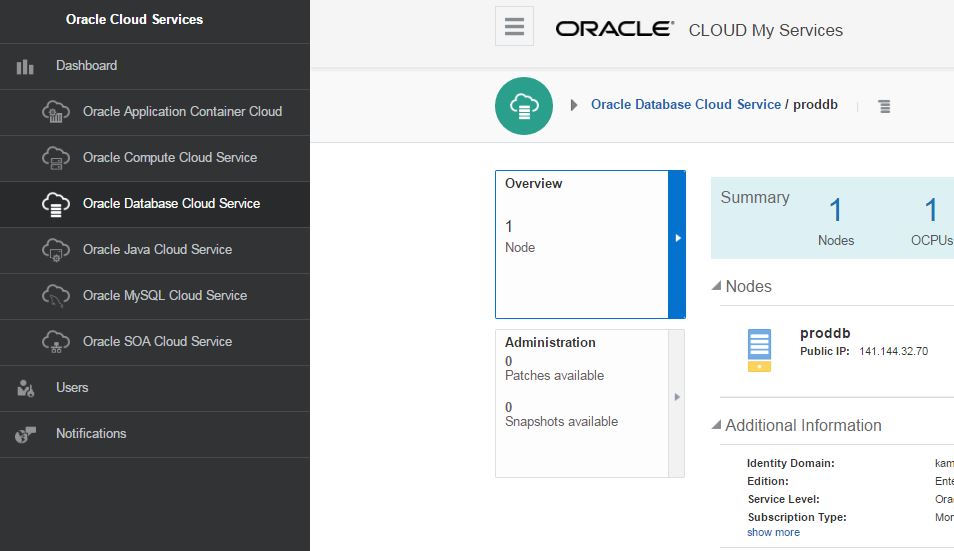
 

image-22


Click on Network tab

image-23


When you click on Network tab, you will get list of security roles.
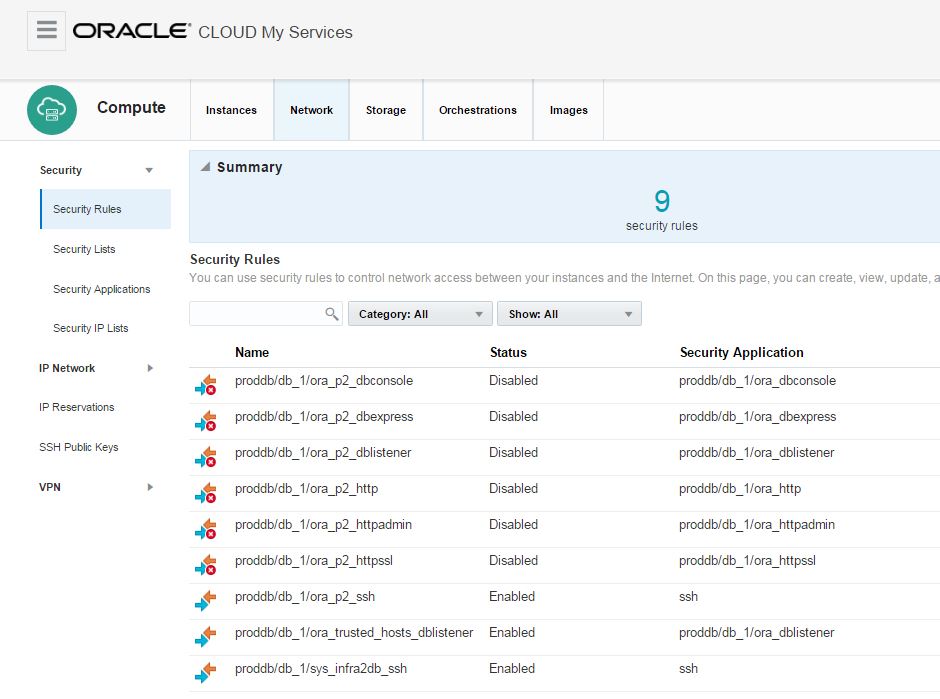
 

image-24


Click on the menu icon for ora_p2_dblistener role and select Update.


image-25


Enable the status of this security role
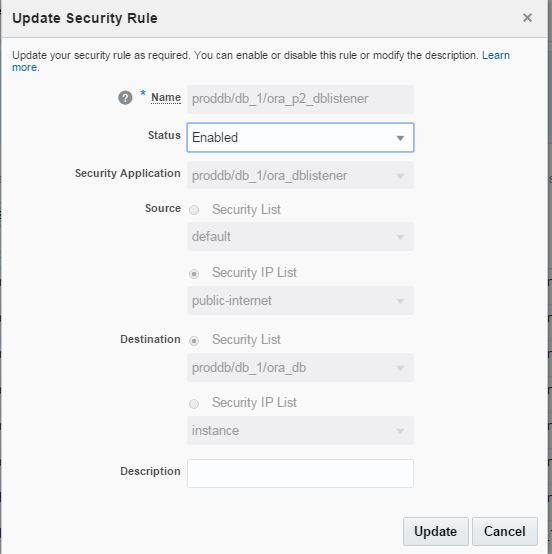
 

image-26


Enable the ora_p2_dbconsole security role to get access to OEM.


image-27


Now, let’s connect to the database from SSH. Provide the private key that was saved above
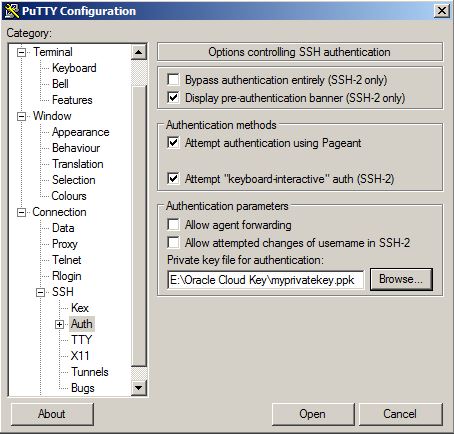
image-28


Provide the IP of the virtual machine that is provided in the main page of the database cloud service and click Open.
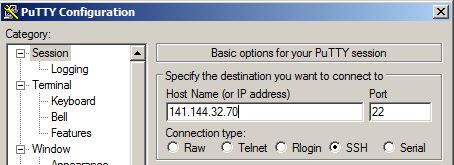
 

image-29


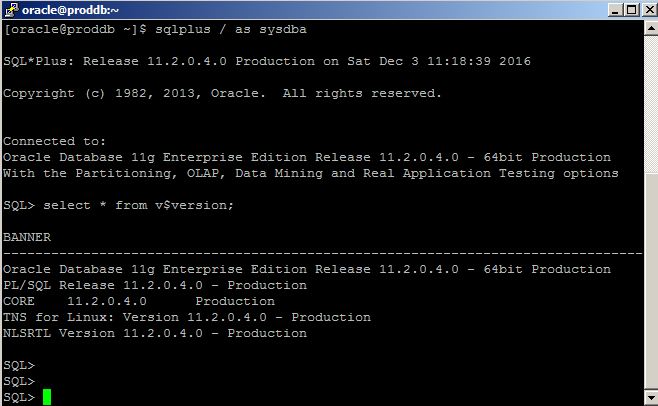
Provide username as “oracle” and password that was provided when generating a private key using PuTTy Key Generator tool and login to the server where the database is running.  Connect to SQL*Plus and run SQL commands:
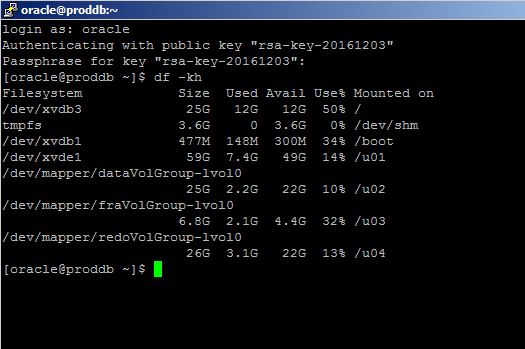
image-31


image-32


No open tnsnames.ora file and add the following entry:


tnsnames.ora

PRODDB =

(DESCRIPTION =

(ADDRESS = (PROTOCOL = TCP)(HOST = 141.144.32.70)(PORT = 1521))

(CONNECT_DATA =

(SID = PRODDB)

)

)


Open a command prompt, login to the database in the cloud and run SQL commands:
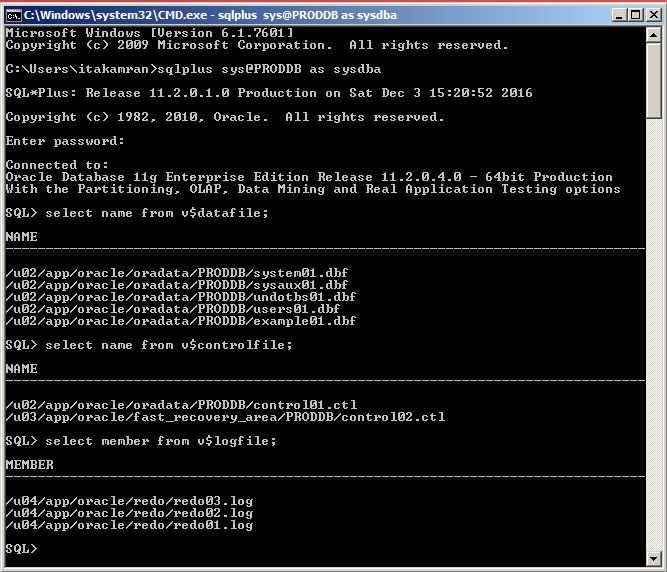
 

image-33


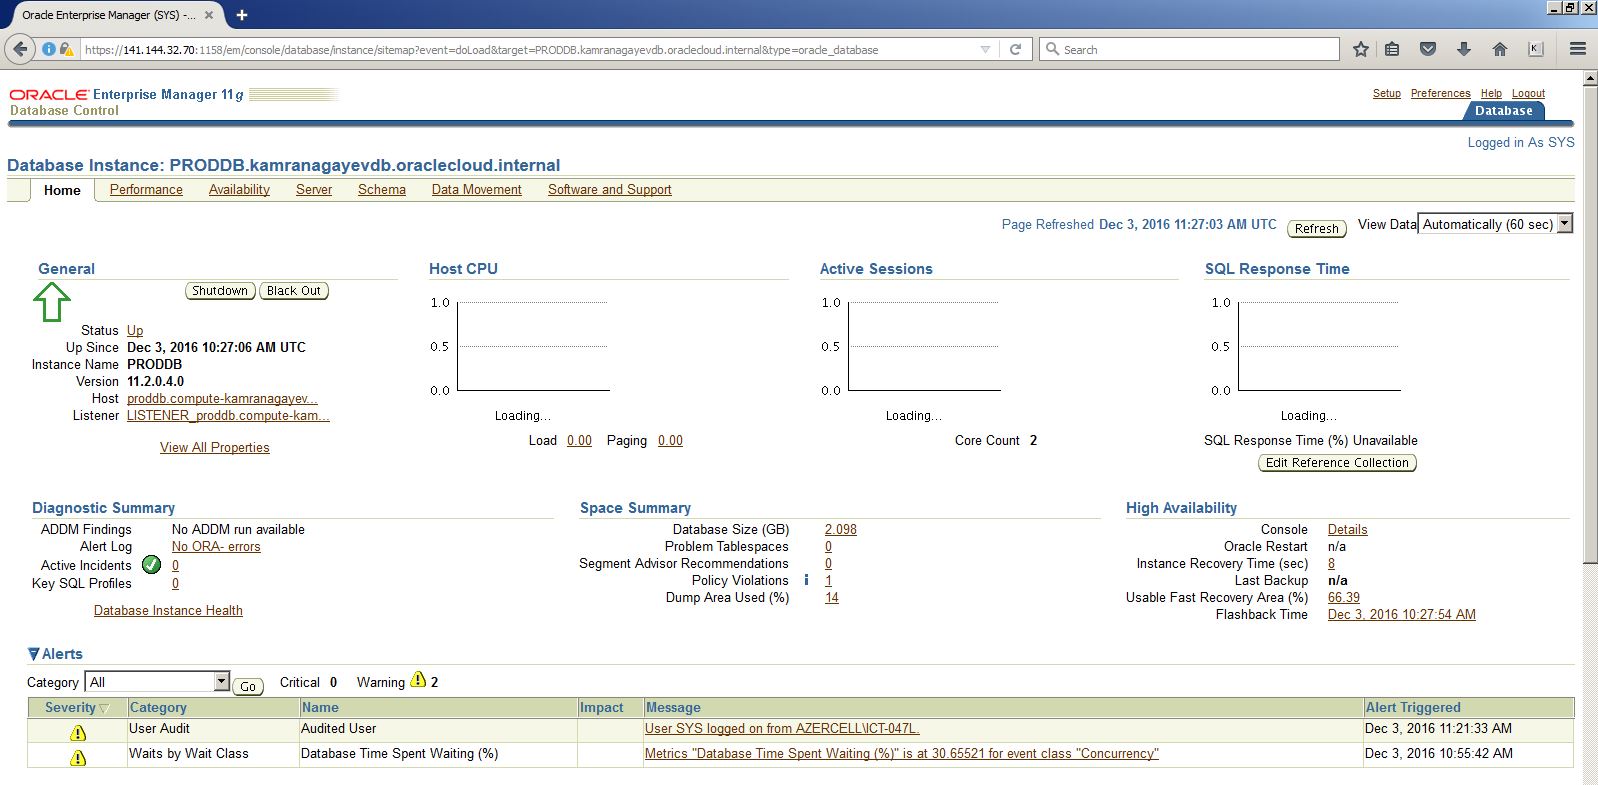
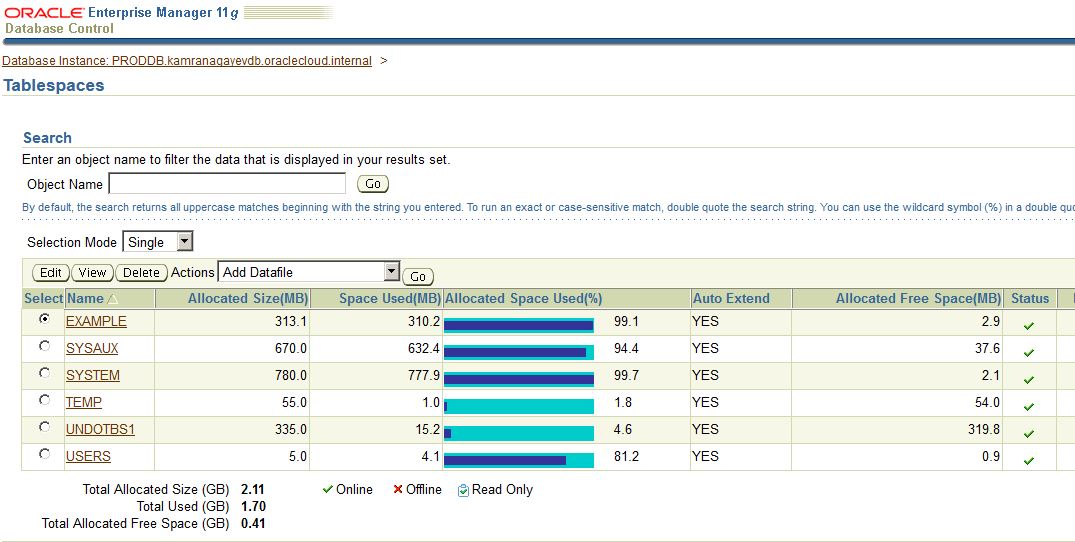
To open an OEM, click on the menu icon on the Database Cloud Service home page and select “Open EM Console”
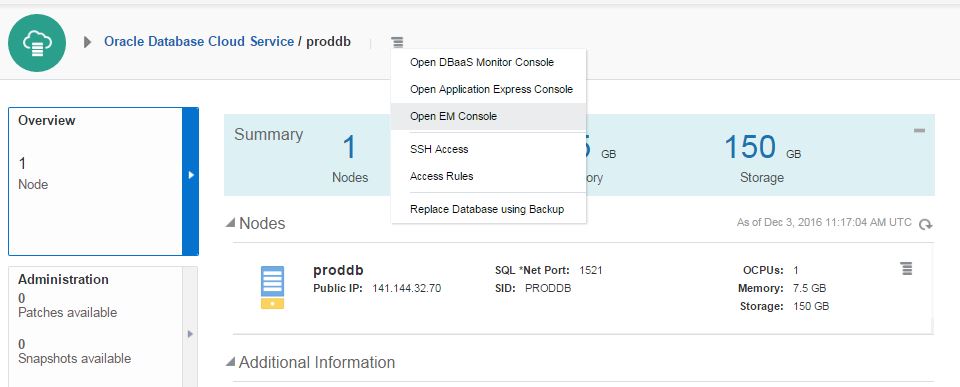
 

image-34


Provide the username and password and login
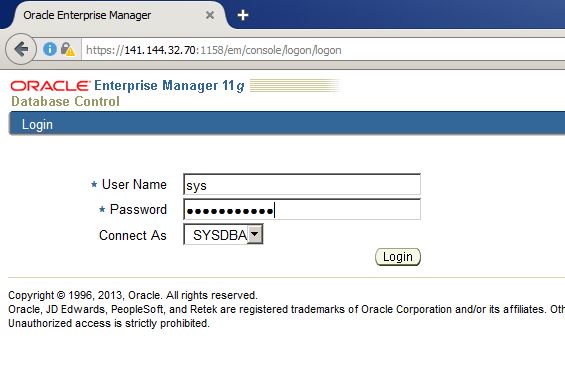
 

image-35


image-36


image-37


After creating and configuring a database using a wizard, I decided to create a new database in a silent mode in the same machine as follows:


[oracle@proddb dbhome_1]$ dbca -silent -createdatabase -gdbname mydb -templatename /u01/app/oracle/product/11.2.0/dbhome_1/assistants/dbca/templates/General_Purpose.dbc -sid mydb -syspassword oracle -systempassword oracle -emConfiguration none -datafileDestination /u02/app/oracle/oradata/mydb -memoryPercentage 40


Copying database files

1% complete

3% complete

11% complete

18% complete

26% complete

37% complete

Creating and starting Oracle instance

40% complete

45% complete

50% complete

55% complete

56% complete

60% complete

62% complete

Completing Database Creation

66% complete

70% complete

73% complete

74% complete

75% complete

76% complete

77% complete

88% complete

99% complete

100% complete

Look at the log file “/u01/app/oracle/cfgtoollogs/dbca/mydb/mydb.log” for further details.

[oracle@proddb dbhome_1]$


Check if the database is up and running and connect to it:


[oracle@proddb dbhome_1]$ ps -ef | grep smon

oracle    7040     1  0 11:40 ?        00:00:00 ora_smon_mydb

oracle    7226  2625  0 11:40 pts/1    00:00:00 grep smon

oracle   11837     1  0 10:30 ?        00:00:00 ora_smon_PRODDB

[oracle@proddb dbhome_1]$ export ORACLE_SID=mydb

[oracle@proddb dbhome_1]$ sqlplus / as sysdba


SQL*Plus: Release 11.2.0.4.0 Production on Sat Dec 3 11:40:39 2016

Copyright (c) 1982, 2013, Oracle.  All rights reserved.

Connected to:

Oracle Database 11g Enterprise Edition Release 11.2.0.4.0 – 64bit Production

With the Partitioning, OLAP, Data Mining and Real Application Testing options

SQL>


Run free command to check the free space of the machine. We have 2 databases running on this machine, so we have only 1g free memory.

[oracle@proddb dbhome_1]$ free

total       used       free     shared    buffers     cached

Mem:       7397060    6295684    1101376     266948      66356    1364664

-/+ buffers/cache:    4864664    2532396

Swap:      4194300      29916    4164384

[oracle@proddb dbhome_1]$

After having a database service with the specific parameters, you can change the parameters anytime. Let’s add 2gb free space to the machine. Switch to the home page of the database cloud service, click on the menu icon and choose “Scale Up/Down” link
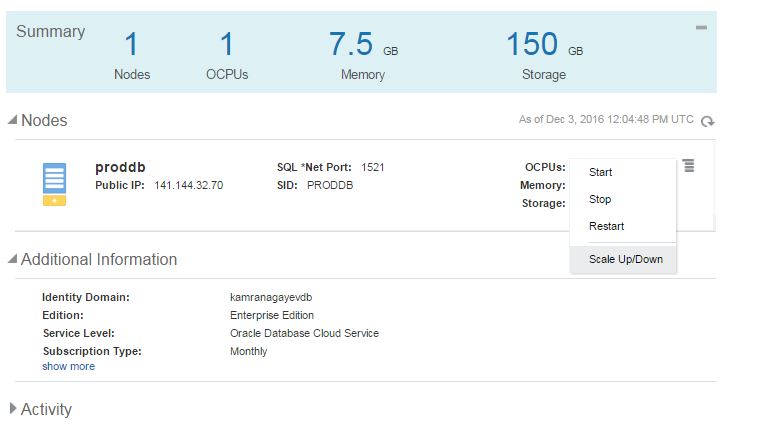
image-38


Provide size of the new space and click “Yes, Scale Up/Down Service” button
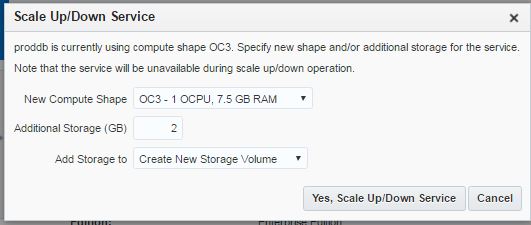
image-39


The host will reboot and the required space will be added :

image-40


The new space is mounted to the new mount point (u05):


[oracle@proddb ~]$ df -kh

Filesystem            Size  Used Avail Use% Mounted on

/dev/xvdb3             25G   12G   12G  51% /

tmpfs                 3.6G     0  3.6G   0% /dev/shm

/dev/xvdb1            477M  148M  300M  34% /boot

/dev/xvde1             59G  7.4G   49G  14% /u01

/dev/mapper/dataVolGroup-lvol0

25G  3.8G   20G  17% /u02

/dev/mapper/fraVolGroup-lvol0

6.8G  2.1G  4.4G  32% /u03

/dev/mapper/redoVolGroup-lvol0

26G  3.1G   22G  13% /u04

/dev/xvdg1            2.0G  3.1M  1.9G   1% /u05

[oracle@proddb ~]$
Posted in Uncategorized | 3 Comments »

“Oracle Certified Master 11g Study Guide” – www.ocmguide.com – Free Ebook

Posted by Kamran Agayev A. on October 14th, 2016

ocm-book


This is it! My second book is out!

There are bunch of certified associate and professional Oracle DBAs around the world who plan to take an OCM exam, but without having a study guide it seems to be hard to prepare for that amount of different topics and make all kind of practical tests. And most of them, just give up.

And having successfully passed the exam, I decided to help DBAs by sharing my preparation method with you. It has been 2 years since I have started writing the book about how to prepare for OCM 11g Exam. This guide covers all OCM topics with documentation references and MOS notes, with step by step installation and configuration instructions, practical and real-life examples.

This book consists of 200+ practical scenarios, 260 screenshots and 300+ assigned tasks with specified time limit that makes you 100% ready for the exam. Every single topic is explained in a practical examples using both graphic user and command line interfaces.

If you are a certified DBA and looking forward to become an OCM, then this study guide is for You!

If you are a DBA and want to have a practical experience in different topics such as Oracle Enterprise Manager, Backup and Recovery, ASM, RAC, Grid Infrastructure, Performance Tuning, Data Guard and etc, then this book is for You!

To get a free copy of some chapters of the book, visit www.ocmguide.com


Posted in Uncategorized | 9 Comments »

RMAN “Catalog start with” returns “no files found to be unknown to the database”

Posted by Kamran Agayev A. on January 2nd, 2016

Interesting issue happened today (running 11.2.0.3 DB on Linux) while using “CATALOG START WITH” command in RMAN. Although I was having all backups under /orabackup folder, RMAN didn’t find anything, reporting “no files found to be unknown to the database” message:

RMAN> catalog start with ‘/orabackup’;

searching for all files that match the pattern /orabackup
no files found to be unknown to the database

RMAN>


I changed the permission to “chmod 777” and checked the owner, used different patterns like “/orabackup/*”, “/orabackup/” and  “/orabackup/*.bkp” but failed. Then I decided to create a folder under the /orabackup folder, moved all files in it and tried “CATALOG START WITH” command again, and succeeded.

RMAN> catalog start with ‘/orabackup’;

searching for all files that match the pattern /orabackup
no files found to be unknown to the database

RMAN>

[oracle@db1 ~]$ cd /orabackup/
[oracle@db1 orabackup]$ mkdir test
[oracle@db1 orabackup]$ mv *.bkp test/
RMAN> catalog start with ‘/orabackup/test’;

searching for all files that match the pattern /orabackup/test

List of Files Unknown to the Database
=====================================
File Name: /orabackup/test/mydb_database_btqqatr2_1_1.bkp
File Name: /orabackup/test/mydb_database_bsqqakoq_1_1.bkp
File Name: /orabackup/test/mydb_arch_buqqatrp_1_1.bkp
File Name: /orabackup/test/mydb_contolfile_bvqqatsc_1_1.bkp
File Name: /orabackup/test/mydb_spfile_c0qqatsk_1_1.bkp

Do you really want to catalog the above files (enter YES or NO)? YES
cataloging files…
cataloging done

List of Cataloged Files
=======================
File Name: /orabackup/test/mydb_database_btqqatr2_1_1.bkp
File Name: /orabackup/test/mydb_database_bsqqakoq_1_1.bkp
File Name: /orabackup/test/mydb_arch_buqqatrp_1_1.bkp
File Name: /orabackup/test/mydb_contolfile_bvqqatsc_1_1.bkp
File Name: /orabackup/test/mydb_spfile_c0qqatsk_1_1.bkp

RMAN>


Posted in Administration, RMAN Backup and Recovery | 11 Comments »

Oracle 11g Clusterware failure scenarios with practical demonstrations – Webinar

Posted by Kamran Agayev A. on October 5th, 2015

Sharing my Webinar on “Oracle 11g Clusterware failure scenarios with practical demonstrations” which I did for RACSIG few days ago


racsig


Posted in Uncategorized | 2 Comments »

Interim patch apply best practices in Oracle

Posted by Kamran Agayev A. on October 2nd, 2015

Yestarday, after successfully applying an interim patch to the 3 node clusterware environment, I decided to share my experience with you. In this blog post, you can find some best practicec that I think must be followed before and during patch insallation to bring the downtime and failure risks to the minimum.

First of all, make sure you read the following metalink notes:

Master Note For OPatch (Doc ID 293369.1)
FAQ: OPatch/Patch Questions/Issues for Oracle Clusterware (Grid Infrastructure or CRS) and RAC Environments (Doc ID 1339140.1) 


Before applying any interim patches or upgrading the database or the clusterware, make sure you have answers to the following questions:

– Have you tested the patch installation? 

– Have you tested rollback of the patch? 

– What you will do if you can’t rollback the patch with default rollback mechanism? 

– What you will do if you fail to open the database after the patch installation? 

Do you have a backup? Have you tested it? What if you don’t have enough time to restore? 


Here is the list of what I would prefer to do before applying any interim patches to the mission critical environment:

– Backup the home folder that is going to be patched

tar -cvf grid_home_before_patch.tar /home/oracle/app/11.2.0

If the patch installation goes wrong and you can’t rollback the patch using default method, restore the backup of the installation home folder and bring the database (clusterware) up.

– Make sure you have a full backup of the database 

Most probably you will not go with the restoration, but you never know what might happen)

– Make sure your backup is recoverable

Yes. This might be a discussion topic, but I strongly believe (as an author of the RMAN Backup and Recovery book :) ) in “If you don’t test your backup, you don’t have a backup” philosophy. Restore it and make sure a) The backup is restorable/recoverable b) Your restore/recover scripts works fine. In my experience, I had a situation where the restore of the backup failed while restoring it for the developers for the testing purpose because of non tested recovery scripts. I heard a situation (a couple of years ago when I attended a wonderful OOW session) where one of the attendees complained how they failed to restore a backup when the production environment failed and this downtime (for days) costed them for a couple of million dollars.
– Make sure you have a Standby database.

Why? Imagine you took 30 minutes downtime to apply the patch and for any reason you were not able to do it and can’t rollback because you are in the middle of the patch apply procedure and trying to fix the issue. Or you can’t rollback the patch for any reason. You stuck! And you don’t have time to solve it. And you are forced to open the database right away. And you can’t do it as well. In this critical case, you can forward the applications to the Standby database. Build up a standby database, make sure archived log files of the production database are shipping to the standby server. You can also perform a failover to test your standby database and build it up again.

– Test the patch apply procedure on the test environment with the “same binaries”. 

Clone the database and clusterware soft to the test machine (or install the same release and apply the same patches as in the production environment) and apply the patch. Get the errors in the test environment before you get them in the production.

– Make sure there’s no any session runinng in the background related with the binaries of the home that is being patched. 

Yesterday, when I was trying to apply an interim patch to the 3 node clusterware (11.2.4) I came up with the following error:

Backing up files…

UtilSession failed: Map failed
java.lang.OutOfMemoryError: Map failed
Log file location: /home/oracle/11.2.0/grid_1124/cfgtoollogs/opatch/opatch2015-10-01_17-40-56PM_1.log

OPatch failed with error code 73

The reason was not the memory at all, we were having a lot of free memory at that time. There were some binary files in use in the background despite the fact that the whole clusterware stack was down. Anyway, I killed all processes and the installation proceeded.

The following metalink note also might be useful – OPatch Apply/Rollback Errors: ‘Prerequisite check “CheckActiveFilesAndExecutables” failed’ (Doc ID 747049.1)

– Download the latest OPatch

Check the following metalink note to download the latest OPatch. How To Download And Install The Latest OPatch Version (Doc ID 274526.1)

Download and extract it under the home folder that is going to be patched. Add the $GRID_HOME/OPatch or $ORACLE_HOME/OPatch to the PATH environment variable. Make sure which opatch command returns you a result

– Make sure you have enough free space in the mount point where the home folder reside.

A few years ago when I was trying to install a patch to the production environment, I decided to try it on the test environment (10 minutes before patching a production database). I ended up with the “There is no free space to proceed the installation” error. Home folder was full, and OPatch was taking backup of the binaries and library files that are being patched.  Check the following metalink note for more informaton: Opatch Fails Updating Archives with ” No space left on device ” Error. (Doc ID 1629444.1)

 – Bring the instance down before patching

If you have a Grid Infrastructure installed, you have a RAC database and you plan to apply the patch node by node without a downtime, bring the instance of the node you’re patching using the following command:

srvctl stop instance -d RACDB -i RACDB1

Why? Because if you start installing the patch and run the rootcrs.pl -unlock command which is the first step that brings the clusterware stack down, the database will be closed with ABORT mode and non of the sessions will be failed over.

– Try to rollback the patch installation at test environment after installing it

Why? Feel how you should rollback (and see if you get any error) the specific patch if you failed the installation and can’t proceed, or you installed successfully, but it caused another bug or problem. Check the following metalink note to learn how to rollback the patch and run opatch lsinventory to make sure it is rollbacked.  How to Rollback a Failed Interim Patch Installation (Doc ID 312767.1)

Sometimes, rollback also might fail :) In this case, the best option is to restore the whole home folder from the backup, but it is not mentioned in ths metalink note OPatch Fails to Rollback Patch Due to Relink Errors (Doc ID 1534583.1)

– Debug the OPatch if it is stuck 

You can use OPATCH_DEBUG=TRUE parameter to debug the OPatch. If it doesn’t generate enough information, use truss (or strace in Liunx) to debug OPatch. Check the following metalink note to learn how to use truss with OPatch. How To Use Truss With OPatch? (Doc ID 470225.1) 

Opatch might also hang due to corrupted jar and java executables. Check this metalink note – opatch napply Hanging (Doc ID 1055397.1)


This is all I have :) Please let me know if this document helped you and share your experience with me :) Have a successfull patching days ahead! :)

Posted in Administration, RAC issues | 8 Comments »

ORA-02298: cannot enable name – parent keys not found

Posted by Kamran Agayev A. on August 28th, 2015

An interesting case we just got while migrating a data to the different database where we got the following error:


ORA-39083: Object type REF_CONSTRAINT failed to create with error:

ORA-02298: cannot enable name – parent keys not found


The issue was between 2 tables. It couldn’t enable the foreign key constraint by throwing error that “parent key not found”. The migration was from production database where the foreign key constraint was enabled and it is not possible to have a data in the child table without parent rows.

After quering both tables I found the missing rows, deleted them from the child table and run the query to enable the constraint again – and it succeeded. The reason was because the first table that was exported was the primary table. Then a few rows were added to both primary and child tables (in the production database). Then child table was exported with having those rows which are missing from the primary table (because it was exported firstly)

The solution was to use FLASHBACK_SCN or FLASHBACK_TIME parameter while exporing the data and get all rows that are consistent as of this SCN or TIME

Posted in Administration | No Comments »

ORA-00304: requested INSTANCE_NUMBER is busy

Posted by Kamran Agayev A. on August 27th, 2015

There are a lot of explanation and different solutions for the error “ORA-00304: requested INSTANCE_NUMBER is busy”. But today, in my case while I was tyring to shutdown one of the cluster nodes, it hanged. There were no more information related with the hang in the log and trace files, so I went with shut abort and startup and got the following message:

SQL> startup

ORA-00304: requested INSTANCE_NUMBER is busy

SQL>

The second node of the RAC database was up and running. And the instance_number was set to 2. After a little investigation, I found out that there was one process related with the database running on OS (even the database was closed) I killed that session and started the first node and it opened successfully

Posted in Administration, RAC issues | 3 Comments »

Wrong parallelism degree for the heavy SQL commands

Posted by Kamran Agayev A. on June 24th, 2015

Yesterday I got a call from the Datawarehouse team member who claimed that some reports started to run slowly. Hmm … Slowly … Right after I got a call, I checked the session and found that it was running with parallel degree 8. The degree value was too low. I checked parallelism parameters of the database:

SQL> set linesize 150

SQL> show parameter parallel_degree_policy

NAME                                 TYPE                             VALUE

———————————— ——————————– ——————————

parallel_degree_policy               string                           AUTO

SQL>


The automatic degree of parallelism future was enabled.

parallel_degree_limit parameter was set to CPU.  As the formula to calculate the limit is PARALLEL_THREADS_PER_CPU * CPU_COUNT * the number of instances available, I got the necessary values and calculated

SQL> show parameter PARALLEL_THREADS_PER_CPU


NAME                                 TYPE                             VALUE

———————————— ——————————– ——————————

parallel_threads_per_cpu             integer                          2

SQL>

SQL> show parameter cpu_count


NAME                                 TYPE                             VALUE

———————————— ——————————– ——————————

cpu_count                            integer                          47

SQL>


So the parallel_degree_limit=47*2=94 (which is pretty high)

So there is no issue regarding the SQL statement and the database level parallelism configuration. I got an execution plan of the same SQL command from SYS user, and here what I got after the execution plan:

Note

   – automatic DOP: Computed Degree of Parallelism is 94 because of degree limit

Hmm… If I run the query with SYS user, the query runs with correct parallelism degree. If I run it with different user, I get the only 8 parallel sessions. The first thing came into my mind was Resource Manager.

I need to check the Resource Manager, but …. but …. there was a problem with the Enterprise Manager :) I know you’re smiling, because you should know how it’s hard to view and configure resource manager with command line interface.

No way, I don’t have an option to make the customer wait for me to configure the agent of the Grid Control. First of all, I queried DBA_RSRC_CONSUMER_GROUP_PRIVS view to get the list of consumer groups that the specific user is assigned:

SQL> SELECT * FROM DBA_RSRC_CONSUMER_GROUP_PRIVS

2  where grantee=’PROD_USER’;


GRANTEE                        GRANTED_GROUP                  GRA INI

—————————— —————————— — —

PROD_USER                         CG_BATCHES                     NO  NO

PROD_USER                         CG_REP_LOW                     NO  NO

PROD_USER                         CG_REP_HIGH                    NO  NO

PROD_USER                         CG_REP_NORMAL                  NO  NO


SQL>


Then I queried DBA_RSRC_PLAN_DIRECTIVES view to get detailed information about the resource plan directives of the consumer groups that the specific user belongs to:

SQL> SELECT plan, group_or_subplan, cpu_p1, cpu_p2, cpu_p3, cpu_p4, parallel_degree_limit_p1

2    FROM DBA_RSRC_PLAN_DIRECTIVES

3   WHERE     plan = ‘DWH_DAY_PLAN’

4         AND group_or_subplan IN (SELECT granted_group

5                                    FROM DBA_RSRC_CONSUMER_GROUP_PRIVS

6                                   WHERE grantee = ‘PROD_USER’);


PLAN                           GROUP_OR_SUBPLAN                   CPU_P1     CPU_P2     CPU_P3     CPU_P4 PARALLEL_DEGREE_LIMIT_P1

—————————— —————————— ———- ———- ———- ———- ————————

DWH_DAY_PLAN                   CG_REP_LOW                              0          0          0         50                       16

DWH_DAY_PLAN                   CG_REP_HIGH                             0         65          0          0                       32

DWH_DAY_PLAN                   CG_REP_NORMAL                           0          0         80          0                       24

DWH_DAY_PLAN                   CG_BATCHES                              0          0          0         50                       16


SQL>


So the highest parallelism degree was set for CG_REP_HIGH consumer group, thus the user should use that group. Next, I checked V$SESSION view to check which consumer groups are used by that user:

SQL>

SELECT resource_consumer_group, COUNT (1)

FROM v$session

WHERE username = ‘PROD_USER’

GROUP BY resource_consumer_group;


RESOURCE_CONSUMER_GROUP             COUNT(1)

——————————–                           ———-

CG_REP_HIGH                                                  70

OTHER_GROUPS                                              154

_ORACLE_BACKGROUND_GROUP_        3


Ops. Most of the connections are using OTHER_GROUPS consumer group which has a very limited parallelism degree. So why the users were switching to the OTHER_GROUPS consumer group? The first reason was the switch consumer group feature. The sessions are either switched manually (which is not possible to happen) or automatically based on the CPU and I/O resource limits defined for that group (which is not defined in the group specification) So what is the problem? Ah, may be mapping priority. I checked the dba_rsrc_mapping_priority view to get the list of mapping priority:


SQL> SELECT * FROM dba_rsrc_mapping_priority;


ATTRIBUTE                        PRIORITY STATUS

—————————— ———- ——————————

EXPLICIT                                1

SERVICE_MODULE_ACTION                   2

SERVICE_MODULE                          3

MODULE_NAME_ACTION                      4

MODULE_NAME                             5

SERVICE_NAME                            6

ORACLE_USER                             7

CLIENT_PROGRAM                          8

CLIENT_OS_USER                          9

CLIENT_MACHINE                         10

CLIENT_ID                              11

11 rows selected.

SQL>


It didn’t gave me enough information and I checked the consumer group usage based on oracle user, OS user, module name and etc. And what I found was that all users that come from the same machine (from where the heavy SQL commands were running) were using OTHER_GROUPS consumer group. I queried dba_rsrc_group_mappings view to get information about session attributes (such as module name, OS user and etc.) with the consumer groups, and provided the OS username as a parameter for the VALUE column:

SQL> SELECT * FROM dba_rsrc_group_mappings

WHERE value=’REP_USR’;

And didn’t get any value. I asked the guy who called me if they changed the username of the OS, and he told me “Yes” :) 2 days ago they migrated the software to the new machine and now uses different username to run the reports. (The old one was REPUSER) I queried the old user at DBA_RSRC_GROUP_MAPPINGS view and get the output!

SQL> col value format a15

SQL> col consumer_group format a15

SQL> select * from dba_rsrc_group_mappings

2  WHERE value=’REPUSER’;


ATTRIBUTE                      VALUE           CONSUMER_GROUP  STATUS

—————————— ————— ————— ——————————

CLIENT_OS_USER                 REPUSER         CG_REP_HIGH


SQL>


So the previous user was assigned to the specific consumer group, and after the software moved to the new host and used new OS user to run the reports, it didn’t find to which consumer group it belongs and switched to OTHER_GROUPS consumer group. After founding it, I manually set the new OS user to the CG_REP_HIGH consumer group as follows:

BEGIN

dbms_resource_manager.create_pending_area();

dbms_resource_manager.set_consumer_group_mapping (DBMS_RESOURCE_MANAGER.CLIENT_OS_USER,’REP_USR’,’CG_REP_HIGH’);dbms_resource_manager.validate_pending_area();

dbms_resource_manager.submit_pending_area();

END;

/

After assigning the user to the consumer group, we opened a new session to run the report and checked the consumer group of that session. It was as what excepted – CG_REP_HIGH. And we got all parallelism degrees back and users were happy :)

Posted in Uncategorized | 2 Comments »

Default listener “LISTENER” is not configured when running DBCA

Posted by Kamran Agayev A. on January 6th, 2015

When running dbca to create a new database you can get the following message:

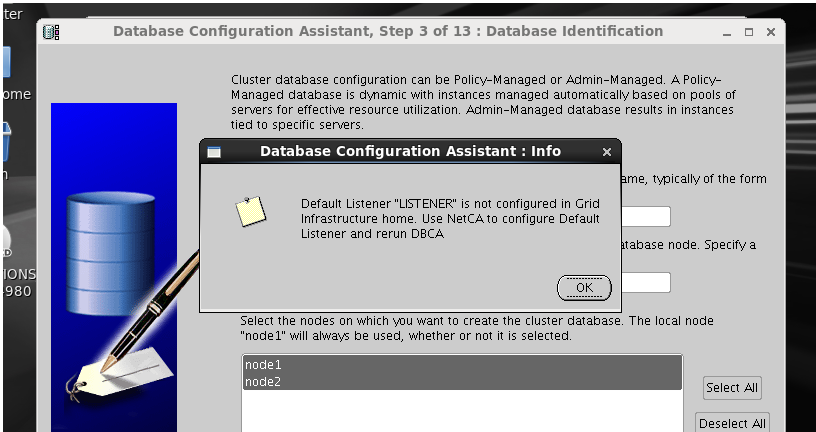
Default Listener “LISTENER” is not configured in Grid Infrastructure home. Use NetCA to configure Default Listener and rerun DBCA

default_listener_problem


Actually, there’s no need to run netca, all you need is to create a new listener as follows:

srvctl add listener

srvctl start listener


Posted in RAC issues | No Comments »