Kamran Agayev's Oracle Blog

Oracle Certified Master

I'm 10g OCP now!!!

Posted by Kamran Agayev A. on February 6th, 2009

Hi all

Today I’ve passed 1Z0-043 Oracle Administration 2 Exam and become Oracle Certified Professional (OCP) with 95% score

You can congratulate me! :)

Now I don’t want to stop and want go further to these certifications:

Oracle Database 11g Administrator Certified Professional

Oracle Database 10g: Managing Oracle on Linux Certified Expert

Oracle Database: SQL Certified Expert

Oracle PL/SQL Developer Certified Associate

Oracle Forms Developer Certified Professional

Oracle Advanced PL/SQL Developer Certified Professional

I’ve registered to all these exams and Oracle University courses and my company (BakuElektrikShebeke) is ready to pay for these exams and courses :)) From here I want to thank to management of my company

Posted in Administration | 32 Comments »

Installing CentOS on VMware – Step by Step

Posted by Kamran Agayev A. on January 5th, 2009


Today, I’m going to show you, installation of CentOS on a virtual machine

First of all, we’ve to download CentOS. CentOS is a freely-available operating system that is based on Red Hat Enterprise Linux system.  You can download the latest release (5) from its website. To download, please refer to download page of CentOS web site

http://isoredirect.centos.org/centos/5/isos/i386/

Select nearest location and begin downloading *.iso files.

After you finish downloading *.iso files, you have to mount it and let your VMware recognize it as a virtual “cd” or “dvd”. For this purpose, I prefer to download one DVD *.iso installation file. Please open VMware, double click on CD-ROM (IDE 1-0) item, select Use ISO image option and click Browse button to select your recently downloaded *.iso installation file of CentOS as shown below
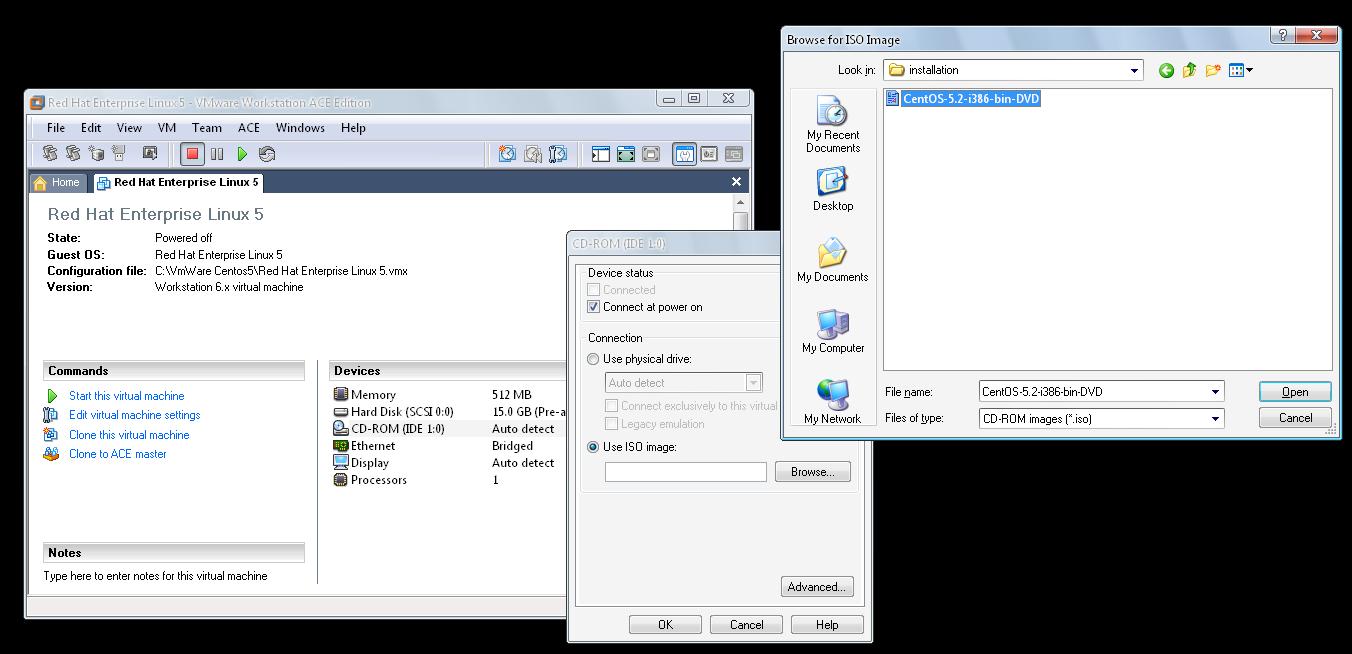


Now you virtually inserted you installation DVD into DVD-ROM. And you’re ready to install your OS virtually.  


You should change your Memory to 1024 MB for your further Oracle installation. Double click on Memory item and set it to 1024

Then click Power button to start your virtual pc
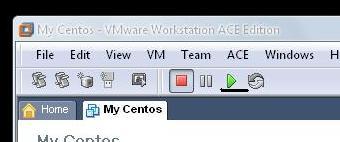
  

When your virtual pc starts, you’ll see welcome screen of installation CentOS
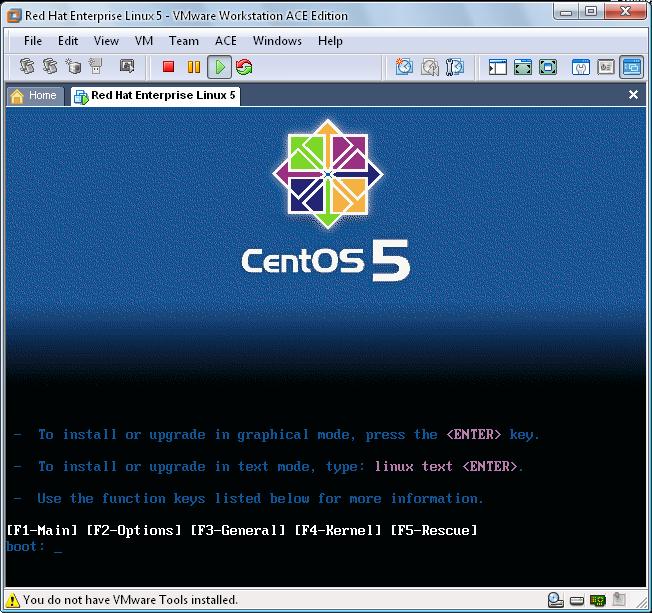


If you’ll not be able to see this screen, then restart your virtual pc and click Esc button for Boot menu. And from this menu, select CD-ROM Drive

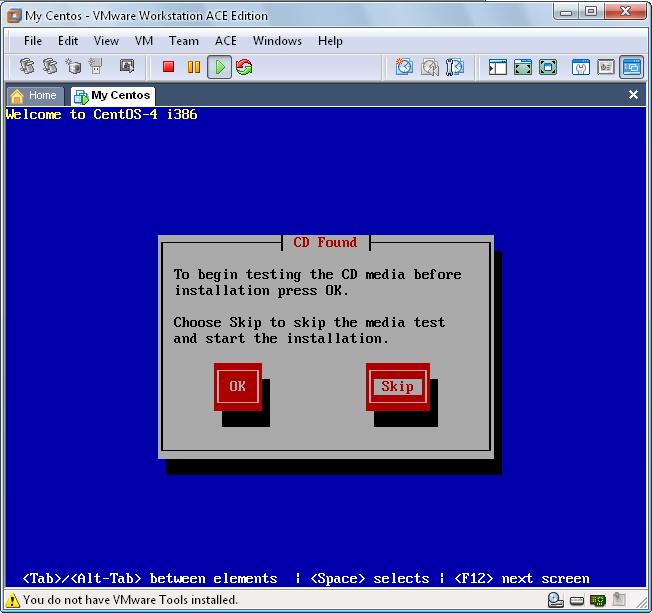
Click enter. The installation will tell you to begin testing of your installation cd or dvd. Select Skip button. It will skip testing your cd media and save your time
 

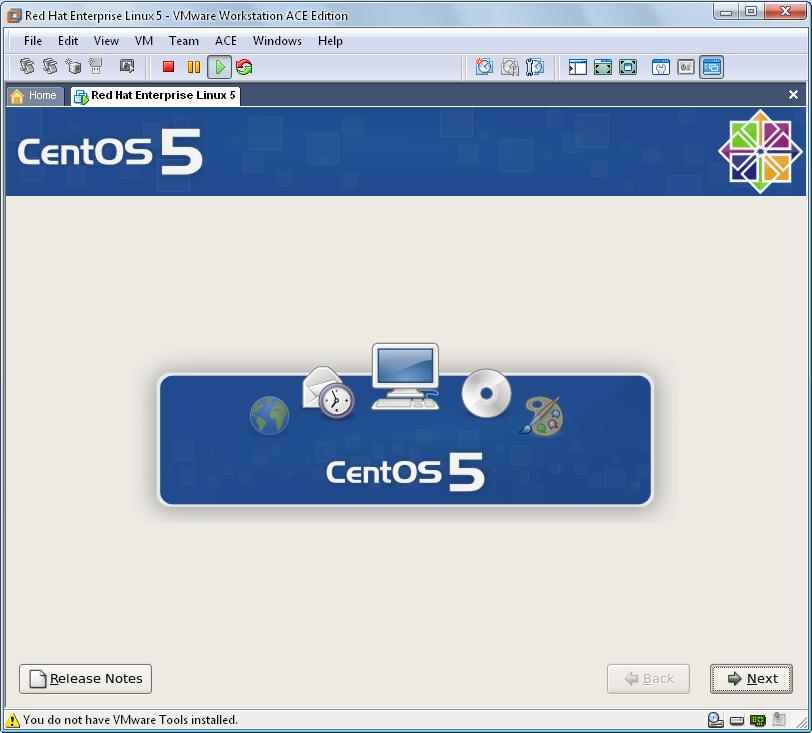
Then you’ll get another welcome screen, you only have to click next button on this screen
 

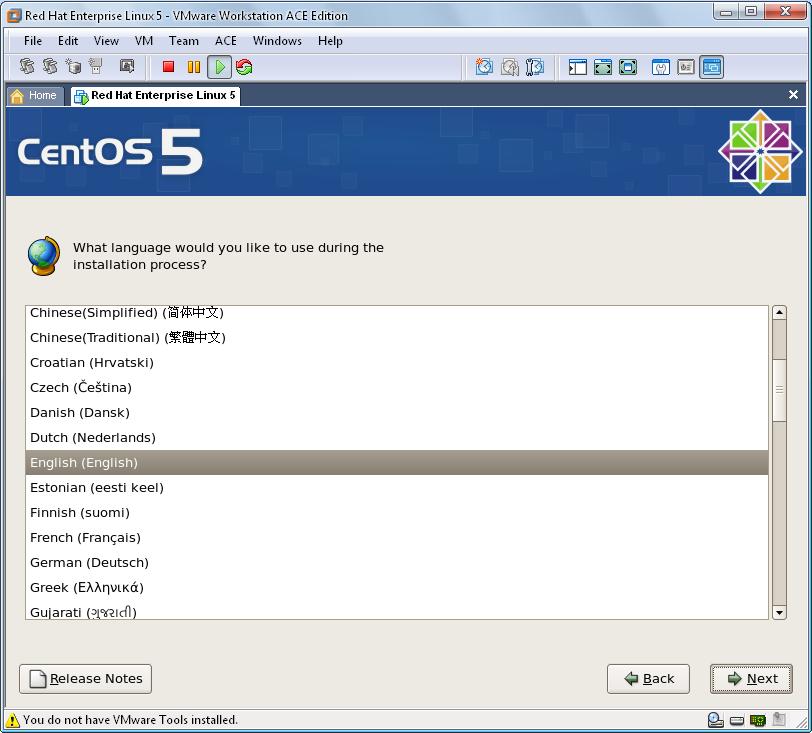
Select your language of installation and click Next
 

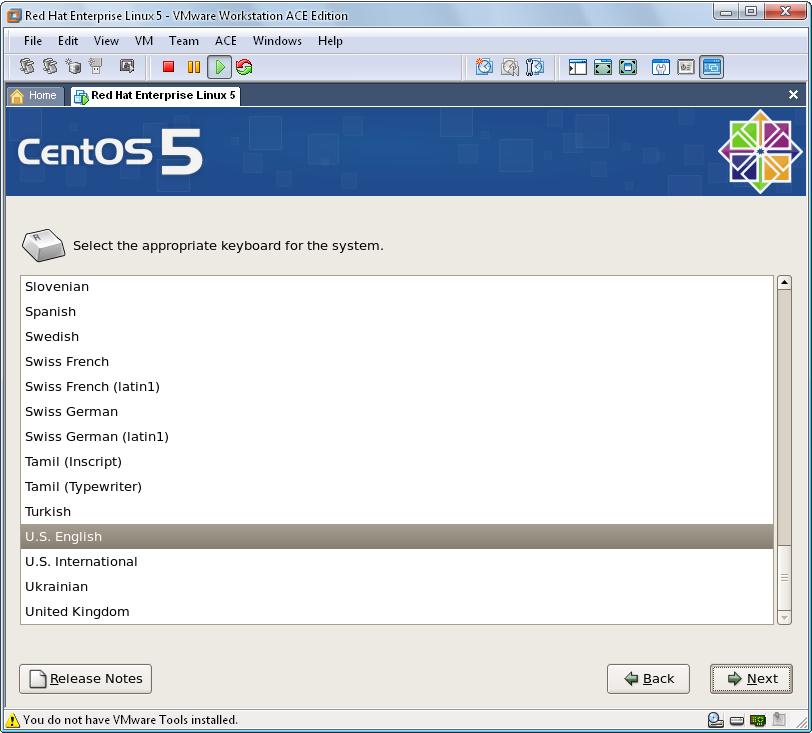
Then, select your keyboard configuration to use it for the system you’re installing and click Next
 

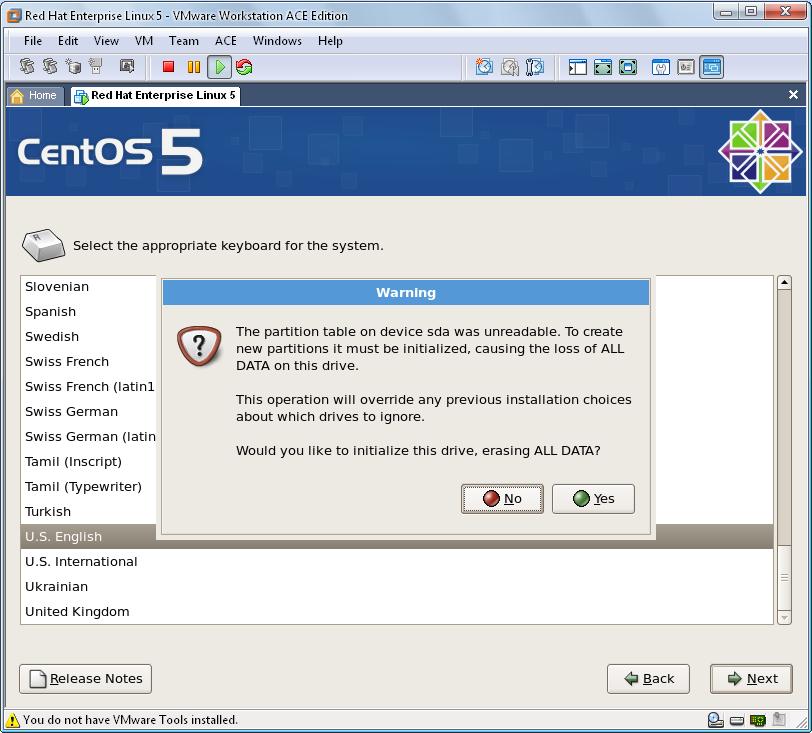
Then, you’ll be warned to create new partitions by erasing ALL DATA on your newly created hard drive. As there’s no information in this drive, you’ll select Yes
centos_installation_8


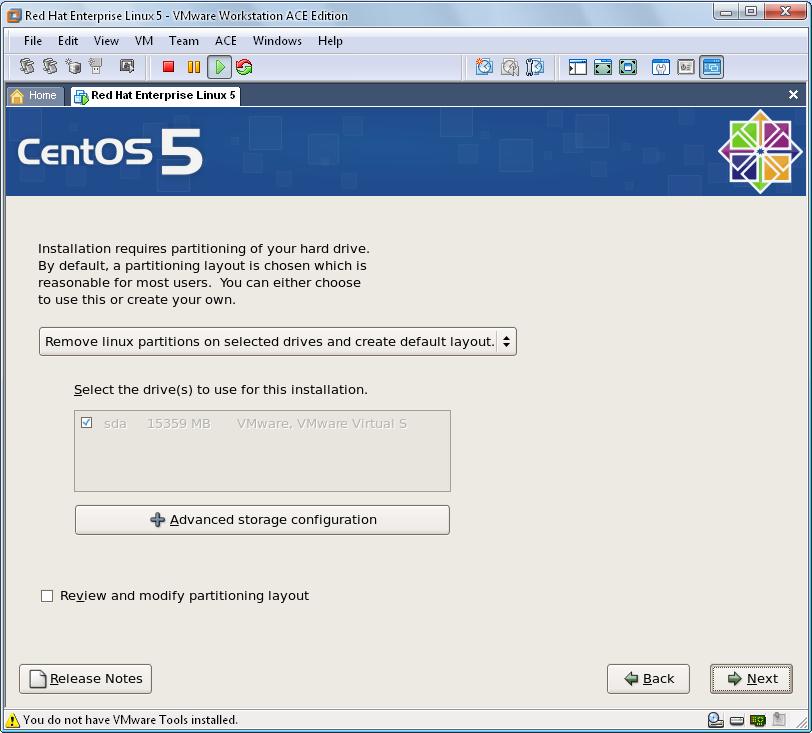
In this step, just let it remain selected and click next
centos_installation_9 


Then there’ll be warning “You have chosen to remove all Linux partitions (and ALL DATA on them) on the following drives: /dev/sda   Are you sure you want to do this?” Click Yes

Then, you’ll see Network Configurations screen, as it is your test virtual pc, don’t change anything and click next. You can change whatever you want after installation, for now, let it continue in this way and click Next
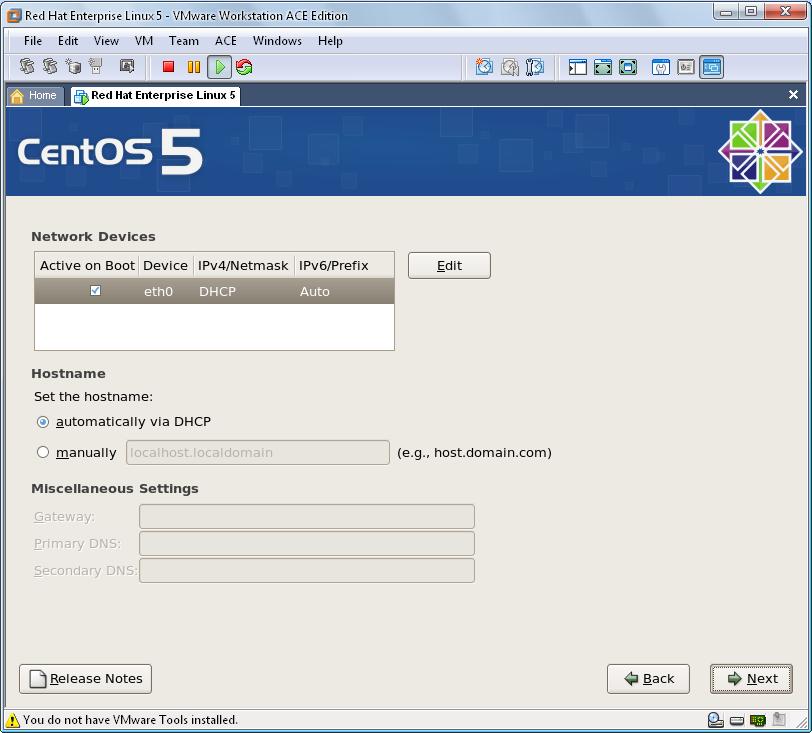
centos_installation_10 


From this screen, select your region and click Next
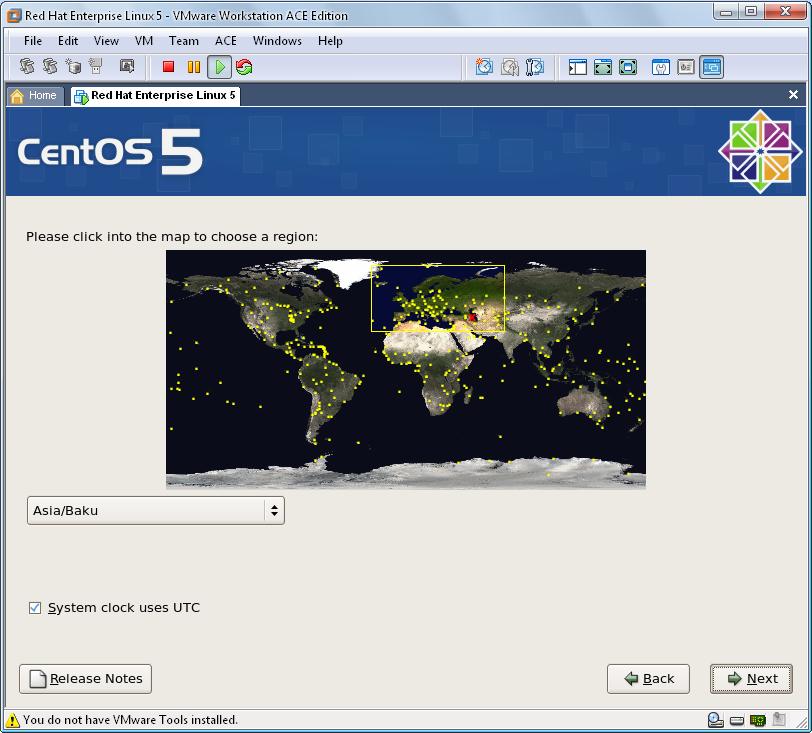
centos_installation_11 


Then, you’ll be prompted to enter password for root user, enter it and click Next
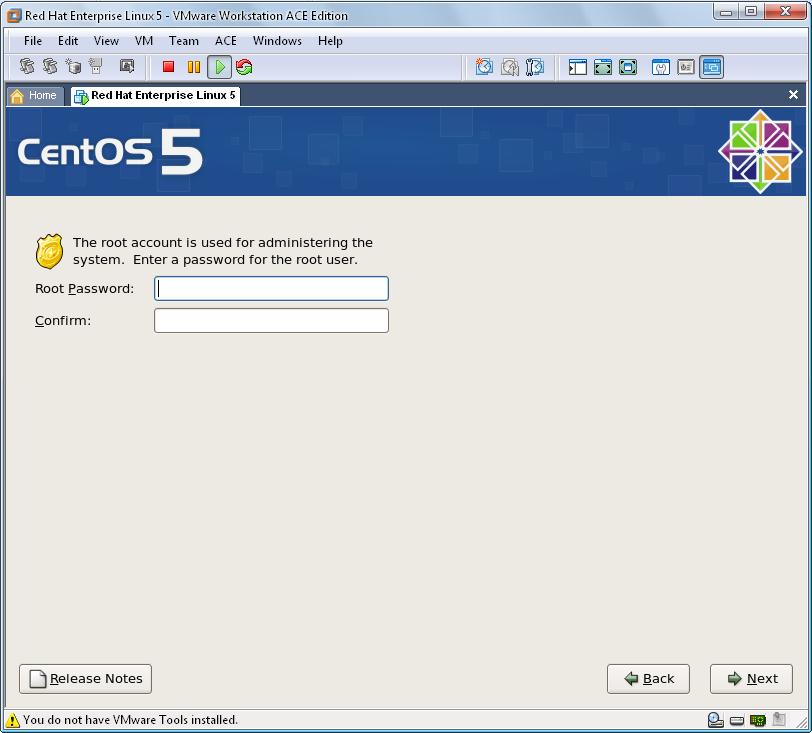
 centos_installation_12 


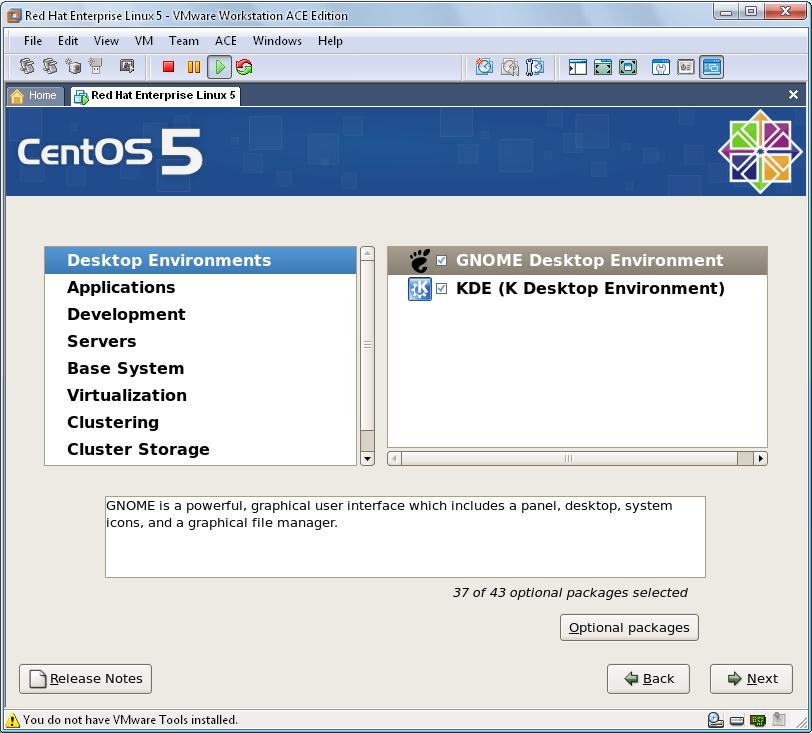
To install packages, especially for working with Oracle Server, select all options except Clustering and Storage Clustering. Then select Customize now option and click Next
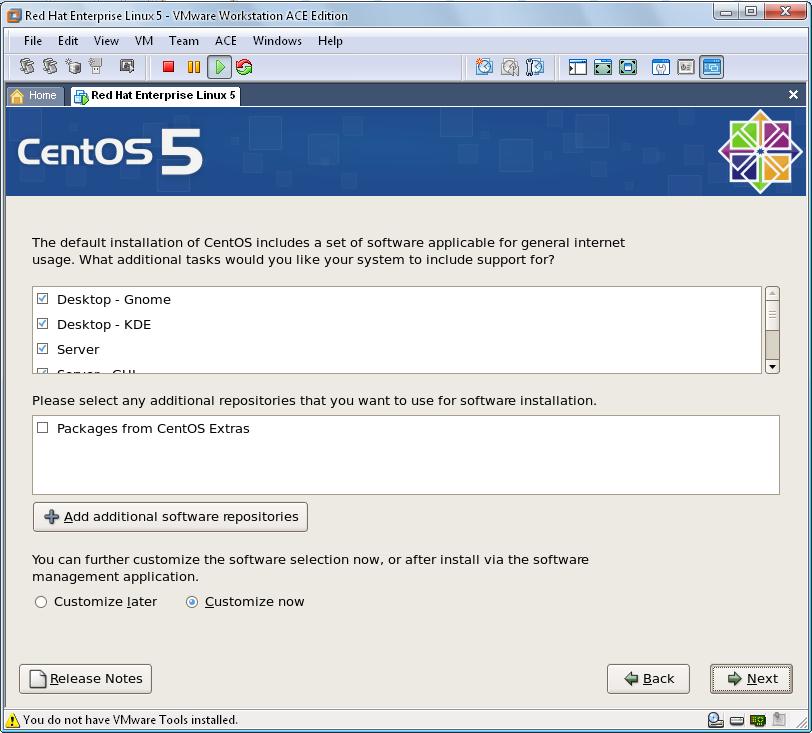
centos_installation_13 


Then, from Base System menu, select Legacy Software Support, System Tools and click Next
centos_installation_14


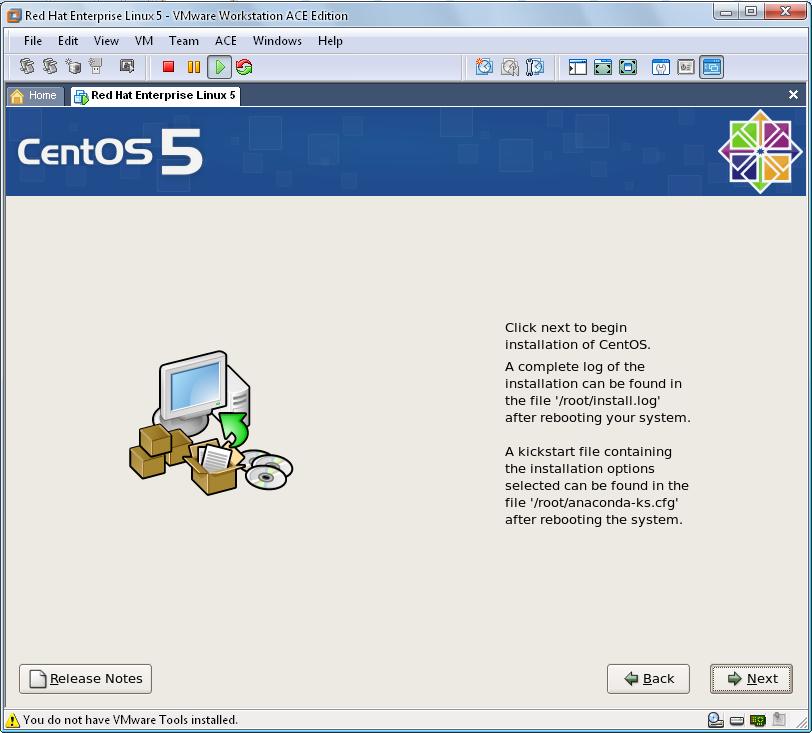
Now, you’re ready for installation. Click next on this screen, the installation will begin
centos_installation_16


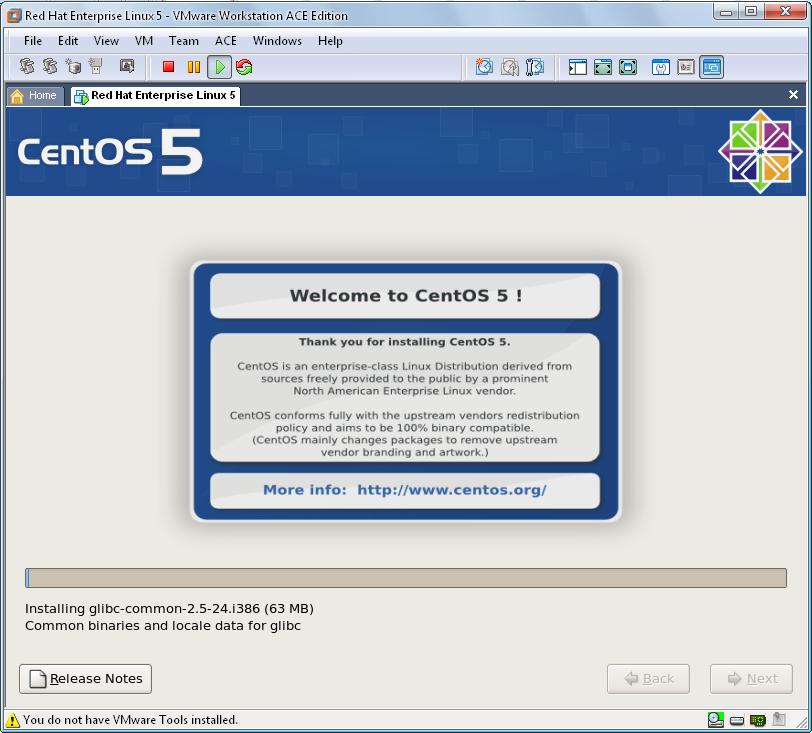
You’ll see how all packages are installing. After a while, your OS will be ready for use
centos_installation_17


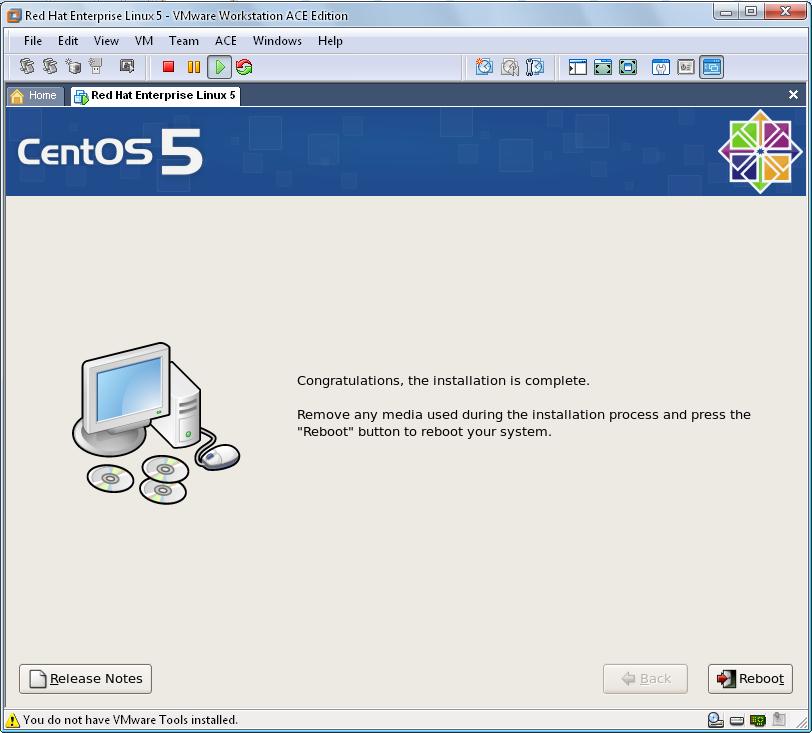
After the installation is completed, click Reboot button to reboot your OS
centos_installation_18


After reboot, you’ll face with another Welcome screen. There’re some steps need to be completed

Click Forward button on the screen.
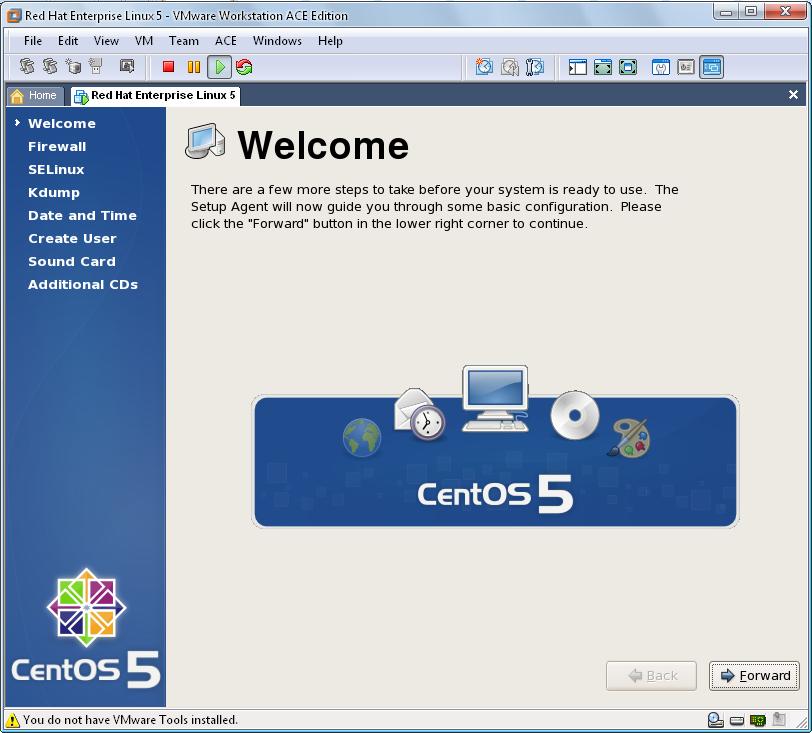
centos_installation_19


Here, just disable your Firewall. Its only for test purpose, don’t disable your Firewall on real system! And click forward button
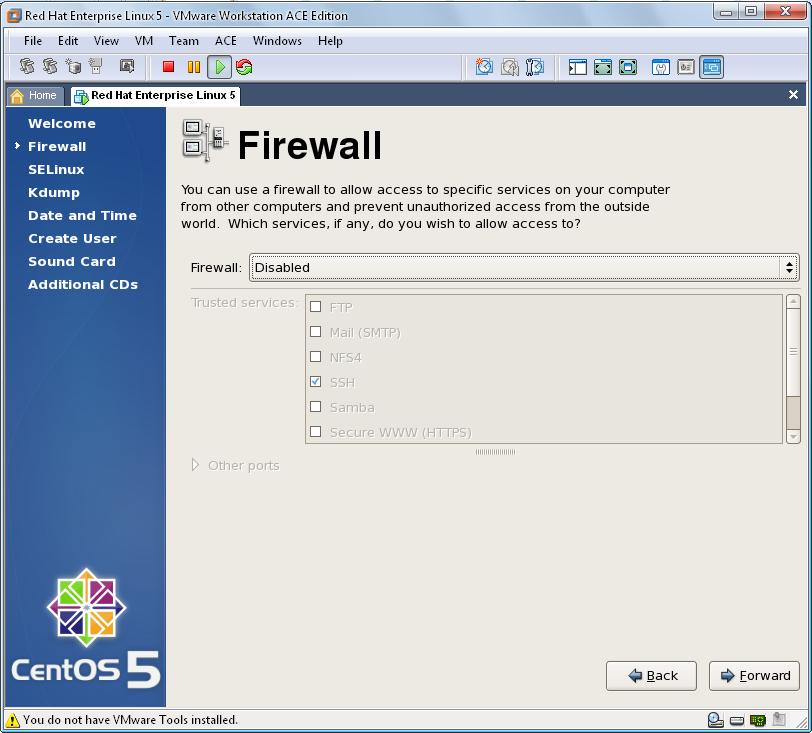
centos_installation_20


For testing purpose, it would be good to disable SELinux too
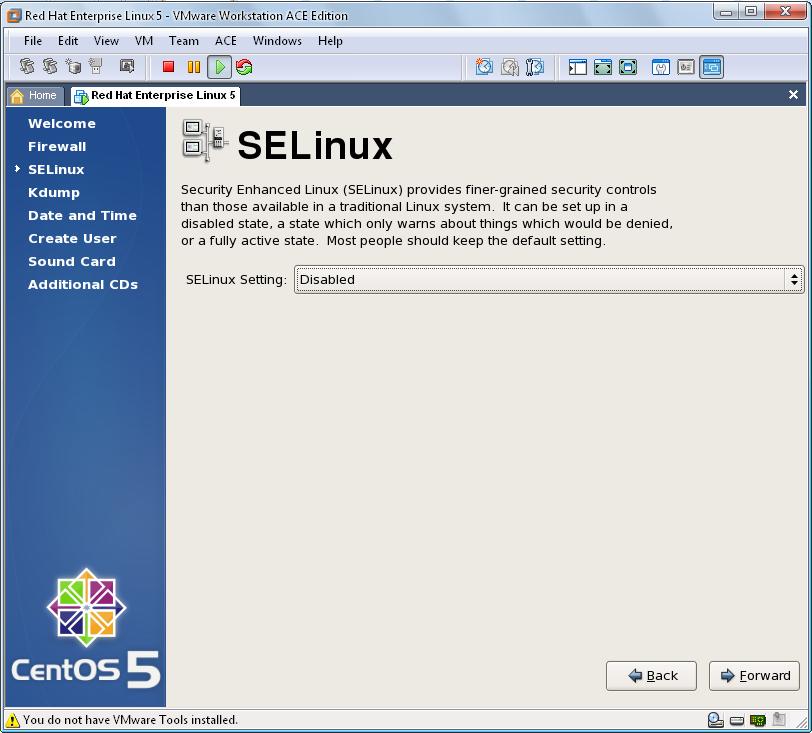
centos_installation_21


Then keeping Kdump disabled, click Forward
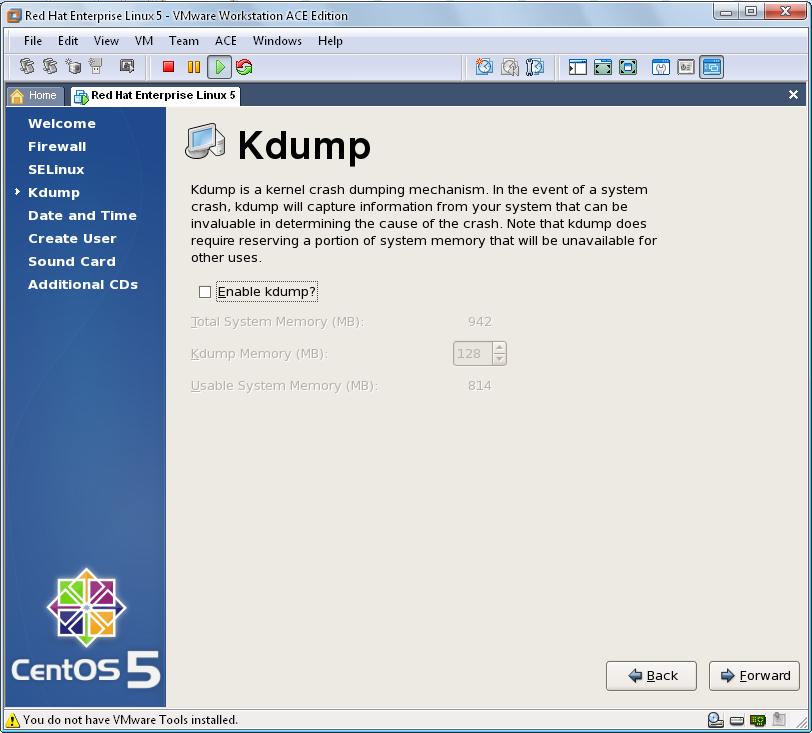
 centos_installation_22


If you need, make your Date and Time configuration and click Forward
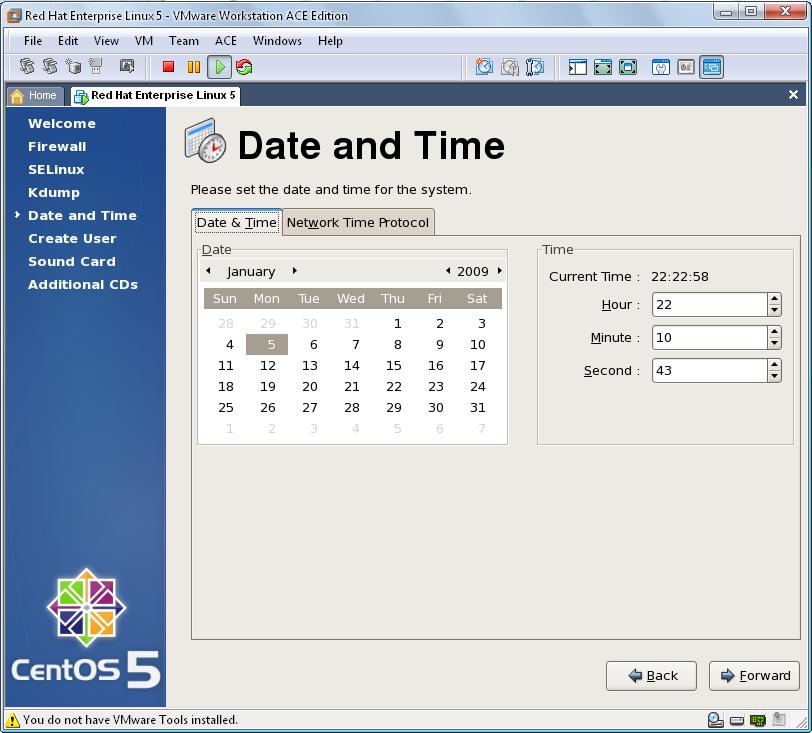
 centos_installation_23


If you want to create a new user, you can fill these blanks. You can pass this step too by clicking Forward button
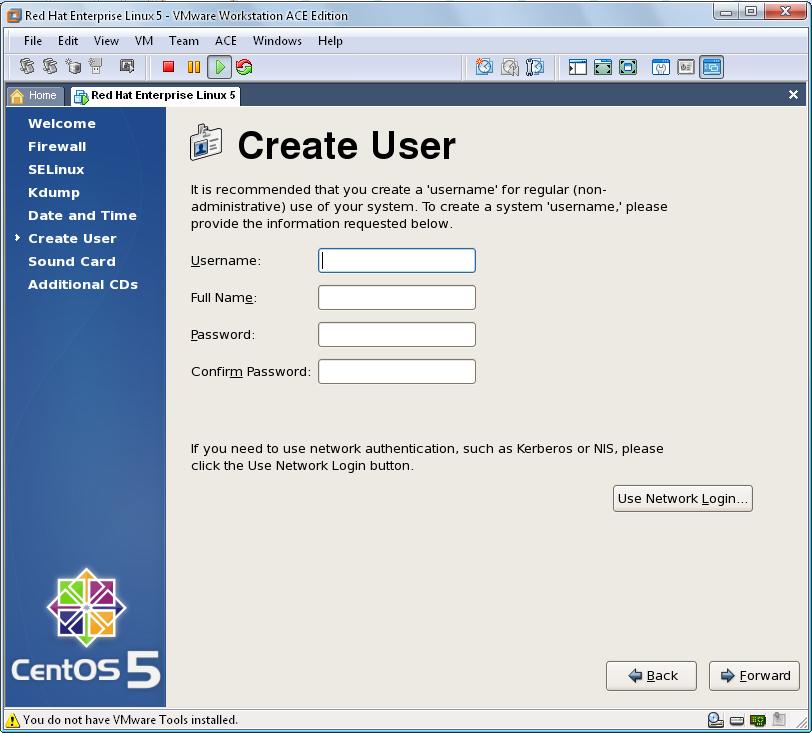
 

centos_installation_24


Then Click Finish and the system will reboot
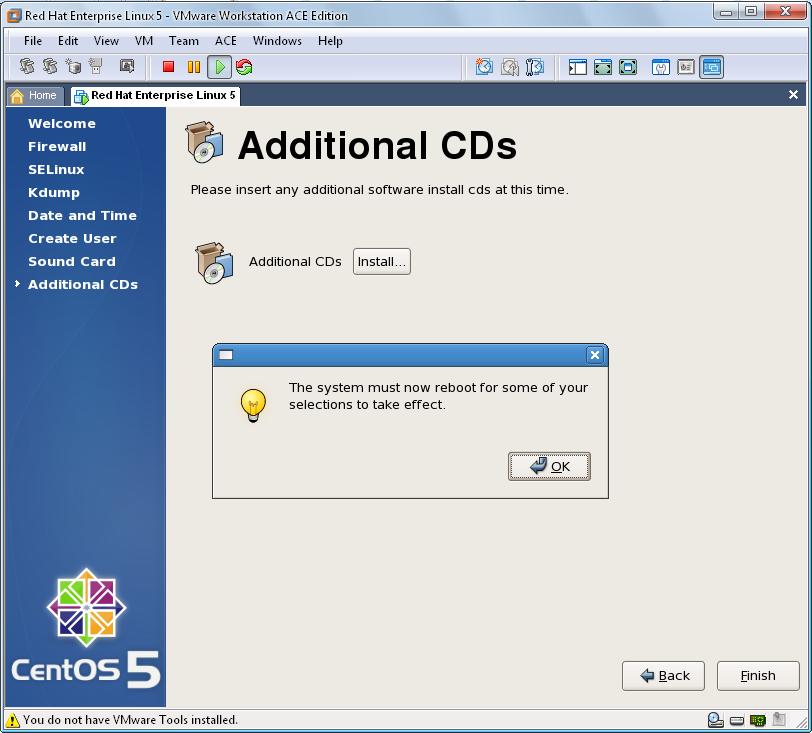
 

centos_installation_25


After reboot, CentOS will be opened and you’ll be prompted to enter username (root) and password (root’s password)
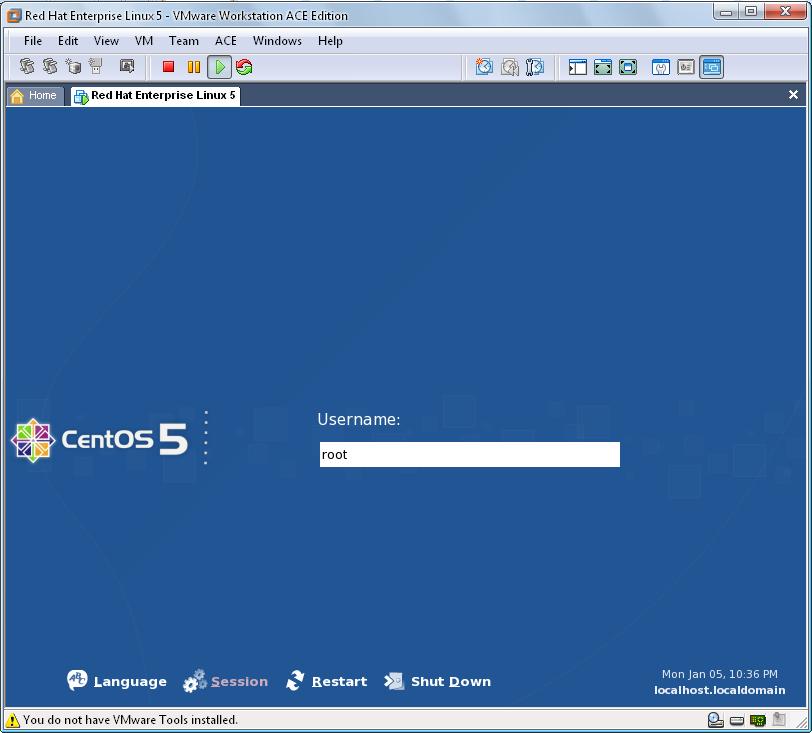
 

centos_installation_26 


Your Centos is ready to use! Congratulations.
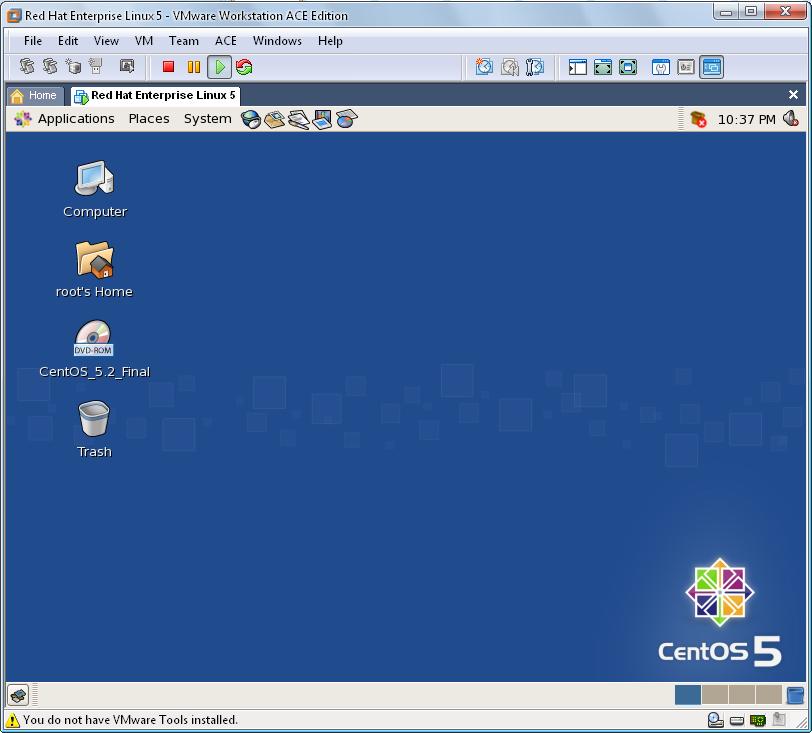
 

centos_installation_27


In the next article, I’m going to show installation of Oracle 10g Release 2 on our Centos OS


Additionally, while using an operating system inside VMware, you recognize that every time you have to enter to its area and then press Ctrl+Alt buttons to leave this area and to return to your system.

To solve this issue, you should install VMware Tools.

As the VMware Tools will be installed from CD-Rom device, you should disconnect your connected CD-Rom device as shown below

 centos_installation_29


Next, Select VM menu on VMware application and select Install VMware Tools menu item.
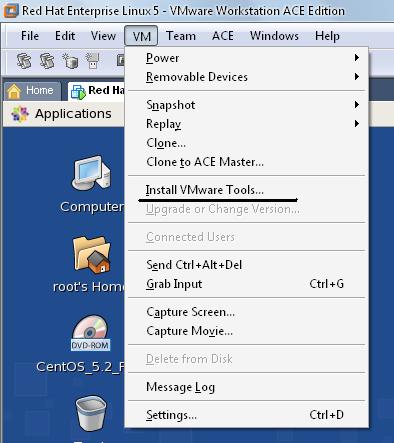
 

centos_installation_28


Then click Install button on this message box to Install VMware Tools
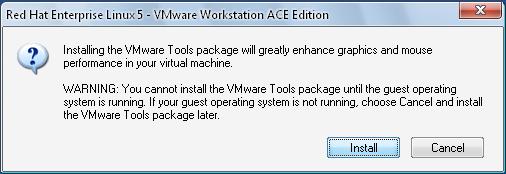
 

centos_installation_30 


Then enter to My Computer and double click on CD-ROM Drive. You’ll see there two packages.
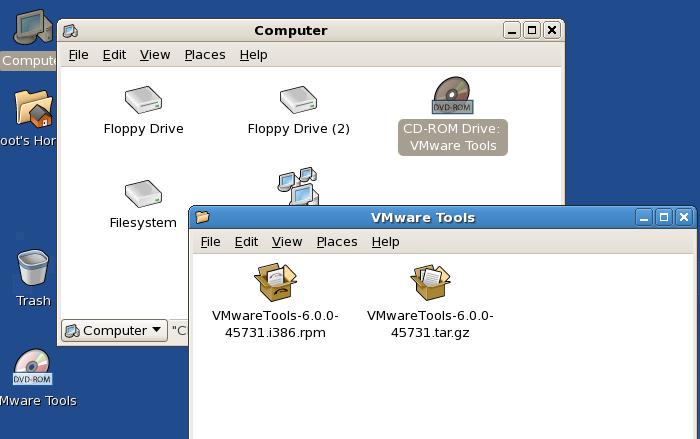
 

centos_installation_31


Now, double click on *.rpm file to setup   

After installation complete, copy another *.gz file to anywhere in hard drive. In our example we are coping it to tmp directory inside FileSystem, paste the file into this folder, right click on it and select Extract Here menu item
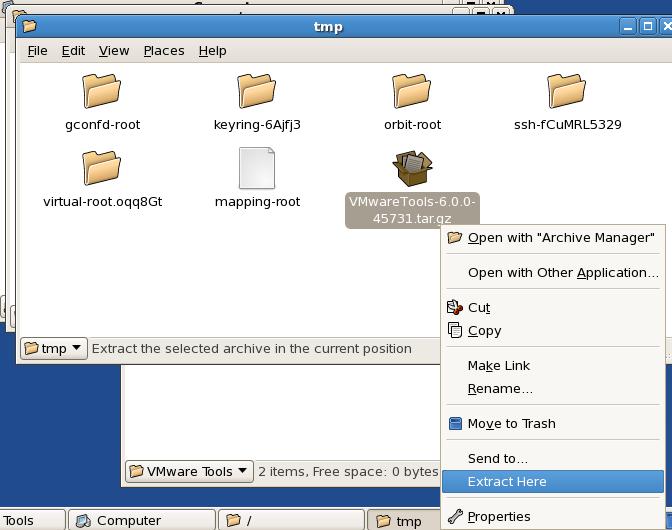
 

centos_installation_32


Then enter to the folder vmware-tools-distrib and double click on vmware-install.pl file and click Run in Terminal button
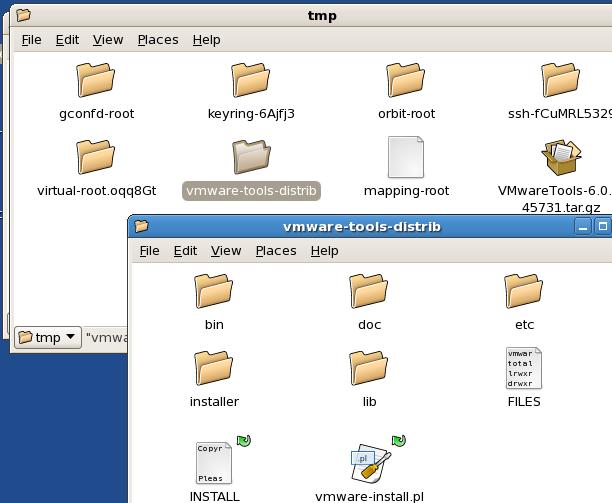
 

centos_installation_33


Then, whenever you’re asked to enter the value, just click enter

But when you’re prompted to enter value for the display size of your X, be careful to enter default value. If you want your Virtual Machine to be little size, enter 2 (800-600)

That’s all! Your VMware Tools installed. Now you can enter to VMware’s area and exit it without clicking Ctrl+Alt

P.S. If you’ll face with “VMware hgfs: HGFS is disabled in the host” error, just reboot your system

Posted in Oracle on Linux | 47 Comments »

Install VMware – Step by step

Posted by Kamran Agayev A. on December 31st, 2008


As we know, if you want to setup Oracle Server – especially for testing purpose – it would be better to setup it on your “virtual PC”, not on PC directly. For this purpose, you can use software named “VMware” to achieve this aim. In this document, firstly we discuss how we can use VMware, how we can setup it, create a new “Virtual PC”. On the next articles, we’ll discuss how to install OS (as an operating system, I’m using Centos) on this virtual machine. CentOS is a freely-available operating system that is based on Red Hat Enterprise Linux system. Then we’ll try to setup Oracle Server (10g Release 2) on this virtual machine

In this article, let’s show how we can setup and create new VMware Virtual machine and prepare it for further OS installation

1. First of all, enter to the official site of VMware and download VMware Workstation with a 30-day free evaluation from this address:

https://www.vmware.com/tryvmware/?p=workstation-w

Currently I’m using version 6.0.0 and all these examples are compatible and tested with this version

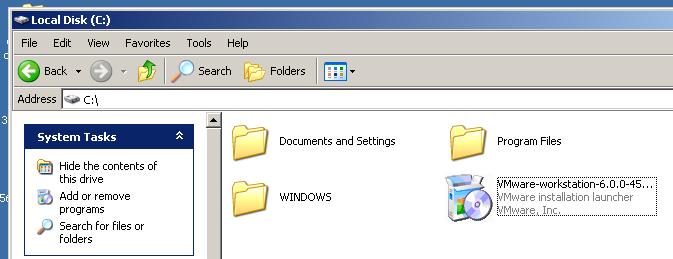
2. After downloading VMware workstation, install it on your PC

Click to install

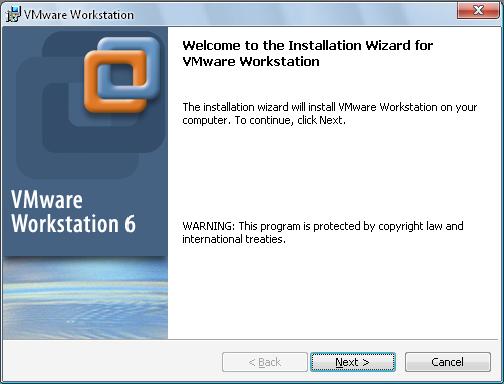
3. Setup will open Welcome Screen

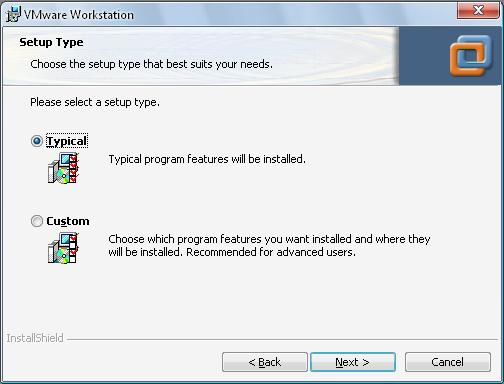
Click on Next button and choose Typical option


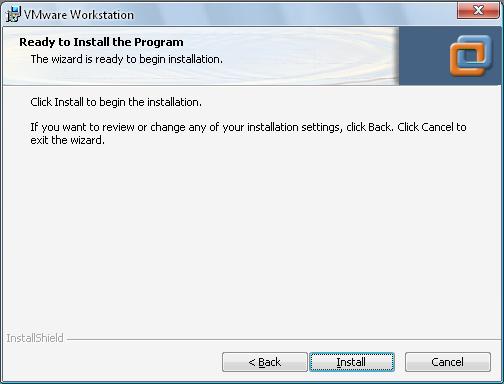
4. By clicking “Next” buttons, to begin the installation, click on Install button at the end

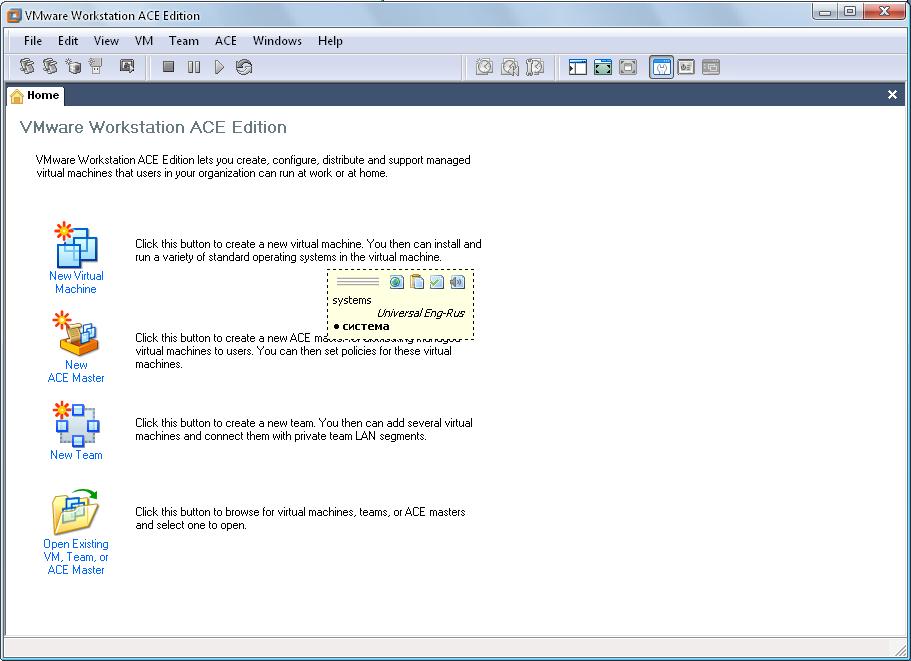
5. This will install VMware Workstation software on your PC, After installation complete, click on Finish button. Then restart your PC. Then open this software


6. In this step we try to create new “virtual machine”. Enter to File menu, then New-> Virtual Machine

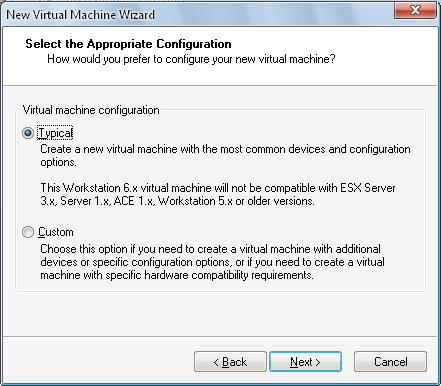
Click on Next button, then check Typical option as below

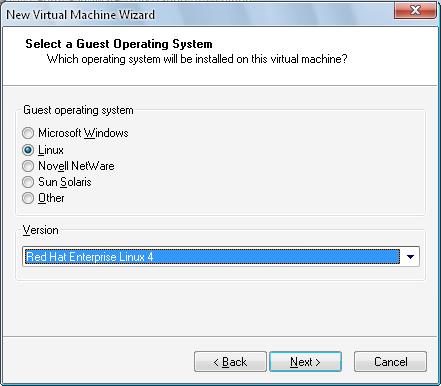
Then click Next button, and check your OS version. In this example, as we’re going to setup Oracle server on CentOS, we’ll check Linux option and from “version” option we’ll check Red Hat Enterprise Linux 4

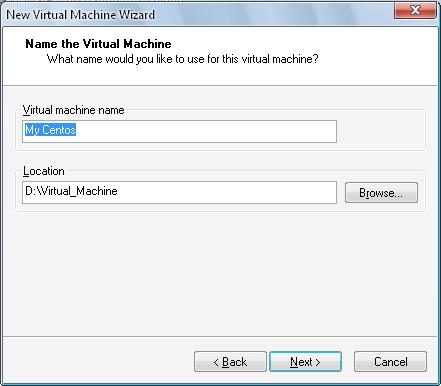
By clicking Next button, we’ll give a name to our virtual machine, and give directory to create this new virtual machine


Then select Use bridged networking option and click Next.


Then you’ve to define size of hard disk by entering its size. I’ll give 15 GB hard disk space and please check Allocate all disk space now option.  Although it will take longer to create new hard disk, you’ll see high performance of your virtual machine when installing new applications and adding new files. If you uncheck this option, new hard disk will be created automatically, but when you install new applications, it will impact your performance, because it will allocate space each time new files added or applications installed

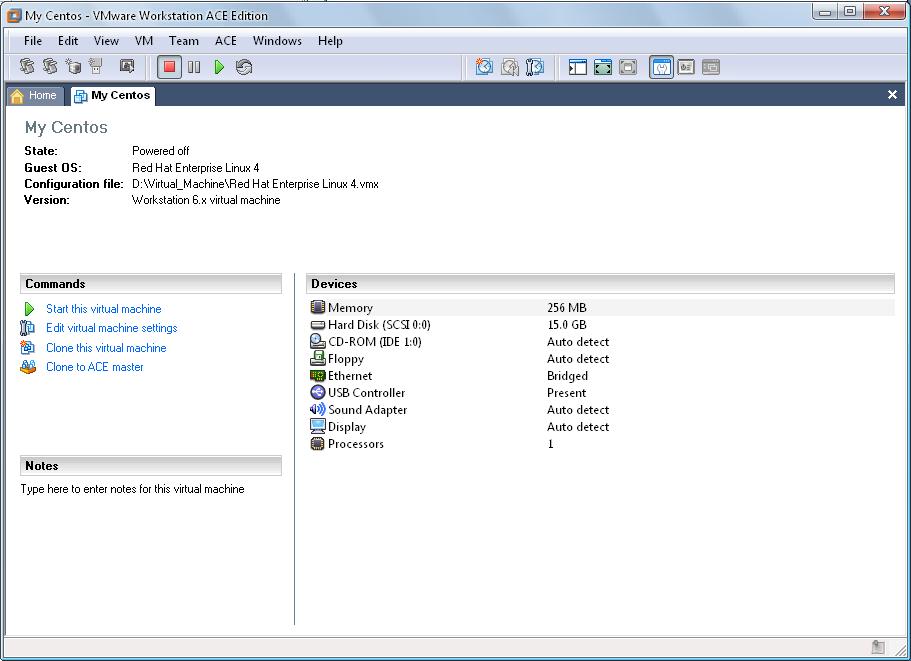
That’s all. Your virtual machine is ready to use


Here, you can delete Sound Adapter, Floppy and USB Controller by entering “Edit virtual machine settings”. If you’re going to setup Oracle Server, please make sure you’ve increased your Memory (RAM) to 1GB

In the next article, we’ll show how to setup CentOS on this newly created virtual machine. It’s very easy, believe me J

Posted in Oracle on Linux | 29 Comments »

Automatically StartUp and Shutdown an Oracle Database in Linux OS

Posted by Kamran Agayev A. on December 22nd, 2008

Today I want to show you how we can Start-up and Shutdown an Oracle database on Linux OS automatically
In Windows, when we install an Oracle database, it creates a Windows Service which starts the database automatically as soon as OS starts. But in Linux, it’s different. You need to create your own service to start and shutdown your database when you start and shutdown your OS respectively. Now we’ll go through this example step by step to show how we can do it

1. First of all we’ve to change our /etc/oratab file. Why do we use it? Oratab file is used by Oracle utilities. It’s created by root.sh script, when we install an Oracle Server, and is updated each time by DBCA (Database Configuration Assistant) when we create a new database. After having installed a new database (in this case, our database name is mydb), entering by root user, let us see the source of this file. At the end of this file, you’ll find:

mydb:/home/oracle/product/10.1.0/Db_1:N

The first field is the name of my database (mydb), the second one is my home directory (/home/oracle/product/10.1.0/Db_1), and the third indicates to the dbstart utility whether the database should, or should not be brough up at the system boot time with “Y” or “N” parameters respectively
As a root user, we’ll change last field of this line from “N” to “Y” to let dbstart utility start this database when it runs

2. In this step, we’ll create a file with name startdb and write a small script to be run when our system starts or shuts down. If you want this file to be added as a service which starts when your OS boots, you should put it in /etc/init.d/ directory. In this script, we’ll define two variables, ORA_OWNER and ORACLE_HOME and then, we’ll start (or shutdown) our database by connecting with oracle user and running lsnrctl (Listener utility), dbstart (utility which starts the database) and dbshut (utility which shutdowns the database) utilities depending on our OS state.
This is the source of our startdb file:

ORACLE_HOME=/home/oracle/product/10.1.0/Db_1
ORA_OWNER=oracle

case “$1” in
 ‘start’)  #If the system is starting, then …
su – $ORA_OWNER -c “$ORACLE_HOME/bin/lsnrctl start” #Start the listener
su – $ORA_OWNER -c “$ORACLE_HOME/bin/dbstart #Start the database
  ;;

‘stop’)   #If the system is stops, that is we’re shutting down our OS, then …
  su -$ORA_OWNER -c $ORACLE_HOME/bin/dbshut
  su -$ORA_OWNER -c “$ORACLE_HOME/bin/lsnrctl stop”
  ;;
esac

3. Once you’ve saved your file into this directory, make sure that it’s executable by running:
chmod 750  startdb

4. Then you need to add the appropriate symbolic links to cause the script to be executed when the system goes down, or comes up. Create it with ln -s command.

# ln -s /etc/init.d/startdb /etc/rc.d/rc3.d/K01startdb
# ln -s /etc/init.d/startdb /etc/rc.d/rc3.d/S99startdb
# ln -s /etc/init.d/startdb /etc/rc.d/rc5.d/K01startdb
# ln -s /etc/init.d/startdb /etc/rc.d/rc5.d/S99startdb

Let’s analyze these commands:
The first line creates symbolic link of our script in rc3.d directory. At startup, Linux runs /etc/rc.d/rc script at the current level (normally 3 or 5). rc3.d indicates 3rd runlevel, “K” indicates OS’s shutdown (on servers shutdown, Linux calls the scripts in /etc/rc.d/rc3/K* in order)
The second line creates another symbolic link of our script, to be run at startup of our OS, indicating “S99” and the name of our script
Another two lines creates symoblic links for 5th runlevel.

That’s all. Your script and your service is ready for use. Just restart your OS and upon startup you’ll see your newly created service running. Then open new terminal, enter you database and issue :
SQL>SELECT status FROM v$instance;

You’ll see your database’s status is OPEN

P.S
In some releases, even when we create a new service, it doesn’t work. When we issue dbstart command manually from OS, we’re getting an error:
cat: /var/opt/oracle/oratab: No such file or directory

It has simple reason and solution
If the directory /var/opt/oracle exists during the Oracle installation the dbhome script will have the parameter ORATAB set to “/var/opt/oracle/oratab” instead of “/etc/oratab”. The normal DBCA process during a default installation will still add the instance entry to /etc/oratab.

It has two solutions:
1. You can either copy the original oratab file to this directory :
cp /etc/oratab /var/opt/oracle/

2. Or you can edit dbstart and dbshut scripts, find the variable ORATAB, and you’ll find that it’s addressing to  /var/opt/oracle/oratab file. Just change it to /etc/oratab

Posted in Administration, Oracle on Linux | 40 Comments »

Automatically display SID and connected User in Sql*Plus

Posted by Kamran Agayev A. on December 10th, 2008

In this example, we’ll change Sql*Plus view and display our database name and conneted user name instead of word “SQL ”

If you’re using Sql*Plus , you know that every time you type a command, you’re typing it after “SQL>”

SQL>show user
USER is “SYS”
SQL>

If you want to display your SID, your connected USER name instead of “SQL>” you’ve to change “glogin.sql” in your $ORACLE_SID/sqlplus/admin directory as below

set termout off
define gname=idle
column global_name new_value gname
select lower(user)||’@’ ||substr(global_name,1,decode(dot,0,length(global_name),dot-1)) global_name from (select global_name, instr(global_name,’.’) dot from global_name);
set sqlprompt ‘&gname>’
set termout on

And after that adding an alias to your /home/oracle/.bashrc file:

alias sqlplus=’export ORACLE_SID=kam;sqlplus “/ as sysdba”‘
every time from Linux terminal when you type sqlplus, you’ll connect automatically to database kam as sysdba and your SQL> prompt will be changed to SYS@KAM>
[oracle@localhost ~]$ sqlplus

SQL*Plus: Release 10.1.0.3.0 – Production on Mon Dec 8 06:29:29 2008

Copyright (c) 1982, 2004, Oracle.  All rights reserved.

Connected to:
Oracle Database 10g Enterprise Edition Release 10.1.0.3.0 – Production
With the Partitioning, OLAP and Data Mining options

sys@KAM>show user
USER is “SYS”
sys@KAM>

Posted in DBA scripts | 11 Comments »

Copy OS files from Oracle

Posted by Kamran Agayev A. on December 9th, 2008

Sometimes you need to copy some OS file from one location to another. If you’re using only Sql*Plus and you can’t connect directly to OS, you can user Oracle’s UTL_FILE.FCOPY function to achieve this goal.

Firstly, we’ll create two directories and one file. Then we’ll create a user and copy this file from one folder to another using UTL_FILE package

[oracle@localhost /]$ cd /tmp
[oracle@localhost tmp]$ mkdir copy_dir
[oracle@localhost tmp]$ mkdir backup_dir
[oracle@localhost tmp]$ ls backup_dir/
[oracle@localhost tmp]$
[oracle@localhost tmp]$ cd copy_dir
[oracle@localhost copy_dir]$ vi test.dat (We are adding a line with word MY_TEST to file test.dat)
[oracle@localhost copy_dir]$ ls -lh
total 4.0K
-rw-r–r–  1 oracle oinstall 8 Dec  7 04:11 test.dat
[oracle@localhost copy_dir]$ cat test.dat
MY_TEST
[oracle@localhost copy_dir]$sqlplus “/ as sysdba”

SQL> CREATE USER kamran IDENTIFIED BY kamran;

User created.

SQL> grant connect, resource to kamran;

Grant succeeded.

SQL> grant create any directory to kamran;

Grant succeeded.

SQL> grant execute on utl_file to kamran;

Grant succeeded.

SQL> conn kamran/kamran
Connected.
SQL> create directory file_source as ‘/tmp/copy_dir’;

Directory created.
SQL> create directory backup_source as ‘/tmp/backup_dir’;

Directory created.

SQL> exec utl_file.fcopy(‘FILE_SOURCE’,’test.dat’,’BACKUP_SOURCE’,’copied_test.dat’);

PL/SQL procedure successfully completed.

SQL>exit
[oracle@localhost tmp]$ cd backup_dir/
[oracle@localhost backup_dir]$ ls -lh
total 4.0K
-rw-r–r–  1 oracle oinstall 8 Dec  7 04:32 copied_test.dat
[oracle@localhost backup_dir]$

Posted in DBA scripts | 2 Comments »

Make Table read only

Posted by Kamran Agayev A. on December 9th, 2008

Today I’ll show how we can make a table read only using database triggers

In this example, we’ll create a table, insert data in it, and then create trigger to prevent any insert, update or delete statement on table

SQL> CREATE TABLE tbl_read_only (id NUMBER);

Table created.

SQL> INSERT INTO tbl_read_only VALUES(1);

1 row created.

SQL> COMMIT;

Commit complete.

SQL> SELECT * FROM tbl_read_only;

        ID
———-
         1

SQL> CREATE TRIGGER trg_tbl_read_only BEFORE DELETE OR INSERT OR UPDATE
  2  ON tbl_read_only
  3  BEGIN
  4  RAISE_APPLICATION_ERROR(-20202,’Table Status: READ ONLY!!!’);
  5  END;
  6  /

Trigger created.

SQL> INSERT INTO tbl_read_only VALUES(2);
INSERT INTO tbl_read_only VALUES(2)
            *
ERROR at line 1:
ORA-20202: Table Status: READ ONLY!!!
ORA-06512: at “KAMRAN.TRG_TBL_READ_ONLY”, line 2
ORA-04088: error during execution of trigger ‘KAMRAN.TRG_TBL_READ_ONLY’
SQL>

Posted in DBA scripts | 5 Comments »

How delete duplicate rows

Posted by Kamran Agayev A. on December 6th, 2008

Today I want to give you an example of how delete duplicate rows from a table
Let’s create new table with name students:
CREATE TABLE students (ID NUMBER, NAME VARCHAR2(10), surname VARCHAR2(10))
Now let’s add some duplicate rows to it:
INSERT INTO students VALUES (1, ‘Kamran’, ‘Agayev’);
INSERT INTO students VALUES (2, ‘Elcin’, ‘Mammedov’);
INSERT INTO students VALUES (1, ‘Kamran’, ‘Agayev’);
INSERT INTO students VALUES (2, ‘Elcin’, ‘Mammedov’);
INSERT INTO students VALUES (1, ‘Kamran’, ‘Agayev’);
INSERT INTO students VALUES (2, ‘Elcin’, ‘Mammedov’);
And now let’s look to the data of our table:
SELECT * FROM students
1  Kamran  Agayev
2  Elcin   Mammedov
1  Kamran  Agayev
2  Elcin   Mammedov
1  Kamran  Agayev
2  Elcin   Mammedov
Now let’s delete duplicate rows using this script:
 
DELETE FROM students   
WHERE ROWID NOT IN (SELECT MAX (ROWID) FROM students GROUP BY ID) 
And now let’s look to students table
SELECT * FROM students
1  Kamran  Agayev
2  Elcin   Mammedov

Posted in DBA scripts | 8 Comments »

Run SQL statement from one Linux command

Posted by Kamran Agayev A. on December 6th, 2008

These two examples shows you how to run SQL command directly from Linux in a single command

[oracle@localhost~] echo “select count(*) from tab;” | sqlplus -s username/pass
With another method, you can run from one Linux command a SQL file

 [oracle@localhost~] sqlplus -s username/pass <filename.sql

 COUNT(*)

————-

                20

 [oracle@localhost~]

Posted in DBA scripts | No Comments »

What's View and Synonym?

Posted by Kamran Agayev A. on December 6th, 2008

What is a view?

A view is a virtual table. Every view has a Query attached to it. (The Query is a SELECT statement that identifies the columns and rows of the table(s) the view uses.)

A view is based on a table or another view and acts as a window through which data on tables can be viewed or changed. A view does not contain data. The definition of the view is stored in the data dictionary. You can see definition of view in user_view data dictionary table.
A view is a logical representation of another table or combination of tables. A view derives its data from the tables on which it is based. These tables are called base tables.

What is a synonym and what types it has?

A synonym is an alias for a schema object. Synonyms can provide a level of security by masking the name and owner of an object and by providing location transparency for remote objects of a distributed database. Also, they are convenient to use and reduce the complexity of SQL statements for database users.

Synonyms allow underlying objects to be renamed or moved, where only the synonym needs to be redefined and applications based on the synonym continue to function without modification.

You can create both public and private synonyms. A public synonym is owned by the special user group named PUBLIC and is accessible to every user in a database. A private synonym is contained in the schema of a specific user and available only to the user and the user’s grantees.

Posted in Interview questions | No Comments »