


Step by Step installing Oracle 10g RAC on VMware
Posted by Kamran Agayev A. on 5th April 2011
In this guide I’m going to show you the process of creating Oracle 10g R2 RAC on OEL4. First of all I have to mention that I’ve prepared this guide based on the well known RAC on VMWare guide of for Vincent Chan which can be found at OTN. After using that guide I’ve decided to create a more screenshot based explained guide and prepared this blog post which contains 150 screenshots! 
These days wordpress.com is working veeeeery slowly, so it took me two days to upload all images and create this blog post That was really boring. But now the blog post is online and I would be glad to hear the visitors valuable feedbacks.
In this tutorial, we use OEL4 because Oracle 10gR2 is not compatible with OEL5 (as the db was released before the OS released) As in my all tutorials, I use vmware virtual machine. In this guide I will create two virtual machines. Let’s start creating the first machine. But before it, create three directories inside one folder (for example c:\vmware)
[code]C:\vmware\rac1
C:\vmware\rac2
C:\vmware\sharedstorage[/code]
Create the following virtual machine in the first folder and create all shared storages in the third folder

Click Next

Select Typical and click Next

Select “Red Hat Enterprise Linux 4” and Click Next

Provide the name of the virtual machine (rac1), select the location for vmware disk (you can make it c:\vmware\rac1) and click Next

Select bridged network and click next

Define the size of the hard drive of the virtual machine and click Next (set it to 20 GB and don’t check “Allocate all disk space now” checkbox)

Mount the ISO image of the OEL4 installation and start adding more four hard drives and one Ethernet device. Click on Add button

Select “Hard Disk” and click Next

Select “Create a new virtual disk” and click Next

Select “SCSI” and check “Independent->Persistent” and click Next

For the first device, specify the disk size as “3gb”, check “Allocate all disk space now” and click Next

Create a separate folder named “C:\vmware\sharedstorage” in your hard drive, set the name of the new hard drive to “ocfs2disk.vmdk”.

After creating the first device, create more three devices with 4GB in size (asmdisk1.vmdk, asmdisk2.vmdk, asmdisk3.vmdk) and make all of them “Independent->Persistent” and don’t allocate the disk space for each of them

Next, start changing the device node for each of them. Start from the firstly added hard drive, select it, click on Advanced button and make it SCSI 1:0. For next hard drive make it 1:1 and so on

Add new Ethernet device

Change the network connection to “Host-only”

Make sure that the last state of your virtual machine looks like as it’s seen above

Then locate the configuration file of the virtual machine and start editing it

Add the lines that are marked in bold to the configuration file to make the devices be shared between to nodes
– By specifying “disk.locking” to FALSE will allow any virtual machine to load a SCSI disk device even it’s in use by an another virtual machine
– Specify “diskLib.dataCacheMaxSize = “0” to turn off the disk caching for clustered virtual machines.
– By specifying scsi1.sharedBus = “virtual” will give the whole bus the ability to be shared. This prevents the locking of this specific disk
![]()
Start the virtual machine

As you have already mounted the ISO image of the OEL4, the above screen appears

Click Skip

Click Next

Select installation language and click next

Select appropriate keyboard and click next

Select “Server” as the installation type and click Next

Select Disk Druid for disk partitioning method and click Next

Click Yes for all warnings and click Next

Double click in the first drive /dev/sda

Specify ‘/’ as a mount point, make its files system “ext3” and make the End Cylinder 900 (to make the size of the root folder 7Gb). Check “Force to be a primary partition” and click Ok

Select File System Type as “swap” and change End Cylinder to 1170

Create mount point called /u01, make its files system “ext3” and make End Cylinder 2610 and click Ok

Make sure that the last state of your disk partitioning looks like as it’s seen above

Now let’s configure the network devices. Select the first device and click Edit

Uncheck “Configure using DHCP” and provide the following ip address and netmask:
IP Address: 192.168.2.131
Netmask: 255.255.255.0

Select the second device, edit it, uncheck “Configure using DHCP” and provide the following ip address and netmask
IP address: 10.10.10.31
Netmask: 255.255.255.0

Set the hostname as “rac1.test.az” (you can provide any domain name) and set the gateway to 192.168.2.1

Disable Firewall and SELinux and click Next

Select the default language for the system and click Next

Select Time-Zone and Click Next

Provide the password for the root user and click next

Select necessary packages for Oracle installation. Here’s the list of the necessary packages:
X Window System
Gnome Desktop Environment
Editors
Graphical Internet
Server Configuration Tools
Legacy Network (click Details and select “rsh_server” and “telnet-server”)
Development Tools
Legacy Software Development
Administration Tools
System Tools (select all packages that starts with “ocfs2” and “oracleasm”, select “systat” as well)

Click Next to start the installation

After installation completed the machine restarts. Click Next

Agree with license and click Next

Set the date and time and click Next

Set the display and click Next

You don’t need to create a user so click Next

Click Next

Click Next and finish the installation

Now let’s install vmware tools. For this, disconnect the mounted ISO image, choose “Install VMware Tools” from VM menu

Double click on VMware tools icon and run the .rpm file by double clicking on it

After the window is closed, open new terminal and run vmware-config-tools.pl and finish the installation of vmware tools

To synchronize the time on the virtual machine with the host machine execute “vmware-toolbox” on the terminal window and check the check box

Edit /boot/grub/grub.conf file and add “clock=pit nosmp noapic nolapic” to the line that reads kernel /boot
The “clock=pit” prevents the clock for running to quickly and “nosmp noapic nolapic” prevents the clock from running too slowly. After you make the change, reboot the machine for change to take effect

Now let’s start the prerequisite steps for Oracle installation. For this we’ll create a group, a user and some directories
[code]groupadd oinstall
groupadd dba
mkdir -p /export/home/oracle
mkdir /ocfs
useradd -d /export/home/oracle -g oinstall -G dba oracle
chown oracle:dba /export/home/oracle /u01
passwd oracle[/code]

Change the .bash_profile (and .bashrc) file and add the following lines:
[code]export EDITOR=vi
export ORACLE_SID=devdb1
export ORACLE_BASE=/u01/app/oracle
export ORACLE_HOME=$ORACLE_BASE/product/10.2.0/db_1
export ORA_CRS_HOME=$ORACLE_BASE/product/10.2.0/crs_1
export LD_LIBRARY_PATH=$ORACLE_HOME/lib
export PATH=$ORACLE_HOME/bin:$ORA_CRS_HOME/bin:/bin:/usr/bin:/usr/sbin:/usr/local/bin:/usr/X11R6/bin
umask 022[/code]

Now switch to oracle user with “su – oracle” command. Make sure all environment variables are set (echo $ORACLE_HOME). After that, create the following directories:
[code]su – oracle
mkdir -p $ORACLE_BASE/admin
mkdir -p $ORACLE_HOME
mkdir -p $ORA_CRS_HOME
mkdir -p /u01/oradata/devdb[/code]
Note that if environment variables are not set correctly, then the above mentioned directories will not be created.

Change /etc/security/limits.conf file with a root user and add following lines:
[code]oracle soft nproc 2047
oracle hard nproc 16384
oracle soft nofile 1024
oracle hard nofile 65536[/code]

Change /etc/pam.d/login file and add the following line:
[code]session required /lib/security/pam_limits.so[/code]

Now mount the third installation cd of the OEL4, connect it and open new terminal. Switch to the RPMS folder inside the cd and install “libaio-0.3.105-2.i386.rpm” and “openmotif21-2.1.30-11.RHEL4.6.i386.rpm” packages
[code]rpm –Uvh libaio-0.3.105-2.i386.rpm
rpm –Uvh openmotif21-2.1.30-11.RHEL4.6.i386.rpm[/code]

Change /etc/sysctl.conf file and add the following lines:
[code]kernel.shmall = 2097152
kernel.shmmax = 2147483648
kernel.shmmni = 4096
kernel.sem = 250 32000 100 128
fs.file-max = 65536
net.ipv4.ip_local_port_range = 1024 65000
net.core.rmem_default = 1048576
net.core.rmem_max = 1048576
net.core.wmem_default = 262144
net.core.wmem_max = 262144[/code]
Then execute the following command for change to take effect:
/sbin/sysctl -p

Now let’s configure the network configuration files. For this we need to add IP addresses and hostnames to the /etc/hosts file in each node and test the connection by pinging the hostnames
[code]127.0.0.1 localhost
192.168.2.131 rac1.test.az rac1
192.168.2.31 rac1-vip.test.az rac1-vip
10.10.10.31 rac1-priv.test.az rac1-priv
192.168.2.132 rac2.test.az rac2
192.168.2.32 rac2-vip.test.az rac2-vip
10.10.10.32 rac2-priv.test.az rac2-priv[/code]
Try the connection by pinging all hostnames (don’t ping VIP addresses as they will be created during clusterware installation):
ping rac1.test.az
ping rac1-priv.test.az
and son on

Now start creating disk partitions for OCFS2 and ASM. /dev/sdb will be used for OCFS2 and rest devices will be used for ASM.
fdisk /dev/sdb
Type n (to create new partition)
Type p to create a primary partition
Type 1 to provide the partition number
Double click on Enter and type “w” to save the changes
Perform above steps for all hard disk:
fdisk /dev/sdc
fdisk /dev/sdd
fdisk /dev/sde

To map the raw devices to the shared partitions, change /etc/sysconfig/rawdevices file:
[code]/dev/raw/raw1 /dev/sdc1
/dev/raw/raw2 /dev/sdd1
/dev/raw/raw3 /dev/sde1[/code]
And run the following command to make it effective
/sbin/service rawdevices restart
Then change the permission for all newly created raw devices:
[code]chown oracle:dba /dev/raw/raw[1-3]
chmod 660 /dev/raw/raw[1-3]
ls -lat /dev/raw/raw*[/code]
Next, switch to the oracle user and create links for raw devices
[code]su – oracle
ln -sf /dev/raw/raw1 /u01/oradata/devdb/asmdisk1
ln -sf /dev/raw/raw2 /u01/oradata/devdb/asmdisk2
ln -sf /dev/raw/raw3 /u01/oradata/devdb/asmdisk3[/code]

As the raw devices are remapped on boot, change /etc/udev/permissions.d/50-udev.permissions with the root user and add the following lines:
[code]# raw devices
ram*:root:disk:0660
#raw/*:root:disk:0660
raw/*:oracle:dba:0660[/code]
After performing all above steps, shutdown the virtual machine. Then copy all its files to another directory (c:\vmware\rac2)

Open it, switch to the Options tab, change its name to “rac2” and start it

Open Network Configuration and change addresses of each Ethernet device.
eth0 – 192.168.2.132
eth1 – 10.10.10.32
Then from Hardware Device type click on “Probe” button to get new MAC address, enable both network devices, change hostname to rac2.test.az and click Ctrl+S to save the changes. Then add the following line to the /etc/hosts file
127.0.0.1 localhost

Now it’s time to establish user equivalence with SSH. Oracle Universal Installer installs the binaries in one node and then propagates the files to the other nodes. For this, it uses ssh and scp command in the background during installation to run remote commands and copy files to the other cluster nodes. So SSH must be configured so that these commands not prompt for a password. For this power on the first machine, login with root user, switch to the oracle user and generate RSA and DSA key pairs
su – oracle
ssh-keygen –t rsa (click Enter twice)
ssh-keygen –t dsa (click Enter twice)
Perform above steps in the second node (rac2)

Now (from rac1) add the generated keys to the ~/.ssh/authorized_keys file
[code]cat ~/.ssh/id_rsa.pub >> ~/.ssh/authorized_keys
cat ~/.ssh/id_dsa.pub >> ~/.ssh/authorized_keys[/code]
Then from rac1 SSH to rac2 twice and add the .rsa and .dsa keys to the “authorized_keys” file that locates in the first node:
[code]ssh rac2 cat ~/.ssh/id_rsa.pub >> ~/.ssh/authorized_keys
ssh rac2 cat ~/.ssh/id_dsa.pub >> ~/.ssh/authorized_keys[/code]
Now copy the “authorized_keys” file from rac1 to rac2:
[code]scp ~/.ssh/authorized_keys rac2:~/.ssh/authorized_keys[/code]
After performing all above steps, you should successfully open SSH connection from rac1 to rac2 and vice verse. So run the following commands in both nodes and ensure that you’re not prompted for the password for the second time:
[code]ssh rac1 date
ssh rac2 date
ssh rac1-priv date
ssh rac2-priv date
ssh rac1.test.az date
ssh rac2.test.az date
ssh rac1-priv.test.az date
ssh rac2-priv.test.az date[/code]
I want to note again “Please make sure that after running above commands on each node, you’re not prompted for the password for the second time”

Now let’s configure Oracle ASM (Automatic Storage Management). So run the following commands from both nodes with root user:
/etc/init.d/oracleasm configure
Pass “oracle” as a parameter for “default user”
Pass “dba” as a parameter for “default group”
Pass “y” for the third and fourth parameters
Then create ASM disks on any node (try on the first node – rac1) with a root user:
/etc/init.d/oracleasm createdisk VOL1 /dev/sdc1
Marking disk “/dev/sdc1” as an ASM disk: [ OK ]
/etc/init.d/oracleasm createdisk VOL2 /dev/sdd1
Marking disk “/dev/sdd1” as an ASM disk: [ OK ]
/etc/init.d/oracleasm createdisk VOL3 /dev/sde1
Marking disk “/dev/sde1” as an ASM disk: [ OK ]
Verify that the ASM disks are visible from every node.
/etc/init.d/oracleasm scandisks
Scanning system for ASM disks: [ OK ]
/etc/init.d/oracleasm listdisks
VOL1
VOL2
VOL3

Now let’s configure Oracle Cluster File System (OCFS2). For this, run “ocfs2console” with a root user from the first node. Then from the Cluster menu select Configure Nodes, click Add button and apply both nodes:
rac1
192.168.2.131
7777
rac2
192.168.2.132
7777

Then propagate the configuration to the second node. For this select “Propagate Configuration” from the Cluster menu.

To configure O2CB to start at the boot unload and configure it on both nodes as a root user:
/etc/init.d/o2cb unload
/etc/init.d/o2cb configure
and pass the following parameters
“y”
ocfs2
61

Now format the file system on the first node (rac1). For this run ocfs2console program, select Format from the Tasks menu and click OK to format the drive. Press Ctrl+Q to quit

Now execute the following command on both nodes to mount the files system
mount -t ocfs2 -o datavolume,nointr /dev/sdb1 /ocfs
and add the following line to the /etc/fstab to mount the files system on boot
/dev/sdb1 /ocfs ocfs2 _netdev,datavolume,nointr 0 0

Create a “clusterware” directory under /ocfs folder and change the owner:
[code]mkdir /ocfs/clusterware
chown -R oracle:dba /ocfs[/code]
Now to test the shared device, create a file in the /ocfs directory from the first node (rac1) and check the same folder in the second node.
cd /ocfs
touch test_file
ls
Now download the clusterware installation, copy it under /tmp directory, unzip it and start the installation
./runInstaller
Provide the folder for the Inventory and click Next
Create a “clusterware” directory under /ocfs folder and change the owner:
<p class="MsoNormal" style="margin: 0 0 10pt;"><span style="font-family: Calibri; font-size: small;">chown -R oracle:dba /ocfs[/code]
Now to test the shared device, create a file in the /ocfs directory from the first node (rac1) and check the same folder in the second node.
cd /ocfs
touch test_file
ls

Now download the clusterware installation, copy it under /tmp directory, unzip it and start the installation
./runInstaller

Provide the folder for the Inventory and click Next

Change the CRS folder to /u01/app/oracle/product/10.2.0/crs_1 and click Next

After checking all prerequisites it should not give any warning, so click Next

Click on Add button and provide the information on the second node:
Public Node Name: rac2.test.az
Private Node Name: rac2-priv.test.az
Virtual Host Name : rac2-vip.test.az

Click on Edit button, change the Interface type of the first Ethernet device (eth0) to “Public” and the second to “Private”

Select External Redundancy and provide the location for OCR :
/ocfs/clusterware/ocr

Select External Redundancy and provide the location for Voting Disk
/ocfs/clusterware/votingdisk

Now click Install button to start the clusterware installation


After installation completes, run both scripts on both nodes
Run /u01/app/oracle/oraInventory/orainstRoot.sh on rac1 and rac2 (wait each script to complete before running it on the second node)
Run /u01/app/oracle/product/10.2.0/crs_1/root.sh on rac1 and rac2 (wait each script to complete before running it on the second node)

After running the second script on the second node (rac2) you’ll get an error (on running VIPCA), so you need to run it manually. Switch to the following directory
cd /u01/app/oracle/product/10.2.0/crs_1/bin
and run the ./vipca to create and configure VIP
Select the first Ethernet device and Click Next
After running the second script on the second node (rac2) you’ll get an error (on running VIPCA), so you need to run it manually. Switch to the following directory
cd /u01/app/oracle/product/10.2.0/crs_1/bin
and run the ./vipca to create and configure VIP

Select the first Ethernet device and Click Next

Type “rac1-vip” on the IP Alias Name for the first node (rac1). The rest boxes will be filled automatically. Click Next

Click Finish to start the installation


After vipca finished successfully, switch to the first node and click OK button on the “script running” window.

Click Exit button to exit the installation of an Oracle Clusterware

Now copy the installation of the database (Oracle 10gR2) to the /tmp directory, unzip and start the installation. You need to start the installation with an oracle user, so run “xhost +” from the root user to allow the connection to the X server and switch to the oracle user
xhost +
su – oracle
./runInstaller

Select “Enterprise Edition” and click Next

Provide the installation directory (/u01/app/oracle/product/10.2.0/db_1)

Select both nodes and click Next

The prerequisite check should be successful, so click Next

Let’s install just a software, so check “Install database Software only” and click Next

Click Install to start the installation


Execute the mentioned script on both nodes (wait for the script to finish before running it on the second node)

After installation finishes, run “dbca” (Database Configuration Assistant), select “Oracle Real Application Clusters database” and click Next

Select “Configure Automatic Storage Management” and click Next

Select both nodes and click Next

Provide the password for an ASM instance, select “Create initialization parameter file (IFILE)” and click Next

Click OK to create and ASM instance on both nodes

Click YES to create listener on both nodes

Now let’s create an ASM disks. For this, click “Create New” button

Provide the name of the diskgroup “dg1”, select the “External” redundancy, select two disks “raw1,raw2” and click OK

The disk group will not be mounted in the second node, so omit this warning. The second node should be restarted (but not now)

Create the second disk group for flash recovery area (fg), select an “External” redundancy, select the last device (raw3) and click Ok

As you see, the state of disk group shows that it’s not mounted on the second node. For this, we need to restart the second node. Click on Finish and restart the second node. After it starts, login with root user and call dbca from the first node again.

Move to the above window again and you’ll see that the disk group is mounted on both nodes. Click on Finish button

Run dbca again and select “Create a Database”

Select both nodes and click Next

Select “General Purpose” and click Next

Provide the database name “devdb” and click Next

Uncheck “Configure the Database with Enterprise Manager” as it’s taking too much (some hours) to finish (however, if you have enough RAM, you can check it) and click Next

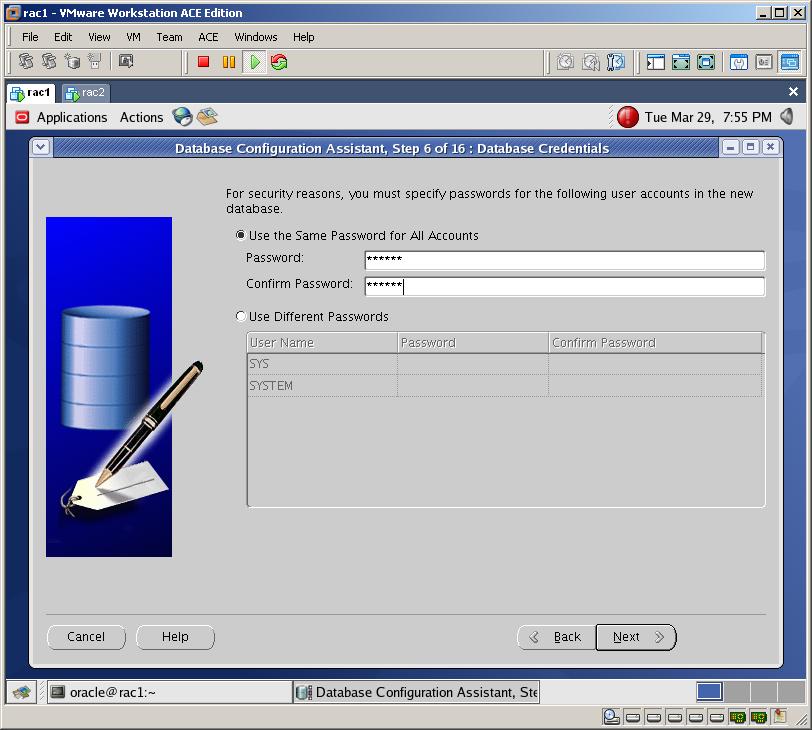
Provide the password for the SYS user and click Next

Select “Automatic Storage Management” and click Next

Provide the password for ASM and click OK

Select the first disk group and click Next

Select “Use Oracle-Managed Files” and click Next

Check “Specify Flash Recovery Area” and chose “FG” disk group and click Next

Click Next

Click Next (We’ll create TAF afterwards)

Click Next

Click Next

Click Finish to start the installation


After some hours (as I was running each virtual machine with 1GB RAM) this screen appears. Click Exit

Now both instances will be started.

After all, check the status of the Clusterware. As you see, some applications are with “OFFLINE” state. To make them online, stop and start them with SRVCTL utility as it’s shown above

After all, check the CRS status again. As you see, the State column of all applications are ONLINE

Now connect to the database from the first node (rac1) and run the following query
SQL>col host_name format a20
SQL>SELECT instance_name, host_name, thread#, status from gv$instance;
Try the conection to both instances:
[code]
[oracle@rac1 ~]$ sqlplus system@devdb1
SQL*Plus: Release 10.2.0.1.0 – Production on Wed Mar 30 10:38:40 2011
Copyright (c) 1982, 2005, Oracle. All rights reserved.
Enter password:
Connected to:
Oracle Database 10g Enterprise Edition Release 10.2.0.1.0 – Production
With the Partitioning, Real Application Clusters, OLAP and Data Mining options
SQL>exit
[oracle@rac1 ~]$ sqlplus system@devdb2
SQL*Plus: Release 10.2.0.1.0 – Production on Wed Mar 30 10:39:04 2011
Copyright (c) 1982, 2005, Oracle. All rights reserved.
Enter password:
Connected to:
Oracle Database 10g Enterprise Edition Release 10.2.0.1.0 – Production
With the Partitioning, Real Application Clusters, OLAP and Data Mining options
SQL>
[/code]
Let’s query datafiles and logfiles:
[code]
[oracle@rac1 ~]$ sqlplus system@devdb1
SQL> col file_name format a45
SQL> select file_name, bytes/1024/1024 size from dba_data_files;
SQL> select file_name, bytes/1024/1024 "size" from dba_data_files;
FILE_NAME size
——————————————— ———-
+DG1/devdb/datafile/users.259.747087235 5
+DG1/devdb/datafile/sysaux.257.747087221 240
+DG1/devdb/datafile/undotbs1.258.747087233 25
+DG1/devdb/datafile/system.256.747087209 480
+DG1/devdb/datafile/undotbs2.264.747088231 25
SQL>
SQL> col member format a45
SQL> select group#, type, member from v$logfile;
GROUP# TYPE MEMBER
———- ——- ———————————————
2 ONLINE +DG1/devdb/onlinelog/group_2.262.747087539
2 ONLINE +FG/devdb/onlinelog/group_2.258.747087547
1 ONLINE +DG1/devdb/onlinelog/group_1.261.747087519
1 ONLINE +FG/devdb/onlinelog/group_1.257.747087533
3 ONLINE +DG1/devdb/onlinelog/group_3.265.747132209
3 ONLINE +FG/devdb/onlinelog/group_3.259.747132221
4 ONLINE +DG1/devdb/onlinelog/group_4.266.747132235
4 ONLINE +FG/devdb/onlinelog/group_4.260.747132249
8 rows selected.
SQL>[/code]
Now connect to an ASM instance and query the diskgroups:
[code]
export ORACLE_SID=+ASM1
sqlplus / as sysdba
SQL> col name format a20
SQL> select group_number, name, state, type, total_mb, usable_file_mb from v$asm_diskgroup;
GROUP_NUMBER NAME STATE TYPE TOTAL_MB USABLE_FILE_MB
———— ——————– ———– —— ———- ————–
1 DG1 MOUNTED EXTERN 8188 7048
2 FG MOUNTED EXTERN 4094 3760
SQL>
[/code]
Now let’s create a Service. Services are used to manage the workload in an RAC environment and provide high availability. To create the service run “dbca”

Select the first option and click Next

Select “Service Management” and click Next

Select the first database and click Next

Provide the name of the Service and click Next

When you specify PREFERRED instances, you are specifying the number of instances on which a service will normally run. The Oracle Clusterware attempts to ensure that the service always runs on the number of nodes for which you have configured the service. Afterwards, due to either instance failure or planned service relocations, a service may be running on an AVAILABLE instance
Select Preferred for the first instance, and Available for the second instance, change the TAF policy to Basic and click Finish
After the Service created automatically, check tnsnames.ora file and you’ll see that the new entry is added
When you specify PREFERRED instances, you are specifying the number of instances on which a service will normally run. The Oracle Clusterware attempts to ensure that the service always runs on the number of nodes for which you have configured the service. Afterwards, due to either instance failure or planned service relocations, a service may be running on an AVAILABLE instance
Select Preferred for the first instance, and Available for the second instance, change the TAF policy to Basic and click Finish


After the Service created automatically, check tnsnames.ora file and you’ll see that the new entry is added

Try to connect to the database using this service. As you see, we’ll automatically connect to the first instance. Now let’s check the RAC high availability

For this, while connecting to the first instance (devdb1) using a “service”, open new terminal, connect to the first instance and shut it down

Now go back to the first session and query the v$instance view again. As you see, you’ll be automatically forwarded to the second instance
In this step by step tutorial I’ve shown you the deep step by step guide using 150 screenshots to make the RAC installation easier for you. I hope you’ll successfully install RAC and make your own tests. Good Luck!
Posted in Administration, RAC issues | 176 Comments »